How To Put Dimensions In A Floor Plan
Adding dimensions to a floor plan is crucial for clear communication of spatial relationships and accurate construction. Dimensions provide the necessary information for builders, contractors, and homeowners to understand the size and layout of a space. Properly placed dimensions ensure that the final construction matches the intended design.
Key Measurement Considerations
Before placing dimensions, it's essential to understand what needs to be measured. Here are key aspects to consider:
- Wall Lengths: Measure the length of each wall, both interior and exterior.
- Room Dimensions: Indicate the overall length and width of each room.
- Window and Door Openings: Include the width of windows and doors.
- Wall Thicknesses: Specify the thickness of interior and exterior walls.
- Locations of Fixtures: Measure the distance of plumbing fixtures and appliances from walls.
Methods for Adding Dimensions
Several methods can be employed to add dimensions to floor plans, each with its own advantages:
- Manual Drafting: Traditional hand-drafting involves using architectural scales, rulers, and pencils to meticulously draw and dimension the floor plan.
- CAD Software: Computer-Aided Design (CAD) software offers advanced tools for precise dimensioning and automated calculations. Popular CAD software includes AutoCAD, Revit, and SketchUp.
- Online Floor Plan Tools: Numerous online tools and apps simplify the process of creating and dimensioning floor plans. Many offer user-friendly interfaces and pre-built templates.
Dimensioning Standards and Best Practices
Adhering to standard conventions ensures clarity and consistency in floor plan dimensions. Consider these essential practices:
- Units of Measurement: Clearly indicate the units used (e.g., feet, inches, meters, centimeters). Maintain consistency throughout the plan.
- Dimension Lines: Use thin, solid lines to indicate the boundaries of a dimension. Place dimension lines parallel to the element being measured.
- Extension Lines: Use thin, solid lines perpendicular to the dimension lines, extending slightly beyond them. These lines visually connect the dimension line to the measured element.
- Dimension Values: Place the numerical dimension value above the dimension line, centered and readable.
- Arrowheads: Use closed, filled arrowheads at the ends of dimension lines to clearly mark the boundaries of the measurement.
Dimensioning Walls
Accurate wall dimensions are fundamental to a floor plan. Follow these guidelines for dimensioning walls:
- Exterior Walls: Dimension the exterior walls of the building, indicating the overall length of each wall segment.
- Interior Walls: Dimension interior walls to define room sizes and locations of partitions.
- Chain Dimensioning: For a series of aligned wall segments, use chain dimensioning to indicate the individual lengths and the overall length.
- Wall Thicknesses: Indicate wall thicknesses using a separate dimension style, clearly labeling them as such.
Dimensioning Doors and Windows
Properly dimensioning doors and windows ensures their correct placement and size within the floor plan:
- Width: Dimension the width of each door and window opening.
- Location: Measure the distance of doors and windows from nearby walls or other fixed elements.
- Swing Direction: Indicate the swing direction of doors using an arc or a designated symbol.
Dimensioning Interior Elements
Include dimensions for key interior features to complete the floor plan:
- Fixtures: Dimension the location of plumbing fixtures (sinks, toilets, showers) from walls and other fixtures.
- Appliances: Indicate the size and location of kitchen appliances (refrigerator, stove, dishwasher).
- Built-in Features: Dimension built-in elements such as cabinets, countertops, and fireplaces.
- Stairways: Include dimensions for stair width, riser height, and tread depth.
Dimensioning for Clarity and Readability
The effectiveness of a floor plan relies on clear and readable dimensions. Implement these techniques for optimal presentation:
- Avoid Overcrowding: Place dimensions strategically to avoid cluttering the drawing. Use separate dimension layers or groups if necessary.
- Consistent Spacing: Maintain consistent spacing between dimension lines, extension lines, and the elements being measured.
- Clear Text: Use a legible font size and style for dimension values. Ensure that the text is not obscured by other elements.
- Logical Organization: Group related dimensions together to facilitate understanding. For example, dimension all the elements within a specific room before moving on to the next.
Using Layers and Organization
Utilizing layers in CAD software or online tools greatly enhances the management and clarity of dimensions:
- Separate Dimension Layer: Create a dedicated layer for dimensions to control their visibility and appearance independently of other elements.
- Grouping by Category: Use layers or groups to organize dimensions by category, such as walls, doors/windows, or fixtures.
- Layer Control: Utilize layer controls to selectively show or hide specific dimension categories for improved clarity.

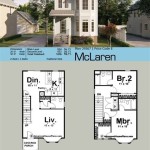
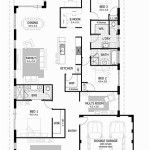
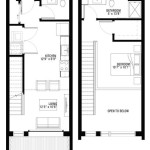
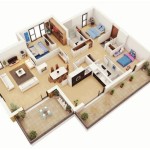
12 Examples Of Floor Plans With Dimensions

Adding Dimensions To Your Floor Plan

Floor Plans With Dimensions Including Examples Cedreo

How To Read A Floor Plan With Dimensions Houseplans Blog Com

How To Properly Read Floor Plans And What Details Look For

How To Read A Floor Plan With Dimensions Houseplans Blog Com

Dimensioning Rules For Architectural Floor Plans By Joe Caruso On Prezi Next

Add Measurements

How To Read Floor Plans

Help Part 11 Add Dimensions Autodesk
Related Posts