Toilet and Bath Floor Plan with Dimensions in Meters
Designing a functional and comfortable bathroom requires careful consideration of the layout and dimensions. A well-planned space maximizes usability while adhering to building codes and accessibility guidelines. This article explores the essential aspects of creating a toilet and bath floor plan with dimensions expressed in meters, providing a framework for homeowners and designers.
Standard Dimensions and Minimum Requirements
Understanding standard dimensions and minimum requirements is crucial for initial planning. Regulations regarding bathroom sizes vary by region, but certain principles remain consistent. The minimum width for a bathroom containing a toilet and a sink is typically 1.5 meters. If a shower or bathtub is included, the minimum width increases to 2.0 meters. These dimensions ensure adequate space for movement and fixture usage.
Toilet compartments require a minimum width of 0.8 meters and a depth of 1.2 meters. This allows for comfortable usage and facilitates accessibility for individuals with mobility challenges. Shower enclosures typically require a minimum area of 0.9 meters by 0.9 meters. Bathtubs vary in size, but a standard dimension is 1.7 meters in length and 0.7 meters in width.
These minimum dimensions provide a starting point. Larger dimensions offer increased comfort and flexibility in design, allowing for the incorporation of additional features such as double vanities, bidets, or larger showers.
Optimizing Space and Layout
Effective space utilization is paramount in bathroom design, particularly in smaller spaces. Careful placement of fixtures can significantly enhance both functionality and aesthetic appeal. The door swing is a crucial consideration, ensuring it does not obstruct access to any fixtures. Positioning the toilet away from the direct line of sight from the door is often preferred for privacy.
In rectangular bathrooms, aligning fixtures along one wall can optimize space efficiency. In larger bathrooms, creating zones for different functions, such as a wet zone for the shower and bathtub and a dry zone for the vanity and toilet, can improve organization and flow.
Consider the placement of windows and natural light sources. Positioning the vanity near a window provides natural light for grooming tasks. Incorporating mirrors strategically can enhance the perception of space and reflect light throughout the room.
Accessibility and Universal Design
Designing for accessibility ensures the bathroom is usable for individuals of all ages and abilities. Incorporating universal design principles creates a space that is both functional and aesthetically pleasing for everyone. A clear turning radius of 1.5 meters is essential for wheelchair users to maneuver comfortably within the bathroom.
Grab bars should be installed near the toilet and in the shower or bathtub area to provide support and stability. The toilet should be positioned at a height that allows for easy transfer from a wheelchair. Lever-style handles for faucets and doors are easier to operate for individuals with limited hand strength or dexterity.
A curbless shower entry eliminates the need to step over a threshold, making it easier for individuals with mobility challenges to access the shower. Proper lighting is also crucial for accessibility, providing adequate illumination for safe navigation and use of the bathroom facilities.
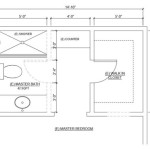
Detailed Floor Plan Example
A practical example illustrates the application of these principles. Consider a rectangular bathroom with dimensions of 2.5 meters by 1.8 meters. A possible layout could include a 1.7-meter by 0.7-meter bathtub positioned along the 2.5-meter wall. Adjacent to the bathtub, a 0.9-meter by 0.9-meter shower stall with a curbless entry allows for convenient access.
Opposite the bathtub and shower, a 1.2-meter long vanity with a sink can be installed. The toilet can be positioned in the remaining corner, ensuring a minimum clearance of 0.8 meters from the center of the toilet to any adjacent wall or fixture. This layout provides a comfortable and functional space while adhering to accessibility guidelines.
Careful consideration of dimensions and layout optimization can result in a well-designed bathroom that meets the needs of all users. Utilizing a scaled drawing and incorporating specific measurements ensures accurate representation and facilitates effective communication during the design and construction process.
Material Selection and Finishes
Selecting appropriate materials and finishes is essential for creating a bathroom that is both aesthetically pleasing and durable. Flooring materials should be water-resistant and slip-resistant to ensure safety. Popular choices include ceramic tiles, porcelain tiles, and vinyl flooring.
Wall finishes should be moisture-resistant and easy to clean. Ceramic tiles, paint specifically designed for bathrooms, and wall panels are suitable options. Countertop materials should be durable and resistant to stains and scratches. Common choices include granite, quartz, and solid surface materials.
Consider the overall style and aesthetic of the bathroom when selecting materials and finishes. Choose materials that complement each other and create a cohesive look. Proper ventilation is crucial to prevent moisture buildup and potential mold growth, preserving the integrity of the chosen materials and finishes.

Bathroom Restroom And Toilet Layout In Small Spaces

Standard Toilet Dimensions

Bathroom Restroom And Toilet Layout In Small Spaces

Bathroom Dimensions Useful Wc

Bathroom Layout 101 A Guide To Planning Your Dream

Split Bathrooms

Standard Bathroom Dimensions Engineering Discoveries

Clever Layouts For 5x7 Bathroom To Make The Most Of Every Inch Hydrangea Treehouse

Minimum Dimensions And Typical Layouts For Small Bathrooms Archdaily

Designing Showers For Small Bathrooms Fine Homebuilding
Related Posts