Simple Kitchen Floor Plan With Dimensions: A Comprehensive Guide
Designing or remodeling a kitchen requires careful planning, and a well-defined floor plan is the cornerstone of a successful project. A kitchen floor plan, complete with dimensions, provides a visual representation of the layout, including the placement of appliances, cabinets, countertops, and other essential elements. This article will delve into the process of creating a simple kitchen floor plan with dimensions, emphasizing the importance of accurate measurements and thoughtful design considerations.
A kitchen floor plan with dimensions serves as a blueprint for contractors, designers, and homeowners. It ensures that all parties involved have a clear understanding of the spatial relationships within the kitchen. Without precise dimensions, mistakes can be made during construction or installation, leading to costly delays and potentially impacting the overall functionality and aesthetics of the space. Furthermore, a detailed floor plan can be used to effectively plan the budget, as it facilitates accurate material estimations.
Phase 1: Measuring the Existing Kitchen Space
The initial step in creating a kitchen floor plan is to accurately measure the existing space. This requires a reliable measuring tape, a pencil, and graph paper or a digital drawing tool. It is crucial to record all measurements in feet and inches (or meters and centimeters, depending on the preferred units). Start by measuring the length and width of the entire kitchen area. These are the foundation of the floor plan and should be verified multiple times to minimize errors.
Next, meticulously measure the length and width of each wall. Note the location of any architectural features, such as windows, doors, bulkheads, and soffits. The height of windowsills and the top of window frames should also be recorded, as this impacts cabinet placement and backsplash design. Doorways should be measured, including the width of the door opening and the direction the door swings. Any obstacles, such as plumbing pipes, electrical outlets, or heating vents, should be noted and their precise location documented.
Consider also the ceiling height, and any variations in height within the kitchen space. If the ceiling is not uniform, take several measurements at different points to accurately represent the space. This is particularly important where upper cabinets are to be installed. For accurate measurements, use a laser distance measurer to obtain precise dimensions, minimizing the risk of human error associated with manual measurements. Carefully document all measurements on the graph paper or within the digital drawing software.
Creating a rough sketch of the kitchen layout before taking measurements can be helpful. This sketch will serve as a visual aid during the measurement process, helping to identify all necessary dimensions and ensuring that no critical details are overlooked. It is advantageous to photograph the existing kitchen space from various angles. These photographs will provide a visual reference throughout the design process, and they can be particularly useful when visualizing different design options or discussing specific features with contractors or designers.
Phase 2: Defining the Work Triangle and Appliance Placement
Once the existing kitchen space has been accurately measured, the next step involves defining the work triangle and planning the placement of major appliances. The work triangle is a concept that connects the three primary work areas: the sink, the refrigerator, and the cooktop. The distance between these three points should ideally be within a specified range to ensure efficient workflow and minimize unnecessary steps. The total length of the work triangle's legs should be between 13 and 26 feet, and no single leg should be shorter than 4 feet or longer than 9 feet.
The placement of the refrigerator is often dictated by the existing plumbing and electrical connections. However, the refrigerator should be easily accessible from the main entrance to the kitchen and should not obstruct the flow of traffic. The cooktop or range should be located near a vent hood to ensure adequate ventilation and removal of cooking fumes. Consider the proximity of the cooktop to the sink for easy access to water when cooking.
The sink should be located near a window, if possible, to provide natural light and a pleasant view while washing dishes. Consider the size and configuration of the sink based on individual needs and preferences. A double-bowl sink is useful for separating clean and dirty dishes, while a single-bowl sink provides more space for washing large pots and pans.
The dishwasher should be placed adjacent to the sink for easy loading and unloading. Ensure that there is adequate space for the dishwasher door to open fully without obstructing traffic flow. Consider the location of electrical outlets when planning appliance placement. Each major appliance will require its own dedicated outlet to prevent overloading the circuit. Consult with a qualified electrician to ensure that the electrical wiring is adequate for the intended appliances.
Remember to plan for adequate countertop space around each appliance. Countertop space is essential for food preparation, staging ingredients, and placing finished dishes. Consider incorporating islands or peninsulas to increase countertop space and create additional work areas. Islands can also provide seating and storage, making them a versatile addition to the kitchen.
Phase 3: Cabinet and Countertop Design
After determining the placement of appliances, the next step is to design the cabinet and countertop layout. Start by selecting the type of cabinets that best suit the style and budget. Stock cabinets are readily available in standard sizes and are typically the most affordable option. Semi-custom cabinets offer a wider range of sizes and finishes, while fully custom cabinets are designed and built to meet specific requirements.
Base cabinets provide storage below the countertop and are typically 36 inches tall. The depth of base cabinets is usually 24 inches, but deeper cabinets may be used to maximize storage space. Plan for adequate drawer space in base cabinets to store utensils, cookware, and other kitchen essentials. Upper cabinets are mounted on the wall above the countertop and are typically 12 inches deep. The height of upper cabinets can vary depending on the ceiling height and the desired aesthetic.
Consider incorporating specialized cabinets, such as pantry cabinets, spice racks, and pull-out shelves, to maximize storage and organization. Pantry cabinets provide ample space for storing food items, while spice racks keep spices organized and easily accessible. Pull-out shelves make it easier to access items stored in the back of base cabinets. When planning the cabinet layout, consider the location of plumbing and electrical connections. Cabinets may need to be modified to accommodate these connections.
Countertops are an essential element of the kitchen design and should be selected based on durability, aesthetics, and budget. Common countertop materials include granite, quartz, marble, and laminate. Granite is a natural stone that offers a unique and durable surface. Quartz is a manufactured stone that is resistant to stains and scratches. Marble is a luxurious natural stone that requires regular sealing to prevent staining. Laminate is an affordable option that comes in a wide variety of colors and patterns.
The countertop overhang should be considered when planning the cabinet and countertop layout. A standard countertop overhang is 1 to 1.5 inches beyond the face of the base cabinets. This overhang provides a comfortable lip for sitting at the countertop and prevents spills from running down the front of the cabinets. Consider incorporating a backsplash to protect the walls from splashes and spills. Backsplashes can be made from a variety of materials, including tile, glass, and stainless steel.
Phase 4: Incorporating Dimensions and Creating a Detailed Floor Plan
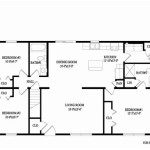
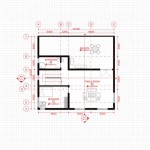
Once the appliance placement, cabinet layout, and countertop design have been finalized, it is time to incorporate dimensions into the floor plan. Using the initial measurements of the kitchen space, accurately draw the walls, windows, and doors on the floor plan. Indicate the location of all appliances, cabinets, and countertops, and label each element clearly. Add dimensions to each wall, appliance, cabinet, and countertop. Indicate the overall dimensions of the kitchen space, as well as the dimensions of individual elements, such as the length and width of countertops and the height of cabinets.
Pay close attention to the spacing between elements. For example, the space between the island and the surrounding cabinets should be at least 36 inches to allow for comfortable movement. The space in front of appliances, such as the refrigerator and dishwasher, should be at least 42 inches to allow for easy access and operation. The dimensions should be clear and easy to read, using a consistent scale. The scale of the floor plan should be indicated on the drawing, such as 1/4 inch = 1 foot. This allows anyone viewing the plan to accurately interpret the measurements.
Utilize digital drawing software to create a professional-looking floor plan. There are several user-friendly software options available, both free and paid. These software programs allow users to easily draw walls, insert appliances and cabinets, and add dimensions. Some software programs also offer 3D rendering capabilities, which can help visualize the finished kitchen. Once the floor plan is complete, save the file in a common format, such as PDF, so that it can be easily shared with contractors, designers, and other parties involved in the project. Regularly review and update the floor plan as the design evolves. Minor adjustments may be necessary as the project progresses.
Accurate dimensions are paramount for avoiding costly mistakes and ensuring that the final kitchen design meets expectations. By following these steps, homeowners can create a simple yet comprehensive kitchen floor plan with legible dimensions, serving as a valuable tool for a successful kitchen renovation or building project.

7 Types Of Kitchen Floor Plans With Dimensions Foyr Neo

Henry Kitchen Floor Plans Html

7 Types Of Kitchen Floor Plans With Dimensions Foyr Neo

Kitchen Floor Plans Types Examples Considerations Cedreo

Useful Kitchen Dimensions And Layout Engineering Discoveries Cabinet Best Plans
:strip_icc()/RENOVCH7J-fb3cabc5a78647389a3de4eac2825432.jpg?strip=all "5 Kitchen Floor Plans To Help You Take On A Remodel With Confidence")
5 Kitchen Floor Plans To Help You Take On A Remodel With Confidence

Free Editable Kitchen Layouts Edrawmax

Kitchen Design Tips Roomsketcher 2d 3d Floor Plan Of Layout Plans

7 Types Of Kitchen Floor Plans With Dimensions Foyr Neo

Henry Kitchen Floor Plans Html
Related Posts