Simple House Floor Plan AutoCAD with Dimensions: A Comprehensive Guide
Creating a simple house floor plan in AutoCAD, complete with accurate dimensions in both meters and inches, is a crucial first step in any construction or renovation project. A well-defined floor plan provides a clear visual representation of the space, allowing architects, builders, and homeowners to understand the layout, size, and relationship between different rooms. This article will delve into the essential aspects of designing a simple house floor plan using AutoCAD, emphasizing accurate dimensioning in both metric and imperial units. The focus will be on practical steps and considerations, enabling users to create functional and precise plans.
AutoCAD is a powerful computer-aided design (CAD) software widely used in architecture, engineering, and construction. Its precision and versatility make it an ideal tool for creating detailed floor plans. When starting any floor plan, it is important to consider the scale, unit of measurement, and layering system to ensure accuracy and clarity throughout the design process. This article will guide you through the process of creating a simple house floor plan, from setting up the AutoCAD environment to adding dimensions.
Setting Up the AutoCAD Environment for a Floor Plan
Before embarking on the design process, configuring the AutoCAD environment is paramount. This initial setup affects the accuracy and efficiency of the entire project. The key considerations during setup include units, limits, and layers.
First, establish the units of measurement. AutoCAD allows users to work with various units, including millimeters, centimeters, meters, inches, and feet. For a floor plan requiring dimensions in both meters and inches, setting up two drawing environments, or using dynamic blocks, is often the preferred approach. Initially, the drawing can be completed using meters as the base unit, and then scaled or converted to inches as needed, or displayed simultaneously using dynamic blocks.
To set the units in AutoCAD, type "UNITS" in the command line and press Enter. This will open the Drawing Units dialog box. Here, specify the "Insertion scale" to meters. The length type should typically be set to "Decimal" for meters. For dimensions, AutoCAD's dimension styles can be configured to display values in various formats, including decimal meters and fractional inches.
Next, define the drawing limits. Limits determine the area within which you will be drawing. Type "LIMITS" in the command line and press Enter. AutoCAD will prompt you to specify the lower-left corner and upper-right corner of the drawing area. For a small house plan, setting the limits to accommodate a reasonable area, such as 20 meters by 20 meters, is a good starting point. These limits can be adjusted later as needed.
Creating layers is an essential practice for organizing the drawing. Layers allow you to group different elements of the floor plan, such as walls, doors, windows, and furniture, into separate, manageable categories. To create layers, type "LAYER" in the command line and press Enter. This will open the Layer Properties Manager. Create layers for each element of the floor plan and assign them appropriate colors and line types. For example, a layer for walls might be assigned a thick line weight and a dark color, while a layer for furniture might be assigned a lighter line weight and a lighter color. Using layers makes it easier to edit and manage the drawing as well as control the visibility of different elements.
Finally, establish a grid and snap settings. The grid provides a visual reference for drawing, while the snap setting allows you to accurately place objects on the grid. To set the grid and snap settings, type "DSETTINGS" in the command line and press Enter. This will open the Drafting Settings dialog box. On the "Snap and Grid" tab, enable both "Snap On (F9)" and "Grid On (F7)". Set the snap spacing and grid spacing to a suitable value, such as 0.1 meters. Adjusting the grid and snap settings ensures precision when drawing the floor plan.
Drawing the Basic Floor Plan Elements
With the AutoCAD environment properly configured, the next step is to start drawing the basic elements of the floor plan. This includes walls, doors, windows, and structural components.
Begin by drawing the exterior walls of the house. Use the "LINE" command to create straight lines representing the walls. Ensure the walls are drawn to scale and accurately represent the intended dimensions of the house. A typical wall thickness might be 0.2 meters. Use the "OFFSET" command to create parallel lines representing the inner and outer surfaces of the walls. The distance between the lines should be equal to the wall thickness. Connect the lines to create closed polygons representing the walls.
Next, add interior walls to define the different rooms of the house. Again, use the "LINE" and "OFFSET" commands to create these walls. Consider the function and size of each room when determining the placement of the interior walls. Ensure sufficient space for furniture and circulation.
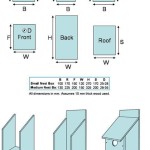
Insert doors and windows into the walls. AutoCAD provides libraries of pre-drawn doors and windows that can be inserted into the drawing. To insert a door or window, use the "INSERT" command. Select the desired door or window from the library and specify its insertion point and orientation. Ensure the doors and windows are placed accurately within the walls. Indicate the swing direction of the doors with an arc.
Add structural components, such as columns and beams, to provide support for the house. Use the appropriate AutoCAD commands to draw these elements. Ensure they are accurately positioned and sized to provide adequate support.
When drawing floor plans, the use of polylines significantly simplifies editing. Polylines allow multiple connected lines to be treated as a single object, making modifications to wall lengths or angles easier. The "FILLET" command can be used to create rounded corners if desired.
Remember to continuously save the drawing as you progress to prevent data loss in case of a system failure.
Dimensioning the Floor Plan in Meters and Inches
Dimensioning is a crucial step in creating a useful floor plan. Accurate dimensions allow builders and contractors to construct the house according to the design. AutoCAD provides various dimensioning tools to add dimensions to the floor plan in both metric and imperial units.
Before dimensioning, configure the dimension styles. Type "DIMSTYLE" in the command line and press Enter. This will open the Dimension Style Manager. Create two dimension styles: one for meters and one for inches. For the meter dimension style, set the units to "Decimal" and the precision to two decimal places. For the inch dimension style, set the units to "Architectural" and the precision to 1/16 inch.
Use the "LINEAR" dimension command to add linear dimensions to the floor plan. This command allows you to dimension straight lines, such as the lengths of walls and the widths of doors and windows. Select the endpoints of the line you want to dimension and specify the dimension line location. AutoCAD will automatically calculate the distance between the endpoints and display it on the dimension line. Use the appropriate dimension style for each dimension.
Use the "ALIGNED" dimension command to add dimensions to angled lines. This command allows you to dimension lines that are not parallel to the X or Y axis. Select the endpoints of the line you want to dimension and specify the dimension line location. AutoCAD will automatically calculate the distance between the endpoints and display it aligned with the line.
Use the "RADIUS" and "DIAMETER" dimension commands to add dimensions to arcs and circles. These commands allow you to dimension the radius or diameter of arcs and circles, such as the swing of doors or the size of circular windows. Select the arc or circle you want to dimension and specify the dimension line location. AutoCAD will automatically calculate the radius or diameter and display it on the dimension line.
Use the "CONTINUE" dimension command to add a series of dimensions in a chain. This command allows you to quickly add dimensions to multiple lines in a row. Start by adding a linear or aligned dimension to the first line. Then, use the "CONTINUE" command to add dimensions to the subsequent lines. AutoCAD will automatically align the dimension lines and space them evenly.
To simultaneously display dimensions in both meters and inches, consider using Dynamic Blocks. A dynamic block can contain multiple attributes, including dimension values, that can be toggled between metric and imperial units. This offers a convenient way to show both measurements without creating separate drawings.
When adding dimensions, ensure they are clear, concise, and accurate. Avoid overlapping dimension lines or placing dimensions too close to the objects being dimensioned. Use appropriate dimension prefixes and suffixes to indicate the units of measurement. Regularly check the dimensions to ensure they are correct and consistent throughout the drawing.
In addition to linear dimensions, include overall dimensions to indicate the total size of the house and the dimensions of each room. This provides a complete overview of the house's dimensions.
By following these guidelines, you can create a simple house floor plan in AutoCAD with accurate dimensions in both meters and inches, providing a valuable resource for construction and renovation projects.

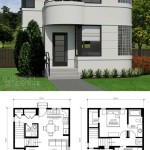
Autocad House Plans With Dimensions

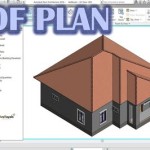
Making A Simple Floor Plan In Autocad Part 1 Of 3

2d Floor Plan In Autocad With Dimensions 38 X 48 Dwg And File Free

Complete House Plan In Autocad 3bhk Floor 40 X 46

Basic Floor Plan Drafting In Autocad 7 Steps Instructables

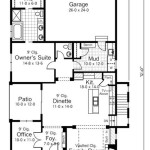
Ground First Floor Architecture Plan 2 6 Inchx47ft

How To Draw A Floor Plan Of 3 Bedroom House In Autocad Beginner Tutorial Step By Guide

Autocad 2d Floor Plan Elevation And Furniture Upwork

Free Floor Plan Cad Drawings Dwg Dxf Format Cads

Ground And First Floor Plan Details Of Four Bedroom House Dwg File 06
Related Posts