Make Simple Floor Plans: A Comprehensive Guide
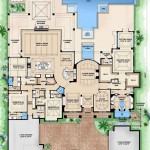
Creating floor plans, even simple ones, is a crucial step in various endeavors, from home renovations and interior design projects to real estate listings and architectural planning. A floor plan visually represents the arrangement of rooms, walls, doors, windows, and other structural elements within a building, providing a clear and concise overview of the space. This article will explore the process of making simple floor plans, focusing on practical methods and essential considerations.
The ability to accurately represent a space through a floor plan allows for informed decision-making throughout the design or renovation process. It enables the visualization of furniture placement, traffic flow, and overall spatial relationships. Furthermore, a well-crafted floor plan serves as a valuable communication tool between architects, contractors, homeowners, and other stakeholders involved in a project.
There are several methods for creating floor plans, ranging from traditional hand-drawing techniques to utilizing sophisticated computer-aided design (CAD) software. The choice of method largely depends on the level of detail required, the resources available, and the user's technical proficiency. This guide will primarily focus on accessible methods suitable for creating simple and effective floor plans without the need for specialized software or advanced drafting skills.
Before embarking on the floor plan creation process, it is essential to gather the necessary tools and materials. These typically include a measuring tape (preferably a long one for larger spaces), a pencil, an eraser, graph paper or plain paper (depending on preference), a straightedge or ruler, and a notebook for recording measurements. Optional but helpful tools include a laser distance measurer for increased accuracy and speed, and a protractor for measuring angles. A digital camera or smartphone can be used to capture reference photos of the space, which can be particularly useful when noting details such as window and door placement.
Key Point 1: Accurate Measurement and Documentation
The foundation of any successful floor plan is accurate measurement. Inaccurate measurements will inevitably lead to discrepancies and errors in the final plan, potentially causing problems during the construction or renovation phase. Therefore, meticulous attention to detail is paramount when measuring the space.
Begin by measuring the overall dimensions of the room or space. Measure the length and width of each room, ensuring that you measure from wall to wall, excluding any moldings or baseboards. Record these measurements in your notebook, clearly labeling each measurement with its corresponding room or wall. It is beneficial to measure each wall multiple times to ensure accuracy and to identify any inconsistencies.
Next, measure the placement and dimensions of all fixed features, such as doors, windows, fireplaces, and built-in cabinets. For doors, measure the width of the door opening, the distance from the door opening to the adjacent walls, and the direction in which the door swings. For windows, measure the width and height of the window opening, the distance from the window to the floor, and the distance from the window to the adjacent walls. For fireplaces and built-in cabinets, measure the overall dimensions and their location relative to the walls.
Pay close attention to any irregularities in the walls, such as alcoves, niches, or angled walls. Measure these features carefully and note their dimensions and angles accurately. If the walls are not perfectly straight, take multiple measurements along the wall to capture the variations in length. Consider using a laser distance measurer for greater accuracy and efficiency, especially when dealing with large or complex spaces. A laser measurer can quickly and accurately measure distances, angles, and areas, significantly reducing the time and effort required for measurement.
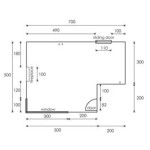
As you measure, sketch a rough outline of the space on your paper. This outline does not need to be to scale, but it should accurately represent the shape and proportions of the room. As you take each measurement, immediately record it on the sketch, labeling each dimension clearly. This will help you keep track of the measurements and avoid confusion later on. The initial sketch serves as a visual guide and helps ensure that all necessary measurements are taken. Regularly review the sketch to check for any missing or inconsistent measurements.
Key Point 2: Choosing a Suitable Scale and Drawing Method
Once you have gathered all the necessary measurements, the next step is to choose a suitable scale for your floor plan. A scale is the ratio between the dimensions of the drawing and the actual dimensions of the space. Selecting an appropriate scale is crucial for ensuring that the floor plan is both accurate and easy to read.
A common scale for residential floor plans is 1/4 inch = 1 foot (or 1:48). This means that every 1/4 inch on the drawing represents 1 foot in reality. This scale is large enough to show sufficient detail while still allowing the entire floor plan to fit on a standard-sized sheet of paper. Other common scales include 1/8 inch = 1 foot (1:96) for larger spaces, and 1/2 inch = 1 foot (1:24) for smaller spaces or when greater detail is required.
Once you have selected a scale, it is time to transfer your measurements to the graph paper or plain paper. Using your straightedge or ruler, carefully draw the outline of the room to scale, based on the measurements you recorded. Ensure that you maintain the correct proportions and angles, using a protractor if necessary. Pay close attention to the accuracy of your lines and curves, as even small errors can accumulate and distort the overall plan.
There are several drawing methods you can employ, depending on your preference and skill level. One common method is to start by drawing the exterior walls of the room, then add the interior walls, doors, and windows. Another method is to start by drawing the major structural elements, such as walls and columns, then add the smaller details later. Whichever method you choose, it is important to work systematically and methodically, checking your measurements and proportions as you go.
When drawing doors and windows, use standard symbols to represent them. A door is typically represented by an arc showing the direction of the swing, while a window is represented by two or three parallel lines. These symbols are universally recognized and help to make the floor plan easier to understand. Be sure to label all rooms and features clearly, using a consistent font and size. This will make the floor plan more professional and easier to read.
Key Point 3: Utilizing Digital Tools for Enhanced Efficiency
While hand-drawing floor plans is a valuable skill and can be suitable for simple projects, utilizing digital tools can significantly enhance efficiency and accuracy, particularly for more complex or detailed plans. There are numerous user-friendly software applications and online platforms available that allow users to create floor plans with ease and precision.
Many free or low-cost online floor plan creators offer intuitive interfaces and libraries of pre-designed symbols and elements, such as walls, doors, windows, furniture, and appliances. These tools often provide drag-and-drop functionality, making it easy to assemble a floor plan by selecting and positioning these elements within the virtual space. Some platforms even allow users to upload images of their existing floor plan (if available) as a template to trace over, further simplifying the process.
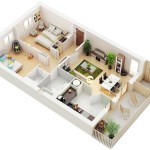
These digital tools often provide features such as automatic measurement scaling, allowing users to input real-world dimensions and automatically generate the floor plan to the selected scale. This eliminates the need for manual calculations and reduces the risk of errors. Some programs also offer the ability to create 3D models of the floor plan, providing a more realistic and immersive visual representation of the space.
One key advantage of using digital tools is the ability to easily edit and revise the floor plan. Unlike hand-drawn plans, which may require starting from scratch if significant changes are needed, digital floor plans can be quickly modified and updated with minimal effort. This flexibility is particularly valuable during the design or renovation process, where changes and adjustments are often necessary.
Furthermore, digital floor plans can be easily shared and collaborated on with other stakeholders, such as architects, contractors, and family members. Most platforms allow users to export the floor plan in various formats, such as PDF, JPG, or DWG, making it easy to distribute and view on different devices. Some platforms even offer collaborative features, allowing multiple users to work on the same floor plan simultaneously, facilitating seamless communication and coordination.
While professional CAD software offers advanced features and capabilities, they often come with a steep learning curve and significant cost. For creating simple floor plans, user-friendly online platforms and apps provide a cost-effective and accessible alternative, empowering users to create accurate and visually appealing plans without the need for specialized skills or equipment.
In summary, creating simple floor plans involves a combination of accurate measurement, careful planning, and the appropriate choice of tools. Whether you opt for hand-drawing techniques or utilize digital software, the key is to prioritize accuracy and clarity in order to effectively communicate the layout and dimensions of the space. By following the guidelines outlined in this article, anyone can create functional and informative floor plans for a variety of purposes.

Graphic Create A Floor Plan Design

Free Floor Plan Creator Edrawmax

Floor Plan Creator Planner 5d

How To Draw A Floor Plan Top Mistakes Avoid Foyr

Free Floor Plan Creator

Floor Plan Design Tutorial

How To Draw A Floor Plan The Simple 7 Step Guide For 2024

Create 2d 3d Floor Plans For Free With Floorplanner

Design Your Own House Floor Plans Roomsketcher

Free Floor Plan Creator
Related Posts