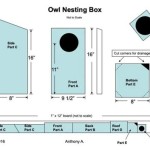
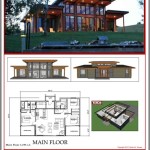
How To Put Measurements In A Floor Plan
Accurate measurements are crucial for any floor plan. They provide the foundation for construction, renovation, interior design, and furniture placement. A well-dimensioned floor plan prevents costly mistakes and ensures the final product aligns with the design vision. This article will guide you through the process of correctly incorporating measurements into your floor plans.
Essential Tools for Measuring
Before beginning, gather the necessary tools. A laser measure offers speed and precision, especially for larger spaces. Alternatively, a standard tape measure is sufficient for smaller areas. A pencil, eraser, and a straight edge (ruler or architect's scale) are essential for transferring measurements onto the floor plan.
Measuring the Space
Start by measuring the exterior walls of the space. Measure the length of each wall, noting any recesses or protrusions. For complex shapes, break down the area into smaller, manageable rectangles or squares. Accuracy is paramount; double-check all measurements to minimize errors. Record the measurements neatly on a sketch or directly into a digital floor plan software if one is being used.
Interior Walls and Features
After measuring the exterior walls, move inwards. Measure the location and dimensions of interior walls, doorways, windows, and built-in features like fireplaces or cabinets. For doors and windows, measure the width and height of the openings. The distance from the edge of the wall to the edge of the opening should also be documented. For fireplaces and cabinets, record the length, width, and depth.
Choosing a Scale
When transferring measurements to a floor plan, selecting an appropriate scale is essential. Common scales include 1/4 inch = 1 foot or 1/8 inch = 1 foot. The chosen scale should allow the entire floor plan to fit comfortably on the drawing surface while still providing sufficient detail. For larger spaces, a smaller scale may be necessary.
Drawing the Floor Plan
Begin by sketching the outer perimeter of the space based on the chosen scale and the recorded measurements. Utilize the straight edge to ensure clean, straight lines. Then, draw the interior walls and features, again using the corresponding measurements and the chosen scale. Maintain consistency throughout the drawing, double-checking the scaled dimensions against the actual measurements.
Adding Dimensions to the Floor Plan
Clearly marked dimensions are crucial for a usable floor plan. Dimensions should be placed outside the floor plan lines for clarity. Use dimension lines with arrows at each end to indicate the extent of the measurement. The numerical value of the measurement is placed in the center of the dimension line. Ensure all units are consistent (e.g., feet and inches or meters and centimeters).
Dimensioning Walls
For walls, place dimension lines showing the overall length of each wall. Additionally, include dimensions showing the distances between windows, doors, and other features along the wall. This provides a comprehensive understanding of the wall layout.
Dimensioning Windows and Doors
For windows and doors, indicate the width of the opening. The dimension line should be placed across the opening itself. It's also helpful to include a separate dimension showing the distance from the edge of the wall to the center of the opening.
Dimensioning Other Features
For features like fireplaces and cabinets, include dimensions showing the length and width. For complex shapes, break them down into smaller rectangles and dimension each segment. For built-in elements, indicating depth is also essential.
Using Software for Floor Plans
Several software programs are available for creating accurate and professional floor plans. These programs often automate the scaling and dimensioning process, simplifying the task considerably. Many programs allow direct import of measurements from digital measuring tools, further enhancing accuracy and efficiency.
Maintaining Consistency
Consistency is crucial throughout the floor plan. Use the same units of measurement and the same scale for all elements. Maintain a consistent style for dimension lines, arrows, and text. This clarity ensures the floor plan is easy to understand and use.
Checking and Verification
Before finalizing the floor plan, thoroughly check all measurements and dimensions. Compare the floor plan dimensions against the original measurements taken in the space. Any discrepancies should be investigated and corrected. This final check helps prevent errors and ensures the accuracy of the floor plan.
Legibility and Clarity
A floor plan's effectiveness depends on its legibility. Use clear, concise notation, and ensure all elements are easily distinguishable. Keep the drawing uncluttered, avoiding unnecessary details that might obscure essential information. A well-organized and legible floor plan is more readily understood and utilized.

12 Examples Of Floor Plans With Dimensions

Add Measurements

How To Read A Floor Plan With Dimensions Houseplans Blog Com

Floor Plans With Dimensions Including Examples Cedreo

Adding Dimensions To Your Floor Plan

How To Properly Read Floor Plans And What Details Look For

How To Read A Floor Plan With Dimensions Houseplans Blog Com

Overview Measurements On Floor Plans Roomsketcher Help Center

Display Outside Wall Measurements On 2d Floor Plans Roomsketcher Help Center

How To Read Floor Plans
Related Posts