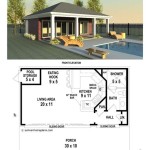
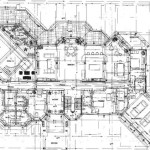
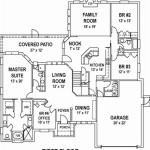
How to Put Dimensions on a Floor Plan in Revit Family
Revit Family is a powerful software tool that allows you to create parametric families of building components. These families can then be used to quickly and easily generate construction documents, such as floor plans. When creating a floor plan, it is important to include dimensions to accurately convey the size and layout of the space.
There are two main types of dimensions that can be added to a floor plan in Revit Family: linear dimensions and radial dimensions. Linear dimensions measure the distance between two points, while radial dimensions measure the distance from a point to a circle or arc.
To add a linear dimension, select the "Dimension" tool from the "Annotate" tab. Then, click on the two points that you want to measure. The dimension will be automatically generated and displayed on the floor plan.
To add a radial dimension, select the "Dimension" tool from the "Annotate" tab. Then, click on the point that you want to measure from. Next, click on the circle or arc that you want to measure to. The dimension will be automatically generated and displayed on the floor plan.
In addition to linear and radial dimensions, you can also add other types of dimensions to a floor plan in Revit Family, such as angular dimensions and baseline dimensions. Angular dimensions measure the angle between two lines, while baseline dimensions measure the distance between a point and a baseline.
To add an angular dimension, select the "Dimension" tool from the "Annotate" tab. Then, click on the two lines that you want to measure. The dimension will be automatically generated and displayed on the floor plan.
To add a baseline dimension, select the "Dimension" tool from the "Annotate" tab. Then, click on the point that you want to measure from. Next, click on the baseline that you want to measure to. The dimension will be automatically generated and displayed on the floor plan.
Once you have added all of the necessary dimensions to your floor plan, you can save the file and export it to a variety of formats, such as DWG, DXF, or PDF.

Dimensions In Revit Beginner To Pro Tutorial

Beginner Tips To Create Floor Plan In Revit Bim Pure Blog

14 Beginner Tips To Create A Floor Plan In Revit Design Ideas For The Built World

Beginner Tips To Create Floor Plan In Revit Bim Pure Blog

Revit Dimensions A How To Guide

Beginner Tips To Create Floor Plan In Revit Bim Pure Blog

Revit Guide Grids Paul F Aubin

Dimensions In Revit Beginner To Pro Tutorial

Solved Casework Sections The Most Efficient Way In Revit Autodesk Community S

Revit Tutorial Two Car Garage Mr Wellwood S Of Horrors
Related Posts