How To Put Dimensions On A Floor Plan
When creating a floor plan, adding dimensions is essential for accurate representation and communication. Dimensions provide precise measurements of the spaces within a floor plan, allowing architects, builders, and other stakeholders to understand the layout and dimensions of a structure. Here's a comprehensive guide on how to put dimensions on a floor plan:
1. Choose Appropriate Units
The first step is to select the appropriate units of measurement. Commonly used units include inches, feet, and meters. Choose units that are standard in your region or industry.
2. Identify Dimensions to Include
Determine which dimensions are necessary to convey the plan's information effectively. Typically, dimensions include:
- Overall length and width of the building
- Lengths and widths of individual rooms, hallways, and spaces
- Door and window openings li>Locations of walls, columns, and other structural elements
3. Use a Drawing Tool
Use a CAD (Computer-Aided Design) program or other drawing tools that allow precise dimensioning. Ensure the drawing is scaled accurately.
4. Place Dimension Lines
Dimension lines are lines that connect two points on a drawing and display the distance between them. Place dimension lines perpendicular to the element being measured, with arrowheads or marks at the endpoints.
5. Add Dimension Text
Position dimension text along or near the dimension line. The text should include the numerical value of the dimension, along with the appropriate unit of measurement.
6. Choose Font and Style
Use a clear and legible font for dimension text. Consider using a consistent font and size throughout the drawing for clarity.
7. Dimension Conventions
Follow industry-standard dimensioning conventions to ensure consistency and readability. These conventions may vary depending on the purpose and usage of the floor plan.
8. Check Accuracy
Thoroughly check the accuracy of all dimensions before finalizing the floor plan. Use a measuring tape or other measuring devices to verify key dimensions if possible.
9. Consider Additional Information
In addition to dimensions, consider including other relevant information on the floor plan, such as room labels, furniture placement, and notes. This information can enhance the plan's usability and provide a more comprehensive understanding of the space.
Conclusion
Adding dimensions to a floor plan is a crucial step for effective communication and accurate representation. By following these steps, you can create dimensioned floor plans that convey clear and precise information about the layout and dimensions of a structure.

Add Measurements

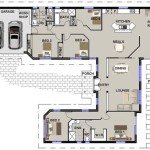
12 Examples Of Floor Plans With Dimensions

Floor Plans With Dimensions Including Examples Cedreo

Add Measurements

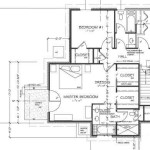
How To Read A Floor Plan With Dimensions Houseplans Blog Com

How To Read A Floor Plan With Dimensions Houseplans Blog Com

Display Outside Wall Measurements On 2d Floor Plans Roomsketcher Help Center

Floor Plans With Dimensions Including Examples Cedreo

12 Examples Of Floor Plans With Dimensions

How To Read A Floor Plan With Dimensions Houseplans Blog Com
Related Posts