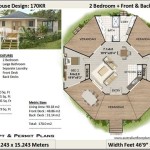
How to Put Dimensions in a Floor Plan
Creating a floor plan with accurate dimensions is crucial for various reasons, whether for construction, interior design, or real estate purposes. Properly dimensioned floor plans provide a clear understanding of a space's size and layout, allowing for precise planning and accurate measurements. Here's a step-by-step guide on how to put dimensions in a floor plan:
Measure the Space Accurately
Before adding dimensions to the floor plan, ensure that the measurements are accurate. Use a measuring tape or laser level to measure the length and width of each room, as well as any doors, windows, or other openings.
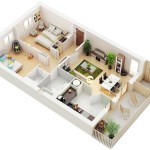
Create a Floor Plan
Start by sketching a rough outline of the floor plan, including all the walls, doors, and windows. Then, use a CAD software or a floor plan creator to create a digital version of your plan.
Add Dimensions
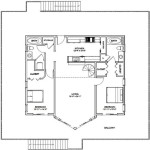
Use the dimensioning tool in your CAD software or floor plan creator to add dimensions to the plan. Start by marking the exterior walls and room dividers, then proceed to add measurements for doors, windows, and other important features.
Types of Dimensions
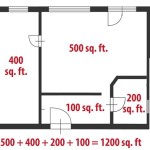
There are two main types of dimensions: linear dimensions and radial dimensions. Linear dimensions indicate the length or width of a line, while radial dimensions show the distance from a fixed point. Choose the appropriate dimension type based on the element you are measuring.
Dimensioning Lines and Arrows
Dimension lines are used to indicate the direction of the measurement. Draw them perpendicular to the line being measured, with arrowheads at both ends pointing towards the dimension text. Always keep the dimension lines parallel or perpendicular to the walls or edges of the plan.
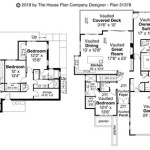
Dimension Text
Dimension text should be placed close to the dimension line, clearly indicating the measurement. Use a consistent font and text size throughout the plan. If there are multiple dimensions, stagger them to avoid clutter.
Dimensioning Standards
Follow the industry-standard dimensioning practices to ensure clarity and consistency. Maintain a consistent distance between dimension lines and the object being measured. Keep dimension lines outside the drawing, and do not allow them to intersect with each other.
Software Tools for Dimensioning
Many CAD software and online floor plan creators provide tools specifically designed for dimensioning. These tools allow you to easily add and adjust dimensions, ensuring accuracy and consistency throughout the plan.
Additional Tips
Use prefixes and suffixes to indicate the unit of measurement, such as "ft" for feet or "m" for meters. Add notes or labels to clarify any complex dimensions or features. Consider using different line styles or colors to distinguish between different types of dimensions.
By following these steps and adhering to industry standards, you can create clear and accurate floor plans with properly dimensioned elements. This will provide a valuable reference for construction, interior design, and real estate professionals.

Add Measurements

Floor Plans With Dimensions Including Examples Cedreo

How To Properly Read Floor Plans And What Details Look For

Adding Dimensions To Your Floor Plan

Floor Plans

Overview Measurements On Floor Plans Roomsketcher Help Center

How To Read A Floor Plan With Dimensions Houseplans Blog Com

How To Read Floor Plans

Floor Plan Designing Buildings

How To Read A Floor Plan With Dimensions Houseplans Blog Com
Related Posts