How to Make a Framing Plan in Revit 2024
Revit 2024, with its enhanced capabilities for structural modeling, offers a streamlined process for creating framing plans. These plans are essential for visualizing and detailing the structural framework of a building, providing valuable information for construction and analysis. This article will guide you through the steps involved in creating a framing plan in Revit 2024, focusing on clarity, accuracy, and efficiency.
1. Setting Up the Project
Before embarking on the framing plan creation, it's crucial to have a well-defined project setup. This involves establishing the following:
- Project Units: Ensure your project uses consistent units for length, area, and volume. Select the appropriate units for your region and project requirements.
- Level and Grid System: Define the levels and grid lines for your project. This will provide a clear framework for aligning and organizing framing elements.
- Structural Materials: Define the materials used for framing, including wood, steel, or concrete. This will allow Revit to automatically assign material properties and calculate relevant data.
- Architectural Model: Ensure the architectural model is complete and accurate. The framing plan will be based on the existing building geometry, so any errors in the architectural model will propagate to the framing plan.
2. Creating Framing Elements
Once the project is set up, you can start creating the framing elements using Revit's tools. Here are the main steps involved:
- Create Walls: Use the "Wall" tool to create the exterior and interior walls of the building. Ensure the wall types match the desired framing materials and thicknesses.
- Create Beams and Columns: Employ the "Beam" and "Column" tools to define horizontal and vertical structural elements, respectively. Select the appropriate profiles and materials based on design specifications.
- Create Floors and Roofs: Generate floor and roof elements using the corresponding tools. Specify the framing materials and thicknesses for these structural components.
- Add Framing Details: Utilize tools such as "Structural Framing" and "Detail Components" to add specific framing details, including joists, girders, and headers, for various structural configurations.
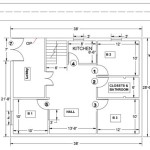
3. Generating the Framing Plan
After creating framing elements, you can generate the framing plan using Revit's powerful visualization tools. This involves the following steps:
- Create a View: From the "View" tab, select "Plan View" and create a new plan view for the desired floor level. Adjust the view range to encompass the relevant framing area.
- Set View Properties: Customize the plan view properties to enhance clarity and readability. This may include adjusting the line weights, visibility of annotations, and shading.
- Create a Layout View: If needed, create a layout view to organize and present the framing plan. Use the "Sheet" tool to create a new sheet and add the plan view as a viewport.
- Add Annotations: Utilize the "Annotate" tab to add dimensions, labels, and other annotations to the framing plan. This will provide essential information for construction and analysis.
By meticulously following these steps, you can create comprehensive framing plans in Revit 2024. These plans will serve as invaluable tools for communication, coordination, and analysis throughout the construction process, ensuring a smooth and efficient project execution.

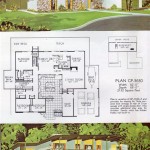
Autodesk Revit Student Built House Framing Plan

Revit The Ultimate Framing Plan Cadclips

Autodesk Revit Student Built House Framing Plan

Roof Plans In Revit Episode 7

Framing Plan Walls Above Cut Plane Autodesk Community

Help Create A Framing Elevation View Autodesk

Solved Questions About The Revit 2024 Default Multidiscipline Template Autodesk Community

Getting Started With Post Beam Framing Extension For Revit Arkance Lithuania

Can T Override Appearance Of Structural Framing What Am I Doing Wrong Autodesk Community

Revit Structural Framing Tutorial Roof With Beam Systems
Related Posts