How to Make a Floor Plan of Your House
A floor plan is a scaled drawing that represents the layout of a space, typically a house. It's a visual representation of rooms, walls, doors, windows, and other features. Floor plans offer a valuable tool for various purposes, including home renovation, furniture arrangement, and even estate planning. Fortunately, creating a floor plan is achievable for anyone, even without prior drafting experience. This article outlines the steps involved in making a floor plan of your house.
Step 1: Gather Necessary Tools and Materials
Before embarking on the floor plan creation process, assembling the essential tools and materials is crucial. These include:
- Measuring tape: A measuring tape is indispensable for accurately measuring the dimensions of your house.
- Paper or digital drawing software: You can choose to draw your floor plan on paper using a pencil, ruler, and eraser or opt for a digital approach using software like AutoCAD, SketchUp, or even free online tools.
- Notepad and pen: Keep a notepad and pen handy to record measurements and notes as you progress.
- Camera: Taking photographs of each room from different angles can be helpful for reference when drawing your floor plan.
Step 2: Measure the Dimensions of Your House
The accuracy of your floor plan hinges on precise measurements. Start by measuring the length and width of each room. Pay close attention to the following features:
- Walls: Measure the length of all walls, including any irregularities or angled sections.
- Doors and windows: Record the width and height of every door and window.
- Protrusions: Measure the dimensions of any protruding features, such as fireplaces, built-in shelves, or cabinets.
- Stairs: If your house has stairs, measure the width, length, and height of each step.
It's essential to note that if your house has uneven walls or rooms with unusual shapes, you'll need to break down the measurements into smaller sections to ensure accuracy.
Step 3: Choose a Scale for Your Floor Plan
Selecting an appropriate scale for your drawing is essential. The scale determines the ratio between the dimensions on your floor plan and the actual dimensions of your house. For example, a scale of 1:100 means that one centimeter on your floor plan represents 1 meter in reality. The scale you choose will influence the size of your drawing and the level of detail you can depict. Consider the size of your paper or digital canvas and the level of detail you want to show.
Step 4: Draw the Basic Layout of Your House
Once you have your measurements and have chosen a scale, you can start drawing the basic layout. Begin by sketching the outer walls of your house. Use a ruler or straight edge to ensure that the walls are straight and parallel. Then, draw in the interior walls to create the individual rooms. Remember to accurately represent the dimensions of each room according to the scale you have chosen.
It's important to have a plan of what you want to represent in your drawing. For example, some people will show furniture arrangements while others will use floor plans for renovations. Knowing this upfront will help with the drawing process.
Step 5: Add Doors, Windows, and Other Features
After drawing the basic layout, you can add doors, windows, and other features to your floor plan. Use symbols or icons to represent these elements. For example, a rectangle with a dashed line could represent a door, whereas a square with a small circle in the center could represent a window. Make sure to represent the dimensions of these features accurately according to your chosen scale. Always refer to your measurements and notes to ensure accuracy.
Step 6: Add Details and Labels
To enhance the clarity and usefulness of your floor plan, consider adding details and labels. You can include furniture placement, light fixtures, electrical outlets, or other relevant features. Clearly label each room, adding information about its purpose or function. Using a legend or key to explain the symbols and abbreviations used in your floor plan can further enhance its clarity.
Step 7: Review and Refine Your Floor Plan
Once you've completed your floor plan, take some time to review it carefully. Check for any inconsistencies or errors in measurements, scale, or representation. Make any necessary adjustments to ensure that your floor plan accurately reflects the layout of your house. Consider seeking feedback from others to gain an objective perspective on your drawing.
Making a floor plan of your house might seem daunting at first, but by following these steps, you can create a clear, accurate, and useful representation of your space. Whether you're planning a renovation, rearranging furniture, or simply wanting to have a better understanding of your home's layout, a floor plan is an invaluable tool.

Floor Plan Creator And Designer Free Easy App

How To Draw A Floor Plan The Simple 7 Step Guide For 2024

Draw Floor Plans With The Roomsketcher App

Floor Plan Creator And Designer Free Easy App

Draw Floor Plans With The Roomsketcher App

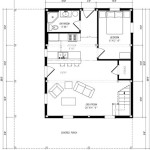
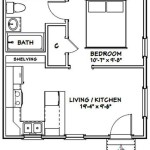
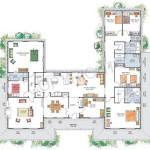
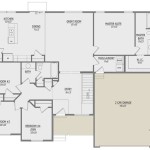
12 Examples Of Floor Plans With Dimensions

Floor Plan Design Tutorial

House Plans How To Design Your Home Plan

Floor Plan Design Tutorial

House Plans How To Design Your Home Plan
Related Posts