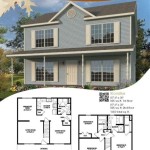
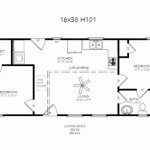
How To Make A Floor Plan of a House
A floor plan is a scaled diagram of a room or building viewed from above. It illustrates the arrangement of rooms, walls, doors, windows, and other structural features at a specific level of a building. Creating an accurate and detailed floor plan is crucial for various purposes, including interior design, renovation projects, real estate listings, and architectural planning. This article outlines a comprehensive guide to making a floor plan of a house, covering essential steps from initial measurements to digital rendering.
Key Point 1: Gathering Necessary Tools and Materials
The first step in creating a floor plan is assembling the necessary tools and materials. The choice of tools can depend on whether a manual or digital approach is preferred. However, certain fundamental tools are essential regardless of the method used.
A measuring tape is paramount. Selecting a long, flexible tape measure, preferably one at least 25 feet in length, is advisable to cover longer distances within the house. Laser distance measurers can also be used for greater accuracy and efficiency, particularly in larger spaces. These devices use a laser beam to determine the distance between two points, providing instant and accurate measurements.
Paper is needed for sketching an initial layout. Graph paper is particularly helpful because its gridlines make it easier to maintain proportions and draw straight lines. A clipboard provides a stable surface for drawing while moving around the house.
Pencils and erasers are basic tools for sketching the initial floor plan. A mechanical pencil with a fine lead can provide greater precision. A reliable eraser is crucial for correcting errors and refining the layout.
A spirit level or laser level ensures that lines are drawn horizontally. This is especially important when representing walls and architectural features.
A protractor or angle finder assists in measuring and drawing angles, particularly for rooms with irregular shapes or angled walls.
For digital floor plans, access to a computer or tablet with appropriate software is required. Various software options are available, ranging from free online tools to professional-grade architectural programs. A printer can be useful for printing out preliminary sketches and the final floor plan.
Careful preparation and gathering the right tools and materials can significantly streamline the process of creating an accurate and effective floor plan.
Key Point 2: Taking Accurate Measurements and Sketching the Initial Layout
The accuracy of a floor plan depends heavily on the precision of the measurements taken. This step involves meticulously measuring each room and architectural element within the house. Using a systematic approach is essential to avoid omissions and errors. Begin by sketching a rough outline of the house's perimeter, indicating the approximate shape and dimensions.
Start by measuring the length of each wall in every room. Ensure the tape measure is held straight and taut for accurate readings. Measure the walls at floor level, as this is the standard reference point. Record the measurements clearly on the sketch, labeling each wall to avoid confusion.
Next, measure the widths of all doors and windows. Note their positions relative to the corners of the room. This will be important when recreating the floor plan digitally. Measure the thickness of the walls, including interior and exterior walls. This helps accurately represent the building's structure.
Measure the height of the ceilings in each room. This information is not typically displayed on a standard floor plan but is useful for visualization and interior design purposes. Mark the locations of all fixtures and appliances, such as sinks, toilets, stoves, refrigerators, and water heaters. Record their dimensions and positions relative to the walls.
Indicate the positions of any built-in features, such as closets, fireplaces, staircases, and support columns. Measure their dimensions and distances from the walls. Take note of any architectural details or irregularities, such as arched doorways, bay windows, or changes in floor level. These features should be accurately represented on the floor plan.
Double-check all measurements to ensure accuracy. It is advisable to have a second person assist in verifying the measurements, particularly for larger rooms or complex layouts. Pay close attention to corners and angles. Irregular shapes can be challenging to measure accurately but are crucial for a precise floor plan.
The initial sketch should reflect the overall layout of the house, including the relationships between different rooms. Ensure that the proportions are reasonably accurate, but focus primarily on capturing the correct dimensions and positions of key elements.
Key Point 3: Creating a Digital Floor Plan
Once accurate measurements are obtained and an initial sketch is complete, the next step is to create a digital floor plan using computer-aided design (CAD) software or other floor planning applications. Numerous software options are available, each offering different features and levels of complexity.
First, select an appropriate software program. Simple online floor planning tools are suitable for basic layouts and require little to no prior experience. These tools often provide drag-and-drop interfaces and pre-designed elements, making it easy to create a basic floor plan. Examples include Floorplanner, RoomSketcher, and Planner 5D. For more complex and professional-grade floor plans, CAD software such as AutoCAD, Revit, or SketchUp is recommended. These programs offer advanced features for precise drafting and 3D modeling, but require more training and expertise.
Start by setting the scale of the floor plan. The scale determines the relationship between the dimensions in the drawing and the actual dimensions of the house. Common scales include 1/4 inch = 1 foot or 1/8 inch = 1 foot. Input the measurements from the initial sketch into the software. Begin by drawing the exterior walls, ensuring the dimensions match the recorded measurements.
Draw the interior walls, using the measured dimensions and positions relative to the exterior walls as a guide. Accurately represent the thickness of the walls. Insert doors and windows into the floor plan, specifying their widths and positions. Use the software's library of pre-designed elements or create custom elements as needed. Add fixtures and appliances to the floor plan, placing them in their measured positions. Represent built-in features and architectural details accurately. Add labels and annotations to the floor plan, indicating room names, dimensions, and other relevant information.
Utilize the software's features to create a visually appealing and informative floor plan. Customize the line weights and colors to differentiate between different elements. Add textures and patterns to represent flooring materials and wall finishes. Consider creating a 3D model of the house to visualize the layout in three dimensions. Most floor planning software allows for generating 3D views from the 2D floor plan, providing a more realistic representation of the space.
Review the digital floor plan for accuracy and completeness. Compare it to the initial sketch and the original measurements to ensure that all elements are correctly represented. Make any necessary corrections and refinements. Save the floor plan in a suitable file format, such as PDF, DWG, or JPG. This allows for easy sharing and printing.
By following these steps, a detailed and accurate digital floor plan can be created. This plan can then be used for various purposes, including interior design, renovation planning, real estate marketing, and architectural documentation.

Floor Plan Creator And Designer Free Easy App

House Plans How To Design Your Home Plan

House Plans How To Design Your Home Plan

Blender For Noobs 10 How To Create A Simple Floorplan In

Make Your Own Blueprint How To Draw Floor Plans

Floor Plans Learn How To Design And Plan

Floor Plans Types Symbols Examples

Creating The Perfect Floor Plan Quarry View Building Group

Floor Plans How To Design The Perfect Layout Cherished Bliss

Make Your Own Blueprint How To Draw Floor Plans Drawing House Sketch Plan
Related Posts