How To Make A Floor Plan In AutoCAD 2024
Creating a floor plan in AutoCAD 2024 involves a structured process, leveraging the software's precision drafting tools to represent a building's layout accurately. This article outlines the steps involved in generating a comprehensive floor plan, emphasizing best practices and common techniques.
Before beginning, ensure AutoCAD 2024 is properly installed and configured. Familiarity with the basic AutoCAD interface, including the command line, ribbon, and viewport navigation, is essential. A basic understanding of architectural drafting conventions is also beneficial. This includes knowledge of standard symbols for doors, windows, fixtures, and other architectural elements.
1. Setting Up the Drawing Environment
The initial step involves configuring the AutoCAD environment to suit the specific requirements of the floor plan. This encompasses setting up units, defining layers, and establishing drawing limits. Proper setup at this stage streamlines the subsequent drafting process and ensures consistency throughout the drawing.
Units: Begin by specifying the drawing units. Use the `UNITS` command by typing 'UN' in the command line and pressing Enter. The Drawing Units dialog box will appear. Select the appropriate units from the 'Units to scale inserted content' dropdown menu. For architectural plans, typically 'Architectural' (feet and inches) or 'Decimal' (meters or millimeters) are used. Set the precision based on the required accuracy of the floor plan.
Layers: Create distinct layers to organize different elements of the floor plan. Layers allow for isolating and manipulating specific components without affecting others. Use the `LAYER` command (type 'LA' and press Enter) to open the Layer Properties Manager. Create layers for walls, doors, windows, furniture, dimensions, text, and any other distinct elements. Assign colors and linetypes to each layer to visually differentiate them. For example, walls might be assigned a dark color and a continuous linetype, while furniture could be assigned a lighter color. It is crucial to set the current layer before drawing each element to maintain organization.
Limits: Define the drawing limits to specify the working area within the model space. While AutoCAD does not strictly enforce these limits, they provide a visual boundary and can be helpful for managing the drawing's extent. Use the `LIMITS` command (type 'LIMITS' and press Enter). Specify the lower-left corner, typically (0,0), and the upper-right corner, based on an estimated size of the building being represented. After setting the limits, use the `ZOOM` command (type 'Z' and press Enter), followed by 'A' (for All) to zoom to the drawing limits.
Grid and Snap: Configure the grid and snap settings to aid in precise drawing. The grid provides a visual reference, while the snap function forces the cursor to snap to specified intervals. Use the `GRID` command to set the grid spacing and the `SNAP` command to set the snap spacing. Adjust these settings based on the desired level of precision. The grid and snap modes can be toggled on and off using the F7 and F9 keys, respectively.
2. Drawing Walls and Architectural Elements
After setting up the drawing environment, the next stage involves drawing the walls, which form the core structure of the floor plan. Subsequently, architectural elements like doors, windows, stairs, and other fixed features are added.
Walls: Activate the wall layer. Use the `LINE` command (type 'L' and press Enter) to draw the external walls of the building. Specify the start and end points of each wall segment. Ensure the 'Ortho' mode (F8 key) is enabled to draw perfectly horizontal or vertical lines. Enter the dimensions directly at the command line or use the cursor to visually define the wall segments. After drawing the external walls, proceed to draw the internal walls, defining rooms and spaces within the building. The `OFFSET` command (type 'O' and press Enter) is invaluable for creating parallel lines representing wall thickness. Specify the offset distance (wall thickness) and select the existing wall line to create the parallel line. Use the `TRIM` command (type 'TR' and press Enter) to clean up wall intersections, removing overlapping lines and creating clean corners.
Doors and Windows: Create dedicated layers for doors and windows. Doors and windows are typically represented with specific symbols and dimensions. AutoCAD provides tools for creating these symbols or blocks can be used. A block is a collection of objects that are treated as a single entity. Pre-made door and window blocks can be found online or custom blocks can be created. Insert door and window blocks into the drawing using the `INSERT` command (type 'I' and press Enter). Specify the insertion point, scale, and rotation angle. Use the `TRIM` command to create openings in the walls where the doors and windows are placed. Ensure the swing direction of the doors is correctly represented in the floor plan. The correct representation of door swing direction is crucial to understanding spatial relationships within the building.
Stairs and Other Fixed Features: Represent stairs, elevators, fireplaces, and other fixed features using appropriate symbols and dimensions. Similar to doors and windows, consider using blocks for these elements. Use the `LINE`, `ARC`, and `POLYLINE` commands to draw the geometry of these features if blocks are not readily available. Ensure the placement of these features adheres to architectural standards and building codes.
Hatching: Use the `HATCH` command (type 'H' and press Enter) to add hatching patterns to designate walls or different floor materials. Select the desired hatch pattern, scale, and angle. Define the boundaries of the area to be hatched by selecting the wall lines or other closed polylines. Hatching can enhance the visual clarity of the floor plan and convey information about the building's construction.
3. Dimensioning and Annotation
Dimensioning and annotation are crucial for providing detailed information about the floor plan's dimensions and specifications. Accurate dimensions are essential for construction and ensure adherence to design requirements. Annotations provide textual information about rooms, materials, and other pertinent details.
Dimensioning: Create a dedicated layer for dimensions. Use the dimensioning tools in AutoCAD to add linear, aligned, angular, and radial dimensions. The `DIMLINEAR` command (type 'DLI' and press Enter) is used for creating linear dimensions. The `DIMALIGNED` command (type 'DAL' and press Enter) is used for creating dimensions aligned with angled lines. The `DIMANGULAR` command (type 'DAN' and press Enter) is used for measuring angles. Dimension the overall dimensions of the building, as well as the dimensions of individual rooms, walls, doors, and windows. Ensure the dimensions are clear, accurate, and conform to architectural drafting standards. Configure the dimension style using the `DIMSTYLE` command (type 'D' and press Enter) to customize the appearance of dimensions, including text size, arrow size, and extension line offset. Consistent dimension styling enhances the readability and professionalism of the floor plan.
Text and Annotation: Create a dedicated layer for text and annotations. Use the `TEXT` command (type 'TEXT' or 'MTXT' for multiline text and press Enter) to add room names, material specifications, and other relevant information to the floor plan. Use appropriate text styles and sizes to ensure readability. Use leaders to point to specific elements in the drawing and provide corresponding annotations. Employ standard abbreviations and symbols to convey information efficiently. Ensure the text is properly aligned and spaced to avoid cluttering the drawing. The `MLEADER` command (type 'MLEADER' and press Enter) is useful for creating leaders with associated text.
Title Block: Include a title block in the floor plan. The title block typically contains information such as the project name, drawing title, date, drafter's name, and scale. Create a title block as a separate block and insert it into the drawing. The title block provides essential context and identification for the floor plan.
Scaling and Plotting: Before plotting or printing the floor plan, ensure it is properly scaled. Determine the appropriate scale based on the size of the drawing and the paper size. Use the `SCALE` command (type 'SC' and press Enter) to scale the entire drawing if necessary. Use the layout tabs in AutoCAD to create a viewport and set the viewport scale. This allows you to control the printed output scale independently of the model space units. Verify that all elements in the floor plan are visible and legible at the chosen scale. When plotting, select the appropriate paper size, plot scale, and plot style table (CTB file). A plot style table defines how different colors in the drawing are plotted (e.g., line weight and color). Preview the plot before printing to ensure the output meets your expectations.
Saving and Backing Up: Save the floor plan as a DWG file. Regularly back up your work to prevent data loss. Consider using AutoCAD's autosave feature to automatically save the drawing at specified intervals. Use descriptive file names to easily identify the drawing. Implement a version control system to track changes and revisions to the floor plan.

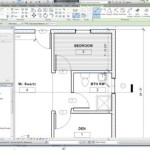
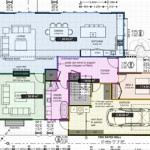
Autocad 2024 Basic 2d Floor Plan For Beginner Complete

Autocad 2024 Basic 2d Floor Plan For Beginner Complete

Making A Simple Floor Plan In Autocad Part 1 Of 3

Autocad 2024 Help Views With Names Autodesk

Autocad 2024 Help File Tab Menu Autodesk

Basic Floor Plan Drafting In Autocad 7 Steps Instructables

Autocad 2024 Basic 2d Floor Plan For Beginner Complete

How To Make House Floor Plan In Autocad Fantasticeng

Autocad Lt 2024 Help View Autodesk

Autocad 2024 Help What S New In Architecture Toolset Autodesk
Related Posts