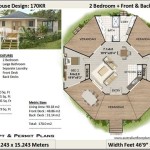
How to Make a Floor Plan in Unity: A Comprehensive Guide for Beginners
Creating a floor plan in Unity is an essential skill for any aspiring game developer. A well-crafted floor plan can help you visualize your game world, design levels, and optimize gameplay. In this beginner-friendly guide, we'll walk you through the steps involved in creating a floor plan in Unity, covering everything from importing assets to setting up your scene.
1. Import Assets
The first step is to import the floor plan assets into Unity. You can either create your own floor plan in a 2D design software or download one from online repositories. Once you have the floor plan, drag and drop it into the Unity editor.
2. Set Up the Scene
With the floor plan imported, it's time to set up the scene. Start by creating a new Scene and renaming it to your floor plan name. Next, create a Plane object and scale it to match the dimensions of your floor plan. This will serve as the base for your floor plan.
3. Create Walls and Doors
Now, it's time to build the walls and doors of your floor plan. Start by creating a Cube object and scaling it to the desired height of your walls. Position the cube along the edges of your floor plan to form the walls. For doors, create a slightly smaller cube and place it at the desired door locations.
4. Add Details
Once you have the basic structure of your floor plan, you can add details to make it more realistic. This could include adding windows, textures, furniture, and other objects. To add textures, simply drag and drop them onto the surfaces of your objects.
5. Set Up Lighting
Lighting plays a crucial role in creating a believable atmosphere in your floor plan. Add a directional light to the scene and position it to provide ambient lighting. You can also add point lights or spotlights to highlight specific areas.
6. Optimize for Gameplay
While aesthetics are important, it's equally important to optimize your floor plan for gameplay. Make sure the layout is clear and easy to navigate. Avoid unnecessary obstacles or dead ends that could hinder the player's experience.
7. Test and Iterate
Once you've created your floor plan, it's essential to test and iterate. Playtest your floor plan to identify any areas that need improvement. Make adjustments to the layout, object placement, or lighting as necessary.
Conclusion
Creating a floor plan in Unity may seem daunting at first, but with the right steps and a bit of practice, you'll be able to create realistic and immersive environments for your games. Remember to experiment with different designs, seek feedback from others, and continually refine your floor plans to create the best possible experience.

How To Make 2d Floor Plan Interactive With 3d Unity News General Discussion Discussions

Is There An Easier Way To Draw Up Floors News General Discussion Unity Discussions

Unity Creating A Maze Like Space With Many Rooms Basics Styly

Unity Probuilder House Tutorial From A Plan Roof Doors And Windows

Unity Probuilder House Tutorial From A Plan Textures Moldings And Lighting

3d House Design In Blender Make Low Poly Art For Unity

Creating Interactive Based On Unity News General Discussion Discussions

Changing Alpha Of 2d Game Object When Collided With Getting Started Unity Discussions

Create A Ai Goap News General Discussion Unity Discussions

A B C Create Virtual Museum In One Day
Related Posts