How To Create a 3D Floor Plan in AutoCAD
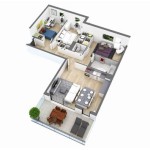
AutoCAD, a leading computer-aided design (CAD) software, is widely used for creating precise 2D and 3D drawings. Converting a 2D floor plan into a 3D model offers several advantages, including enhanced visualization, improved spatial understanding, and better communication with stakeholders. This article provides detailed steps on how to create a 3D floor plan from a 2D drawing in AutoCAD.
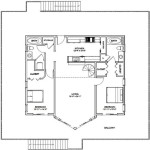
Before initiating the process, ensure a comprehensive 2D floor plan is available. This floor plan should include all essential architectural elements such as walls, doors, windows, stairs, and other relevant interior features. The accuracy of the 2D plan directly impacts the final 3D model. It is crucial to verify that all lines are connected properly and that the drawing is clean, without overlapping lines or gaps.
Preparing the 2D Floor Plan
The initial step involves preparing the 2D floor plan for 3D modeling. This primarily includes organizing the drawing using layers. Layers allow for better control and visibility of different elements within the drawing. Create separate layers for walls, doors, windows, and other architectural features. Assigning different colors to each layer aids in visual differentiation and simplifies the selection process during the 3D conversion.
To create layers, navigate to the Layer Properties Manager. This can usually be accessed via the ribbon interface under the Home tab or by typing "LAYER" into the command line. In the Layer Properties Manager, create new layers by clicking the "New Layer" icon. Name each layer descriptively, such as "Walls," "Doors," "Windows," and so on. Assign a color to each layer for easy identification.
Once the layers are created, select the relevant objects in the 2D floor plan and assign them to their corresponding layers. For example, select all the lines representing walls and assign them to the "Walls" layer. Repeat this process for all other objects, ensuring that each element is placed on the appropriate layer. This layer organization facilitates the efficient manipulation and modification of specific elements during the 3D modeling process.
Furthermore, verify the units of the drawing. Ensure the drawing is set to the appropriate units (e.g., meters, millimeters, inches, feet) before proceeding. This affects the accuracy of the 3D model and its dimensions. The drawing units can be set using the "UNITS" command in AutoCAD.
Extruding the Walls
Extrusion is a fundamental technique in 3D modeling, where a 2D object is extended vertically to create a 3D solid. In the context of a floor plan, extrusion is primarily used to create the walls. The height of the extrusion determines the height of the walls in the 3D model. To extrude the walls, switch to a 3D modeling workspace. In AutoCAD, this can be done by selecting the "3D Modeling" workspace from the workspace switching drop-down menu on the status bar.
Before initiating the extrusion process, it is often helpful to switch to a 3D view, such as the Southwest Isometric view. This provides a better perspective for viewing the 3D elements as they are created. The view can be changed using the View Cube or the View Manager.
To extrude the walls, use the "EXTRUDE" command. This command can be accessed by typing "EXTRUDE" into the command line or by locating it in the ribbon interface under the Solid tab. Select the polylines that represent the walls. It is essential that the walls are represented by closed polylines so that they can be extruded into solid objects. If necessary, use the "JOIN" command to connect individual lines into polylines.
After selecting the wall polylines, specify the extrusion height. This corresponds to the desired height of the walls. Enter the value directly or click on the screen to define the height visually. Once the height is specified, AutoCAD will create 3D solids representing the walls. Ensure the extrusion direction is correct. In most cases, the extrusion should be in the positive Z-direction.
If there are different wall heights in the floor plan, repeat the extrusion process for each set of walls with different heights. This is where the layer organization becomes particularly useful, as you can easily select all the walls on a specific layer and extrude them together.
Creating Doors and Windows
After creating the walls, the next step is to create openings for doors and windows. This can be achieved by using Boolean operations, specifically the "SUBTRACT" command. Create 3D solids representing the doors and windows, and then subtract them from the walls to create openings.
First, create 3D solids representing the doors and windows. These solids should have the correct dimensions and positions within the walls. The height and width of the door and window solids should match the dimensions specified in the 2D floor plan. The depth of the solids should be slightly greater than the thickness of the walls to ensure that the subtraction operation removes the material completely.
To create the door and window solids, use the box command, "BOX", specifying the length, width, and height. Precise placements can be achieved by snapping to existing geometry of walls, ensuring accuracy. Next, position the 3D solids representing doors and windows within the wall where the opening should be.
After creating the door and window solids and positioning them correctly, use the "SUBTRACT" command to create the openings. Type "SUBTRACT" into the command line or locate it in the ribbon interface under the Solid tab. First, select the wall (the object from which you want to subtract). Then, select the door and window solids (the objects you want to subtract). Press Enter, and AutoCAD will subtract the door and window solids from the walls, creating the openings.
Repeat this process for all doors and windows in the floor plan. If there are multiple instances of the same door or window, you can create one solid and then copy it to the other locations using the "COPY" command. Adjust the position of each copy as necessary to ensure accurate placement.
Once the openings are created, you can add 3D door and window models to the openings. These models can be created from scratch in AutoCAD or imported from a library of 3D models. Ensure that the models are correctly scaled and positioned within the openings for a realistic appearance.
Adding Interior Details
To enhance the realism of the 3D floor plan, add interior details such as stairs, furniture, and fixtures. These details can be modeled directly in AutoCAD or imported from external sources.
For stairs, use the AutoCAD's 3D modeling tools to create the steps, railings, and other components. Accurately representing the rise and run of the stairs ensures they are functional and visually appealing in the 3D model. Alternatively, consider using pre-built stair models available online and importing them in suitable formats, such as .dwg or .3ds.
For furniture and fixtures, consider importing pre-existing 3D models, greatly reducing the modeling time involved. Numerous online resources provide free or paid 3D models of furniture, appliances, and other interior elements. The models should be compatible with AutoCAD and imported using the appropriate import commands.
When importing furniture and fixtures, ensure that the models are correctly scaled and positioned within the floor plan. Use the "SCALE" and "MOVE" commands to adjust the size and location of the models as needed. Pay attention to the material and texture properties of the models to ensure they match the overall aesthetic of the design.
Adding lighting is another essential aspect of creating a realistic 3D floor plan. AutoCAD allows you to add various types of light sources, such as point lights, spotlights, and distant lights. Experiment with different lighting setups to achieve the desired effect. Rendering tools available within AutoCAD can create photo-realistic images of the finished model, showing the impact of the lighting choices.
Further enhancements can involve adding materials and textures to the walls, floors, and other surfaces. AutoCAD provides a library of materials that can be applied to the 3D objects. Alternatively, custom materials can be created by specifying the color, texture, and other properties. Proper material application significantly improves the visual appeal and realism of the 3D floor plan.
By following these comprehensive steps, an accurate and visually appealing 3D floor plan can be created from a 2D drawing in AutoCAD. The resulting 3D model will provide a valuable tool for visualizing the design, communicating with clients, and making informed decisions throughout the construction process.

Floor Plan Create 2d 3d Plans Autodesk

Autocad 3d Basics Tutorial To Model A Floor Plan Fast And Effective Part 2

Autocad 2d To 3d House Modeling Simple Floor Plan 2024

Autocad 3d Basics Tutorial To Model A Floor Plan Fast And Effective Part 1

3d Floor Plan Designing Service For Cad In Pan

How To Make 3d Floor Plans Quora

Create 3d House Floor Plan And Render In Autocad By Mahjabeen Sidd Fiverr

Create A Building In 3d Autocad Tutorial And S

How To Make House Floor Plan In Autocad Fantasticeng

Autocad 3d Basics Tutorial To Model A Floor Plan Fast And Effective Part 2
Related Posts