How To Draw a Floor Plan of Your House: Free Printable Templates
Creating a floor plan of a house is a fundamental step in various projects, from interior design and renovations to real estate listings and insurance documentation. While professional architectural software offers advanced features, many individuals can achieve satisfactory results using free printable templates as a starting point. This article details the process of creating a floor plan, focusing on leveraging free templates and manual measurement techniques.
Understanding the Basics of Floor Plans
A floor plan is a scaled diagram depicting the layout of a building or a single level within a building, viewed from above. It typically includes walls, doors, windows, and fixed installations like sinks, toilets, and kitchen appliances. A good floor plan presents an accurate representation of the space, allowing for visualization and planning.
Key elements of a floor plan include: *
Walls:
These define the boundaries of rooms and the overall structure. They are usually represented as thick lines. *Doors:
These indicate entry and exit points, showing the swing direction. *Windows:
These are represented with specific symbols to denote their type and placement. *Fixtures:
These include plumbing fixtures, appliances, and other built-in elements, drawn to scale within their respective spaces. *Dimensions:
These are crucial for accuracy and indicate the length and width of rooms and other features.Floor plans are frequently used for: *
Interior Design:
Planning furniture placement and spatial arrangement. *Home Renovation:
Visualizing potential changes and ensuring proper fit. *Real Estate:
Providing potential buyers with a clear understanding of the property layout. *Emergency Planning:
Providing emergency responders with the layout of the building. *Insurance Documentation:
Documenting the layout for insurance claims.Gathering Supplies and Choosing a Template
Before embarking on the floor plan drawing process, it's necessary to gather the required supplies and select a suitable template. A combination of physical tools and digital resources may be employed.
Essential supplies include: *
Measuring Tape:
A long measuring tape (at least 25 feet) is crucial for accurately measuring room dimensions. Laser measuring tools can increase accuracy and speed. *Pencil and Eraser:
For sketching and making corrections on the template. *Paper or Printable Template:
Select a template appropriate for the size and complexity of the house. *Ruler or Straightedge:
For drawing straight lines and maintaining consistent scale. *Graph Paper:
Useful for maintaining proportions and drawing accurate lines.Free printable floor plan templates are readily available online. These templates come in various formats, including blank grids, pre-designed room outlines, and templates with basic symbols for doors and windows. Popular options include:
*
Blank Grid Templates:
Offer maximum flexibility, allowing for complete customization. These are suitable for simple house layouts or those who prefer a completely manual approach.*
Room Outline Templates:
Provide pre-defined room shapes, saving time and effort in the initial sketching phase. These are helpful for visualizing potential room arrangements.*
Templates with Symbols:
Include common architectural symbols, which can aid in creating a more professional-looking floor plan. Many free templates include symbols for doors, windows, stairs, and fixtures.Consider the complexity of the house and personal preferences when selecting a template. For a large or intricate house, a blank grid template might be preferable, as it offers the most flexibility. For a smaller, simpler house, a template with pre-defined room outlines may suffice.
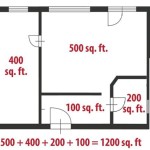
Downloading and printing the chosen template is the next step. Ensure the template is printed to scale to maintain accurate proportions. A common scale for floor plans is 1/4 inch = 1 foot. This means that every quarter inch on the template represents one foot in the actual house.
Taking Accurate Measurements
Accurate measurements are the cornerstone of a reliable floor plan. This section details the process of measuring rooms and features within the house.
The following steps should be followed to ensure accurate measurements:
1.
Prepare the Space:
Clear obstacles from the walls and floor to allow for unobstructed measurement. This includes moving furniture and other items that may impede access.2.
Measure Room Dimensions:
Measure the length and width of each room at the floor level. Take multiple measurements along each wall to account for any irregularities or unevenness. Record all measurements accurately.3.
Measure Wall Thickness:
Measure the thickness of the walls, including interior and exterior walls. Wall thickness is important for accurately representing the overall dimensions of the house.4.
Measure Door and Window Openings:
Measure the width and height of door and window openings. Also, measure the distance from the corner of the room to the edge of the opening. This information is crucial for accurately placing doors and windows on the floor plan.5.
Measure Fixed Installations:
Measure the dimensions of fixed installations, such as sinks, toilets, kitchen appliances, and built-in cabinets. Accurately recording the size and placement of these features is crucial for planning renovations and furniture placement.6.
Document All Measurements:
Keep a detailed record of all measurements, including room dimensions, wall thickness, door and window sizes, and the dimensions of fixed installations. Using a notebook or digital spreadsheet can help organize and manage the data.When taking measurements, adhere to the following best practices:
*
Use consistent units:
Ensure that all measurements are taken in the same unit of measurement (e.g., feet and inches). *Measure to the nearest inch:
Strive for accuracy by measuring to the nearest inch. *Double-check measurements:
Verify all measurements to minimize errors. *Consider obstructions:
Account for any obstructions, such as pipes or beams, that may affect the floor plan.Drawing the Floor Plan on the Template
With the measurements collected and the template prepared, the next step is to translate the data onto the template and create the floor plan.
Follow these steps to draw the floor plan:
1.
Start with the Exterior Walls:
Begin by drawing the outline of the exterior walls on the template, using the measurements taken. Ensure that the walls are drawn to scale, based on the chosen scale (e.g., 1/4 inch = 1 foot). Use a ruler or straightedge to draw straight and accurate lines.2.
Draw Interior Walls:
Add the interior walls, using the measurements taken. Ensure that the walls are drawn to scale and connected to the exterior walls accurately. Pay attention to wall thickness and ensure that it is consistent throughout the floor plan.3.
Add Doors and Windows:
Draw the symbols for doors and windows in their correct locations, using the measurements taken. Indicate the swing direction of doors with a curved line. Ensure that the size and placement of doors and windows are accurate and consistent with the actual features in the house.4.
Draw Fixed Installations:
Add the symbols for fixed installations, such as sinks, toilets, kitchen appliances, and built-in cabinets, in their correct locations. Ensure that the size and placement of these features are accurate and consistent with the actual features in the house. Use standard architectural symbols for these features.5.
Add Dimensions:
Label each room with its dimensions, including length and width. Also, label the dimensions of other features, such as door openings and window sizes. Adding dimensions enhances the clarity and usability of the floor plan.6.
Review and Refine:
Review the floor plan carefully to ensure accuracy and completeness. Make any necessary corrections or adjustments. Double-check measurements and ensure that all features are drawn to scale. Refine the floor plan until it accurately represents the layout of the house.Tips for drawing an accurate and clear floor plan:
*
Use a light hand:
Draw lightly with a pencil, allowing for easy corrections. *Maintain consistent scale:
Ensure that all features are drawn to the same scale. *Use clear symbols:
Use standard architectural symbols for doors, windows, and fixtures. *Label everything clearly:
Label each room and feature with its name or dimensions. *Erase unnecessary lines:
Erase any unnecessary lines or markings to create a clean and professional-looking floor plan.By following these steps, a detailed and accurate floor plan of a house can be created using free printable templates and manual measurement techniques. While the result may not possess the sophistication of professionally generated plans, it can serve as a valuable tool for planning and visualization purposes.

Floor Plan Creator And Designer Free Easy App

Floor Plan Templates Draw Plans Easily With

20 Free Floorplan Template Simple Design

Free Floor Plan Creator Design 2d 3d Layouts Easily

Make Your Own Blueprint How To Draw Floor Plans

Floor Plan Templates

How To Draw Blueprints For A House With Pictures Wikihow

Create And Visualize House Plans In Minutes Roomsketcher

Free Editable Floor Plan Examples Templates Edrawmax

20 Free Floorplan Template Simple Design
Related Posts