How to Draw a Floor Plan of Your House: Free Printable Resources and Techniques
Creating a floor plan of a house can be a valuable undertaking for homeowners, whether for renovation projects, furniture arrangement, home improvement planning, or simply for insurance documentation. While professional architectural software offers advanced features, drawing a floor plan can be achieved effectively with free printable resources and a few fundamental techniques. This article outlines a step-by-step process for drawing a floor plan, emphasizing accuracy and utilizing readily available tools to create a usable and informative representation of a home's layout.
Before beginning, gathering the necessary tools and understanding basic measurement principles is crucial. This preparation ensures accuracy and minimizes errors throughout the drawing process. Inaccurate measurements early on can lead to significant discrepancies in the final floor plan. Free printable grids and templates can serve as a foundation for the drawing, providing a visual framework for scaling and positioning the different elements of the house. The choice of grid size should align with the overall size of the house and the desired level of detail.
Key Point 1: Accurate Measurement and Preparation
The first and arguably most critical step in drawing a floor plan is accurately measuring the dimensions of the house. This involves meticulously measuring each room, hallway, doorway, and window. A long measuring tape (at least 25 feet) is essential for covering larger distances without requiring multiple, potentially error-prone, measurements. Digital laser measures can provide even greater accuracy and efficiency, especially for complex room shapes or hard-to-reach areas.
Start by creating a rough sketch of the house's outline. This doesn't need to be perfectly to scale at this stage, but it should represent the overall shape and arrangement of rooms. Label each room on the sketch for easy reference. Then, systematically measure each wall. It's best practice to measure each wall twice, from different starting points, to verify the accuracy of the measurement. Record all measurements clearly on the rough sketch. Be sure to measure the thickness of walls between rooms, as this is vital information that is easy to overlook. Measure the width and height of all doors and windows, as well as their distance from the nearest corner or wall. These details determine the placement of architectural elements in the final diagram.
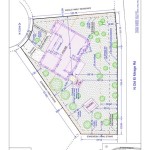
For irregularly shaped rooms or areas with angled walls, break the space down into simpler geometric shapes (squares, rectangles, triangles) and measure each shape individually. Add these individual measurements to the rough sketch and calculate the total area to ensure measurement consistency. This “divide and conquer” approach simplifies the measurement process and reduces the potential for cumulative errors. Furthermore, accurately measuring the location of any fixed structural elements like fireplaces, built-in cabinets, or support columns is necessary. These details are crucial for future renovation or interior design considerations.
After completing all the measurements, verify dimensions. Pay close attention to the overall dimensions of the house. Adding up the dimensions of the walls of each room and comparing that sum to a measurement of the outside dimensions of the house will highlight any disparities. Rectify any discrepancies by remeasuring and confirming the accuracy of the data. Accurate measurement is the foundation for a usable and reliable floor plan.
Key Point 2: Utilizing Free Printable Resources
Once the measurements are complete, the next step involves transferring those measurements onto a scaled drawing. Free printable resources can significantly simplify this process. Printable graph paper provides a convenient grid system for accurately representing the dimensions of the house. Various grid sizes are available online, typically ranging from 1/4 inch to 1 inch squares. The choice of grid size will depend on the desired level of detail and the overall size of the floor plan. A smaller grid size (e.g., 1/4 inch) allows for greater precision but may result in a more cluttered drawing.
Numerous websites offer free printable floor plan templates and symbols. These templates typically include common architectural features such as doors, windows, stairs, and plumbing fixtures. Using these pre-made symbols allows for a more professional-looking and standardized floor plan. They also save time and effort compared to drawing each element from scratch. Download and print these templates on cardstock or thicker paper for durability. Cut out the symbols you plan to use, making it easier to position them on the scaled drawing.
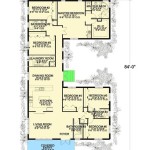
When using graph paper, choosing an appropriate scale is important. A common scale for residential floor plans is 1/4 inch equals 1 foot. This means that each 1/4-inch square on the graph paper represents 1 foot in the actual house. Select a scale that allows the entire floor plan to fit on a manageable number of sheets of paper. This can be determined by converting the house's overall length and width to the chosen scale and ensuring it will fit on the available paper size. For example, if the house is 40 feet long and 30 feet wide, at a scale of 1/4 inch = 1 foot, the drawing will need to be 10 inches long and 7.5 inches wide.
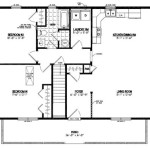
Begin by drawing the exterior walls of the house on the graph paper, using the chosen scale and referring to the measurements taken earlier. Ensure the walls are drawn to the correct thickness, representing the actual wall thickness of the house. Then, add the interior walls, carefully positioning them according to the measurements on the rough sketch. Use a ruler or straightedge to ensure straight lines and accurate angles. Erase any unnecessary lines or guidelines to maintain clarity. Finally, add the architectural symbols for doors, windows, and other fixtures, placing them in their correct locations based on the recorded measurements. Consider utilizing different line weights to distinguish between walls, doors, and other features, enhancing the readability of the finished floor plan.
Key Point 3: Detailing and Refining the Floor Plan
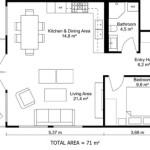
Once the basic layout of the floor plan is complete, the next step involves adding details and refinements to improve its usability and accuracy. This includes labeling each room, adding dimensions, indicating the direction of door swings, and noting the location of essential utilities. Clear and concise labeling is crucial for understanding the intended use of each space. Use a consistent font and size for all labels, and place them within the boundaries of each room. Include labels for closets, bathrooms, and other specialized areas.
Adding dimensions to the floor plan provides crucial information for future reference, renovation planning, and furniture arrangement. Dimensions should be placed along the walls and between key architectural elements, such as doors and windows. Use dimension lines with arrows indicating the start and end points of the measurement. Place the dimensions clearly above or below the dimension lines, avoiding clutter and ensuring legibility. Show overall room dimensions and the distance between key features. For example, dimension the total length and width of a living room and the distance from a window to the nearest wall.
Indicating the direction of door swings is another important detail that enhances the usability of the floor plan. Use a curved arrow to show the direction in which each door opens. This information helps visualize the flow of traffic through the house and plan furniture placement effectively. Also, note the location of essential utilities, such as electrical outlets, light switches, and plumbing fixtures. These details are particularly important for renovation projects and electrical or plumbing work. Use recognized symbols to represent these elements, ensuring clarity and consistency.
Review the completed floor plan carefully, checking for any errors or omissions. Compare the final drawing to the original measurements and rough sketch to ensure accuracy. Erase any unnecessary lines or marks to create a clean and professional-looking floor plan. Consider making multiple copies of the finished floor plan for different purposes, such as renovation planning, furniture arrangement, or insurance documentation. Store the original drawing in a safe place for future reference. This documented floor plan is a valuable asset for any homeowner and can be an invaluable aid in future home improvement endeavors.

Floor Plan Creator And Designer Free Easy App

How To Draw A Floor Plan Live Home 3d

How To Draw Blueprints For A House With Pictures Wikihow

Create And Visualize House Plans In Minutes Roomsketcher

Free Floor Plan Creator Design 2d 3d Layouts Easily

Create And Visualize House Plans In Minutes Roomsketcher

How To Draw Floor Plans Guide Create In 2d And 3d

20 Free Floorplan Template Simple Design

How To Draw A Floor Plan Scale Measuring Sketching

Free Floor Plan Creator Edrawmax
Related Posts