How To Draw a Floor Plan of Your House for Free
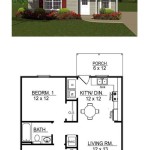
Creating a floor plan of a house can be a valuable endeavor for various reasons. Whether intending to remodel, redecorate, sell the property, or simply document its current layout, a floor plan provides a visual representation of the space. While professional architectural services can generate detailed plans, numerous free methods exist for individuals to create workable floor plans. This article outlines the steps involved in drawing a floor plan using readily available tools and resources, enabling individuals to represent their house's layout accurately and effectively.
Step 1: Gathering Materials and Measuring the Space
Before embarking on the drawing process, assembling the necessary materials is crucial. The tools required are generally inexpensive and readily accessible. These include: a measuring tape (preferably a long one for larger rooms and exterior walls), a pencil, an eraser, graph paper (or plain paper if graph paper is unavailable), and a notebook for recording measurements. A laser measuring device can be a useful optional addition for increased accuracy and efficiency, particularly when dealing with large or irregularly shaped rooms.
The foundation of any accurate floor plan lies in precise measurements. Begin by measuring the exterior walls of the house. Walk around the outside perimeter, measuring each wall length from corner to corner. Record each measurement in the notebook. It is important to note any irregularities in the wall, such as offsets or angles. Next, move inside and measure each room individually. Measure the length and width of each room, again recording the measurements in the notebook. Pay close attention to the thickness of the walls. Measure the wall thickness between rooms and the thickness of exterior walls. This information is essential for accurately representing the wall dimensions in the floor plan.
When measuring, be meticulous about consistency. Use the same unit of measurement (e.g., inches, feet, meters) throughout the entire process. Ensure the measuring tape is held taut and straight to avoid inaccuracies. If using a laser measuring device, follow the manufacturer’s instructions carefully. Document all measurements immediately to prevent errors that can arise from relying on memory. Make sketches of each room as you measure them, noting the locations of windows, doors, and any built-in features. These sketches will serve as valuable references when transferring the measurements to the floor plan.
Don't overlook the placement and dimensions of windows and doors. Measure the width and height of each window and door, as well as their distance from the corners of the room. Indicate the direction in which the doors swing open. Include the locations of any permanent fixtures, such as fireplaces, radiators, or plumbing stacks. These details contribute to a more accurate and comprehensive floor plan. It is also beneficial to measure ceiling height in a few representative locations to note on the plan, although this isn't strictly part of the floor plan, it can be useful information for other purposes.
Step 2: Choosing a Floor Plan Drawing Method
Several methods can be used to create a floor plan for free, ranging from traditional hand-drawing techniques to using free online software. The choice depends on individual preferences, technical skills, and the desired level of detail and accuracy.
Hand-Drawing on Graph Paper: This is the most basic and accessible method. Graph paper provides a grid that simplifies the process of drawing to scale. Choose a suitable scale (e.g., 1/4 inch equals 1 foot) and maintain it consistently throughout the drawing. Start by sketching the exterior walls of the house based on the measurements taken. Then, add the interior walls, rooms, doors, and windows, using the recorded measurements and sketches as guides. This method is ideal for individuals who prefer a hands-on approach and don't require highly detailed or professional-looking plans. It is easy to correct mistakes with an eraser, and the materials are inexpensive.
Using Free Online Floor Plan Software: Numerous websites and applications offer free floor plan drawing tools. These programs typically provide a user-friendly interface, allowing users to draw walls, add doors and windows, and insert furniture symbols with a mouse or touchscreen. Some popular options include: Floorplanner, RoomSketcher (offers a free version with limitations), and Planner 5D (also offers a free version). These tools often offer features such as 2D and 3D viewing options, furniture libraries, and the ability to export the floor plan in various file formats. Before committing to a particular software, explore the available features and limitations of the free version. Look for software that offers the features needed for the specific project.
Using Free Vector Graphics Editors: Software like Inkscape (open-source) can be adapted to create floor plans. This involves setting up a document with appropriate dimensions and using drawing tools to create walls, doors, windows, and other elements. This method offers more flexibility and control over the appearance of the floor plan compared to specialized floor plan software. However, it requires a higher level of technical skill and may involve a steeper learning curve.
No matter which method is chosen, the key to a successful floor plan is starting with the exterior walls and then working inward. Maintaining the chosen scale throughout the drawing is paramount. When using software, be sure to save the work frequently to avoid losing progress. Explore the software's features and experiment with different tools to achieve the desired results.
Step 3: Drawing the Floor Plan to Scale
Drawing to scale is fundamental to creating an accurate floor plan. The scale represents the ratio between the dimensions on the drawing and the actual dimensions of the house. A common scale is 1/4 inch equals 1 foot (or 1:48), meaning that every quarter inch on the drawing represents one foot in the actual house. Other scales, such as 1/8 inch equals 1 foot (or 1:96), can be used for larger houses or when more detail is needed.
If hand-drawing on graph paper, choose a scale that aligns with the grid of the paper. For example, if the graph paper has four squares per inch, a scale of 1/4 inch equals 1 foot would be a natural fit. Convert all measurements to the chosen scale before transferring them to the paper. For instance, if a wall is 12 feet long and the scale is 1/4 inch equals 1 foot, the wall should be drawn as 3 inches long on the graph paper (12 feet x 1/4 inch/foot = 3 inches). Use a ruler to ensure that the lines are drawn accurately to the scaled measurements. Remember to account for wall thickness when drawing interior walls.
When using floor plan software, the software typically handles the scaling automatically. However, it is essential to set the correct units of measurement (e.g., feet, meters) and the overall scale of the drawing. Most software programs allow users to input the actual dimensions of the walls and rooms, and the program automatically scales the drawing accordingly. Verify that the dimensions displayed on the screen match the actual measurements of the house. If discrepancies are observed, double-check the input values and the scaling settings.
Regardless of the method used, double-check all measurements and calculations before finalizing the drawing. Small errors in measurements or scaling can accumulate and result in significant inaccuracies in the floor plan. Use a calculator to verify scaled measurements if needed. Consider drawing a rough draft of the floor plan before creating the final version. This allows for identifying and correcting errors before committing to a more detailed drawing. Once the floor plan is complete, label each room with its name and dimensions. Add notes indicating the location of windows, doors, and any other relevant features.
Step 4: Adding Details and Refinements
Once the basic structure of the floor plan is established, adding details and refinements enhances its clarity and usefulness. These details can include furniture placement, appliance locations, electrical outlets, and other relevant features.
Furniture Placement: Adding furniture to the floor plan provides a sense of scale and helps visualize how the space will be used. Measure the dimensions of key furniture pieces, such as sofas, beds, tables, and chairs. Draw these furniture items to scale on the floor plan, representing their approximate size and shape. Consider the circulation paths within the rooms and arrange the furniture to ensure comfortable movement. Avoid overcrowding the floor plan with too much furniture, as this can make the space appear smaller than it actually is. Focus on including the essential pieces and arranging them in a functional and aesthetically pleasing manner.
Appliance Locations: Indicate the location of major appliances, such as refrigerators, stoves, washing machines, and dryers. Draw these appliances to scale, representing their approximate size and shape. Consider the plumbing and electrical connections required for each appliance and ensure that they are strategically positioned near the appropriate utilities. In kitchens, pay attention to the work triangle connecting the sink, refrigerator, and stove. Arrange these appliances to maximize efficiency and minimize unnecessary steps.
Electrical Outlets and Switches: While not always necessary for a basic floor plan, including electrical outlets and switches can be useful for planning renovations or electrical work. Indicate the location of outlets with a small circle or square. Indicate the location of light switches with a similar symbol, differentiating them from outlets if desired. Consider the placement of outlets in relation to furniture and appliances, ensuring that they are readily accessible. Indicate the location of lighting fixtures, such as ceiling lights, wall sconces, and lamps. This information can be valuable for planning lighting schemes and ensuring adequate illumination in each room.
Other Details: Add any other relevant details that contribute to the accuracy and completeness of the floor plan. This can include the location of stairs, fireplaces, radiators, built-in cabinets, and plumbing fixtures. Indicate the direction in which doors swing open. Label windows with their dimensions and type (e.g., double-hung, casement). Add notes indicating the ceiling height in each room. Consider adding directional indicators to show the orientation of the house (e.g., North arrow). Use different line weights or colors to differentiate between walls, furniture, and other features. This can improve the clarity and readability of the floor plan. Carefully review the completed floor plan to ensure that all measurements and details are accurate and consistent. Make any necessary corrections or adjustments before finalizing the drawing.

Draw Floor Plans Try Smartdraw Free And Easily More

Free Floor Plan Creator Design 2d 3d Layouts Easily

How To Draw A Floor Plan Live Home 3d

How To Draw A Floor Plan Live Home 3d

Create And Visualize House Plans In Minutes Roomsketcher

Free Floor Plan Creator Design 2d 3d Layouts Easily

How To Draw A Floor Plan The Home Depot

How To Draw A Floor Plan Live Home 3d

How To Draw Blueprints For A House With Pictures Wikihow

Free Floor Plan Designer
Related Posts


