How To Draw a Floor Plan of Your House
Creating a floor plan of a house, whether for personal use, renovation planning, or communicating with contractors, requires careful measurement and attention to detail. This article outlines a step-by-step guide on how to accurately draw a floor plan of your house, focusing on the necessary tools, measurement techniques, and representation of architectural elements.
Gathering the Necessary Tools and Materials
The initial step involves assembling the required tools and materials. Accuracy in drawing a floor plan hinges on precise measurements and clear representation. Essential tools include:
*Measuring Tape: A metal measuring tape is preferable due to its durability and accuracy. Choose a tape measure at least 25 feet long to handle larger room dimensions.
*Laser Distance Measurer (Optional): This tool can expedite the measurement process, particularly in large or irregularly shaped rooms. Laser distance measurers provide instant and accurate measurements, reducing the risk of human error.
*Graph Paper: Graph paper provides a scaled grid, facilitating the accurate representation of dimensions. A scale of ¼ inch to 1 foot is commonly used, but adjust based on the overall size of the house and the desired level of detail.
*Pencils: Use mechanical pencils with varying lead hardness (e.g., HB for general use and 2H for fine lines). Sharpened pencils are crucial for precise drawing.
*Eraser: A soft eraser is necessary for correcting mistakes without damaging the paper.
*Straightedge/Ruler: A straightedge or ruler ensures that lines are straight and measurements are accurately transferred to the graph paper.
*Notebook: A notebook is essential for recording measurements and notes about the layout of the house. Include details about window and door placements, wall thicknesses, and any architectural features.
*Camera (Optional): Taking photographs of each room can be helpful for referencing details later, such as the location of electrical outlets, light fixtures, and moldings.
Measuring the House Interior: A Systematic Approach
Once the tools are assembled, the next step is to systematically measure the interior of the house. Consistency and accuracy are paramount during this phase. The following approach ensures comprehensive measurement:
*Establish a Starting Point: Choose a corner in one of the rooms as the starting point. It is helpful to begin in a room with a simple rectangular or square shape.
*Measure Wall-to-Wall Distances: Measure the length of each wall from corner to corner. Note the measurements in the notebook, clearly labeling which wall corresponds to each measurement. Measure each wall at least twice to verify accuracy.
*Account for Openings: Measure the width and height of all doorways and windows. Record the distance from the corner of the room to the beginning of each opening. Also, note the trim width surrounding the openings.
*Measure Wall Thickness: Measure the thickness of the walls, including interior and exterior walls. Interior walls are typically thinner than exterior walls. Wall thickness is essential for accurately representing the overall footprint of the house.
*Identify and Measure Architectural Features: Note and measure any architectural features, such as fireplaces, built-in shelves, columns, or staircases. These elements significantly impact the layout of the room and should be precisely represented on the floor plan.
*Record Ceiling Heights: Measure the height of the ceilings in each room. If there are variations in ceiling height, note the location and dimensions of these changes. This information is important for creating accurate elevations and sections.
*Measure Utility Outlets and Fixtures: While not always included in basic floor plans, documenting the positions of electrical outlets, light switches, and plumbing fixtures can be useful, especially for renovation projects. Record the distance from the adjacent walls to each of these elements.
*Sketch a Rough Layout: Before beginning the final drawing, create a rough sketch of each room in the notebook. This sketch should include the approximate dimensions of the walls, openings, and architectural features. The sketch serves as a visual aid during the final drawing process.
*Maintain Consistency and Organization: Use a consistent measurement system (e.g., inches or centimeters) throughout the entire process. Clearly label each measurement in the notebook to avoid confusion. Take breaks as needed to maintain focus and accuracy.
Transferring Measurements to the Floor Plan
The final stage involves transferring the recorded measurements from the notebook to the graph paper to create the floor plan. This process requires careful attention to scale and detail.
*Choose a Scale: Select an appropriate scale for the floor plan. A scale of ¼ inch to 1 foot (1:48) is commonly used for residential floor plans. This scale allows for sufficient detail while keeping the overall drawing manageable. If the house is very large, a smaller scale may be necessary.
*Start with the Exterior Walls: Begin by drawing the exterior walls of the house. Use the recorded measurements and the chosen scale to accurately represent the dimensions of each wall. Use a straightedge or ruler to ensure that the lines are straight and the corners are square.
*Draw Interior Walls: Once the exterior walls are drawn, add the interior walls. Again, use the recorded measurements and the chosen scale to accurately represent the dimensions and positions of the interior walls. Ensure that interior walls connect properly to the exterior walls.
*Represent Openings: Add doorways and windows to the floor plan. Use the recorded measurements to accurately represent the width and position of each opening. Indicate the direction of door swings, typically using an arc. Windows are usually represented as simple rectangles or squares within the wall.
*Add Architectural Features: Incorporate any architectural features, such as fireplaces, built-in shelves, columns, or staircases. These features should be drawn to scale and accurately positioned within the room.
*Label Rooms: Label each room on the floor plan with its name (e.g., "Living Room," "Kitchen," "Bedroom"). Use clear and legible lettering.
*Add Dimensions: Add overall dimensions to the floor plan to indicate the length and width of each room and the overall dimensions of the house. Ensure that the dimensions are clearly labeled and accurately reflect the scaled measurements.
*Indicate North Direction: Add a north arrow to the floor plan to indicate the orientation of the house. This information is important for understanding the relationship between the house and its surroundings.
*Review and Refine: Once the floor plan is complete, carefully review it for any errors or omissions. Double-check the measurements and ensure that all elements are accurately represented. Make any necessary corrections or refinements.
Following these steps will enable the creation of a detailed and accurate floor plan of your house. Remember, patience and precision are key during the measuring and drawing phases. The finished floor plan can be used for various purposes, including renovation planning, interior design, and communication with contractors.

How To Draw A Floor Plan Live Home 3d

How To Draw Floor Plans With Floorplanner Com Young House Love

Free House Design Home And Plans

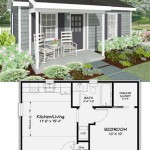
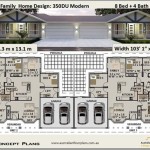
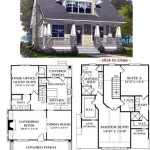
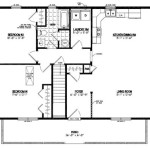
12 Examples Of Floor Plans With Dimensions

How To Draw A Floor Plan Live Home 3d

Create Floor Plan

Draw Floor Plans In Minutes Create 2d And 3d

Floor Plans Learn How To Design And Plan

Make Your Own Blueprint How To Draw Floor Plans

How To Draw A Floor Plan Live Home 3d
Related Posts