How To Draw Dimensions On A Floor Plan
When creating a floor plan, it is essential to include dimensions so that the plan can be accurately interpreted and constructed. Dimensions should be drawn in a clear and consistent manner, and they should include all of the necessary information to fully describe the space. This article will provide a step-by-step guide on how to draw dimensions on a floor plan.
1. Choose the Right Scale
The first step is to choose the right scale for your floor plan. The scale will determine the size of the dimensions and the overall accuracy of the plan. Common scales for floor plans include 1/4 inch = 1 foot, 1/2 inch = 1 foot, and 1 inch = 1 foot. Once you have chosen a scale, be consistent with it throughout the plan.
2. Draw the Outline of the Space
Once you have chosen a scale, you can begin drawing the outline of the space. The outline should include all of the walls, windows, doors, and other features of the space. Be sure to draw the outline accurately and to scale.
3. Add Dimensions to the Walls
The next step is to add dimensions to the walls. The dimensions should include the length of each wall and the distance between the walls. Be sure to label the dimensions clearly and to use the correct scale.
4. Add Dimensions to the Windows and Doors
Once you have added dimensions to the walls, you can add dimensions to the windows and doors. The dimensions should include the width and height of each window and door, as well as the distance between the windows and doors. Be sure to label the dimensions clearly and to use the correct scale.
5. Add Dimensions to Other Features
In addition to the walls, windows, and doors, you may also need to add dimensions to other features of the space, such as furniture, appliances, and fixtures. The dimensions should include the width, height, and depth of each feature, as well as the distance between the features. Be sure to label the dimensions clearly and to use the correct scale.
6. Check Your Work
Once you have added all of the dimensions to the floor plan, be sure to check your work. Make sure that all of the dimensions are accurate and that they are drawn in a clear and consistent manner. If you find any errors, be sure to correct them before finalizing the plan.
Tips for Drawing Dimensions on a Floor Plan
- Use a ruler or measuring tape to ensure that the dimensions are accurate.
- Label the dimensions clearly and use the correct scale.
- Draw the dimensions in a consistent manner.
- Check your work before finalizing the plan.

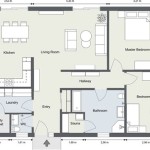
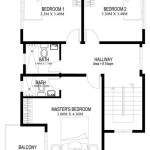
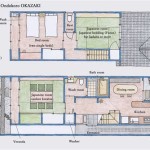
Floor Plans With Dimensions Including Examples Cedreo

12 Examples Of Floor Plans With Dimensions

How To Read A Floor Plan With Dimensions Houseplans Blog Com

Floor Plans

Add Measurements

Make Your Own Blueprint How To Draw Floor Plans

Dimensioning Floor Plans Construction Drawings Spanish Style Homes

How To Read A Floor Plan With Dimensions Houseplans Blog Com

Display Outside Wall Measurements On 2d Floor Plans Roomsketcher Help Center

A Floorplan Of Single Family House All Dimensions In Meters Scientific Diagram
Related Posts