How to Draw a Floor Plan with Dimensions
Floor plans are essential tools in architecture, interior design, and real estate. They provide a visual representation of a space, outlining its layout, dimensions, and features. Drawing a floor plan with accurate dimensions is crucial for various purposes, including home renovation, furniture placement, and property listings. This article will guide you through the process of drawing a floor plan with dimensions, covering essential steps and techniques.
1. Gather Necessary Tools and Information
Before embarking on drawing your floor plan, ensure you have the following tools and information readily available:
- Measuring Tape: A reliable measuring tape is essential for accurately recording the dimensions of your space. A long tape measure (at least 25 feet) is recommended for larger rooms.
- Graph Paper: Graph paper provides a structured grid that facilitates drawing to scale. Choose a grid size that suits the dimensions of your space.
- Pencil: A sharp pencil is ideal for initial sketching and making adjustments to your drawing.
- Ruler: A ruler is necessary for drawing straight lines and precise measurements.
- Eraser: An eraser is essential for correcting mistakes and refining your drawing.
- Floor Plan Template (Optional): A floor plan template can provide a starting point for your drawing, especially if you are unfamiliar with the process.
- Existing Floor Plan (Optional): If you have an existing floor plan of your space, it can serve as a valuable reference.
- Space Dimensions: Measure the length and width of each room, as well as the dimensions of walls, doors, windows, and other features.
- Room Placement and Layout: Determine the arrangement of rooms, furniture, and other objects within your space.
2. Choose a Drawing Scale
Selecting an appropriate scale is crucial for creating a proportionate and visually appealing floor plan. The scale determines the ratio between the drawing and the actual space. Common scales include 1:10, 1:20, and 1:50, meaning one unit on the drawing represents ten, twenty, or fifty units in the actual space, respectively.
Consider the size of your space when choosing a scale. For larger spaces, a smaller scale might be more appropriate to fit the drawing on your graph paper. Conversely, a larger scale might be necessary for smaller spaces to depict details more effectively.
3. Sketch the Outline of the Space
Start by sketching the outer walls of your space on the graph paper. Use your pencil to draw the walls to scale, adhering to the chosen scale for accurate representation. Ensure that the walls are drawn perpendicular to each other, forming a rectangular or square shape. Remember to include any existing structural elements like pillars or beams.
4. Add Interior Walls and Features
Once you have outlined the exterior walls, proceed to add interior walls, doors, windows, and other features to your floor plan. Use your pencil to draw these elements to scale, placing them in their correct positions within the space. Indicate the location and dimensions of doors and windows explicitly.
5. Include Dimensions and Labels
Adding dimensions to your floor plan is crucial for communicating accurate information about the size of each room and feature. Measure the length and width of each room, door, window, and other significant elements. Use a ruler to draw dimension lines and mark the dimensions in clear, legible text. Place dimension lines outside the walls for clarity.
Label each room and feature in your floor plan to ensure easy identification. Use concise and descriptive labels to clearly define each space.
6. Add Symbols and Detail
Floor plans often include symbols to represent various features and objects. Refer to architectural or design standards to utilize commonly recognized symbols for elements like furniture, appliances, plumbing fixtures, and electrical outlets. Incorporate these symbols into your plan to provide a comprehensive visual representation of the space.
7. Use Color and Shading
Adding color and shading to your floor plan can improve its visual appeal and clarity. Use different colors to distinguish between walls, floors, and other elements. Employ shading techniques to create a sense of depth and highlight specific features.
8. Review and Refine
After completing your floor plan, review it thoroughly for accuracy and completeness. Ensure that all dimensions, labels, and symbols are correct and clearly visible. Make any necessary adjustments or refinements to ensure your plan is a precise and informative representation of your space.
Drawing a floor plan with dimensions can be a challenging but rewarding process. By following these steps and utilizing appropriate tools, you can create a detailed and accurate representation of your space. Remember, precision and clarity are essential for effective communication and utilization of your floor plan.

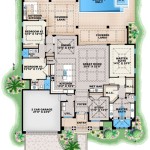
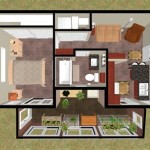
12 Examples Of Floor Plans With Dimensions

Floor Plans With Dimensions Including Examples Cedreo

How To Read A Floor Plan With Dimensions Houseplans Blog Com

Draw Floor Plans In Half The Time Cedreo

How To Draw A Floor Plan Dummies

Make Your Own Blueprint How To Draw Floor Plans

Floor Plan Creator And Designer Free Easy App

How To Read A Floor Plan With Dimensions Houseplans Blog Com

How To Draw A Floor Plan As Beginner Edrawmax

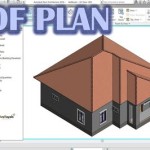
Solved Draw The Floor Plan In Autocad As Shown Chegg Com
Related Posts