How to Draw a Floor Plan of a Building
Creating an accurate and detailed floor plan is a fundamental step in architectural design, interior design, and construction. A floor plan serves as a visual representation of a building's layout, depicting the arrangement of rooms, walls, doors, windows, and other structural elements. Whether for remodeling, construction, or simply documenting an existing space, understanding how to draw a floor plan is a valuable skill. This article provides a comprehensive guide to the process, outlining the essential steps and considerations involved in creating a professional-looking floor plan.
Before embarking on the drawing process, gather the necessary tools and materials. A measuring tape (preferably a laser measure for larger spaces) is crucial for obtaining accurate dimensions. Graph paper or architectural paper provides a scaled grid for drawing. Pencils (various grades for different line weights), erasers, a ruler, a protractor, and templates (for drawing common symbols like doors and windows) are also essential. Computer-aided design (CAD) software offers an alternative approach, allowing for digital drafting and increased precision.
1. Measuring the Existing Space
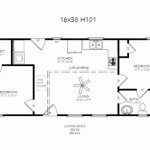
The foundation of any accurate floor plan lies in precise measurements. Start by sketching a rough outline of the building's perimeter. This doesn't need to be perfect at this stage, but it should represent the overall shape. Then, systematically measure each wall, both interior and exterior. For interior walls, measure from wall to wall, taking note of any doors, windows, or other openings. Pay close attention to corners, ensuring they are accurately represented whether they are square or at an angle. Label each measurement clearly on your rough sketch, making sure to distinguish between exterior and interior dimensions.
When measuring windows and doors, record the width and height of the openings. Also, note the distance from the corner of the wall to the edge of the opening. This information is crucial for accurately positioning these elements in the final floor plan. Measure the thickness of the walls as well, as this impacts the overall layout and space utilization.
Account for any architectural features, such as fireplaces, built-in cabinets, or structural columns. These elements need to be accurately measured and positioned on the floor plan as they are integral to the space. Don't forget to measure the height of ceilings, particularly if you are planning any vertical renovations or additions. While not directly depicted on a standard floor plan, the ceiling height is important for determining the overall volume of the space.
If the space is complex, consider dividing it into smaller, more manageable sections. This approach simplifies the measuring process and reduces the likelihood of errors. For example, measure each room individually and then connect them together on the floor plan.
When measuring from corner to corner of irregularly shaped rooms, consider using the 3-4-5 rule to ensure right angles. This involves measuring 3 units along one wall and 4 units along the adjacent wall. If the diagonal distance between those two points is 5 units, the corner is a perfect right angle. This is a simple yet effective way to verify the accuracy of your measurements.
After completing the measuring process, double-check all measurements to identify and correct any errors. Inaccurate measurements can lead to significant discrepancies in the final floor plan, so accuracy is paramount. It is often helpful to have a second person verify your measurements, especially in larger spaces.
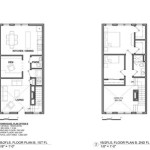
2. Drawing the Floor Plan to Scale
Once you have gathered all the necessary measurements, the next step is to transfer them onto your graph paper or architectural paper, using a consistent scale. A common scale for residential floor plans is 1/4 inch equals 1 foot (1:48), where every quarter inch on the paper represents one foot in the actual building. Choose a scale that allows the entire floor plan to fit comfortably on your paper while still providing sufficient detail. For larger buildings, a smaller scale like 1/8 inch equals 1 foot (1:96) may be necessary.
Start by drawing the exterior walls based on your measurements. Use a sharp pencil and a ruler to create straight, accurate lines. Ensure that the corners are square (or at the correct angle, if the building is not rectangular). Then, draw the interior walls, using the same scale and attention to detail. Remember to account for wall thickness when drawing the interior walls.
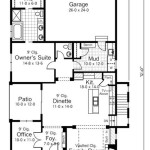
Next, add doors and windows. Use your door and window templates to draw the appropriate symbols to scale. Indicate the swing direction of each door with a curved line. The placement of these elements should correspond precisely to the measurements you recorded earlier. Standard symbols for doors and windows are typically used to ensure clarity and consistency.
Add other architectural features, such as fireplaces, staircases, built-in cabinets, and structural columns. These features contribute to the overall layout and functionality of the space, so their accurate representation is important. Use dotted lines to indicate any overhead features, such as soffits or beams.
Label each room with its name (e.g., "Living Room," "Bedroom," "Kitchen"). Also, consider adding notes to the floor plan to clarify any specific details or features. For example, you might note the type of flooring or the height of a window sill.
To enhance the visual clarity of the floor plan, use different line weights for different elements. Thicker lines can be used for exterior walls, while thinner lines can be used for interior walls and furniture. This technique helps to distinguish the primary structural elements from the secondary features.
Periodically check the overall dimensions of the floor plan against your original measurements. This helps to ensure that the plan is accurately scaled and that no errors have been introduced during the drawing process. Use an eraser to correct any mistakes, and redraw the affected sections as needed.
3. Adding Details and Annotations
Once the basic floor plan is complete, add details and annotations to enhance its clarity and usefulness. This may include adding furniture, fixtures, and appliances. This is often referred to as space planning.
Use standard symbols to represent common fixtures and appliances, such as sinks, toilets, bathtubs, stoves, refrigerators, and washing machines. These symbols are typically drawn to scale and placed in their appropriate locations within the floor plan. While including furniture layouts isn't always necessary, it helps clients and contractors visualize how the space can be used and identify potential layout issues.
Indicate the location of electrical outlets, switches, and light fixtures. This information is essential for electrical wiring and installation. Use standard electrical symbols to represent these elements clearly and unambiguously. These will need to conform with local electrical code.
Add dimensions to the floor plan to indicate the size of rooms, walls, and other features. Dimension lines should be drawn parallel to the object being measured, with arrowheads indicating the start and end points. Place dimensions strategically to provide the most essential information without cluttering the drawing.
Include a north arrow to indicate the orientation of the building. This helps to understand the direction of sunlight and prevailing winds, which can be important factors in building design. The presence of a north arrow is standard practice and aids in navigation.
Add a title block to the floor plan, including the project name, address, drawing date, scale, and drafter's name. This information provides context and helps to identify the drawing. A professional title block is essential for any formal floor plan.
If the floor plan is part of a larger set of drawings, include sheet numbers and cross-referencing to other drawings. This ensures that all the drawings are properly organized and can be easily navigated. Floor plans are part of the larger overall design.
Review the completed floor plan carefully to ensure that all the information is accurate and complete. Have someone else review the plan as well, as a fresh pair of eyes can often catch errors that you might have missed. A thorough review process is essential for producing a high-quality floor plan.
For digital floor plans, use layers to organize different elements, such as walls, doors, windows, furniture, and dimensions. This allows you to easily turn different layers on and off, depending on your needs. Layer management is a powerful feature of CAD software that enhances efficiency and flexibility.
When printing a digital floor plan, choose a paper size and scale that will make the drawing easy to read. Use a high-resolution printer to ensure that the lines and text are clear and sharp. A well-printed floor plan is essential for effective communication.
By following these steps, one can create an accurate and detailed floor plan that serves as a valuable tool for design, construction, and documentation. Whether using traditional drafting methods or modern CAD software, the principles of accurate measurement, scaled drawing, and clear annotation remain essential for producing a professional-quality floor plan.

Floor Plans Learn How To Design And Plan

How To Draw A Floor Plan Live Home 3d

How To Draw A Floor Plan Live Home 3d

Create Floor Plan

How To Draw A Floor Plan As Beginner Edrawmax

How To Draw A Floor Plan Live Home 3d

12 Examples Of Floor Plans With Dimensions

How To Create A Floor Plan Draw Building Plans Using Conceptdraw Pro Diamensions

12 Examples Of Floor Plans With Dimensions

How To Draw A Floor Plan Live Home 3d
Related Posts