How To Create Simple Floor Plans
Creating a floor plan is a fundamental step in various projects, from interior design and home renovations to real estate and architectural planning. A clear and accurate floor plan provides a visual representation of a space, outlining its dimensions, features, and layout. Whether a professional architect or simply an individual planning a remodeling project, understanding the process of creating a simple floor plan is invaluable.
This article details a comprehensive guide on creating simple floor plans, covering the essential steps, tools, and considerations. The goal is to provide a clear, informative, and practical resource that empowers readers to create effective floor plans for diverse purposes.
Key Point 1: Gathering Necessary Information and Tools
Before embarking on the actual drawing process, proper preparation is crucial. This involves collecting accurate measurements and assembling the necessary tools.
First and foremost, accurate measurements are the cornerstone of a reliable floor plan. Inaccurate measurements will render the entire plan useless. The best way to gather measurements is to use a laser distance measurer. These devices provide accurate readings quickly and efficiently. Alternatively, a traditional measuring tape can be used, but it requires more care and attention to detail to minimize errors. When using a measuring tape, ensure it is taut and straight to obtain accurate readings. Record all measurements in a consistent unit, such as feet and inches or meters and centimeters. Consistency is key to prevent confusion later in the process.
Begin by measuring the overall dimensions of the room or space. This includes the length and width of each room, as well as the height of the ceilings. Measure all walls, including any recesses or projections. Pay close attention to corners, as they may not always be perfectly square. Measure the dimensions of any permanent fixtures, such as fireplaces, built-in shelves, or columns. Note the positions and sizes of doors and windows, including their height from the floor and their width. Also, measure the thickness of the walls, as this detail is important for accurate representation on the floor plan. If multiple floors are involved, measure the thickness of the floors between levels.
In addition to measurements, it is helpful to sketch a rough draft of the space. This preliminary sketch doesn't need to be precise, but it should capture the general layout of the rooms, the positions of doors and windows, and any other significant features. This sketch serves as a visual reference during the measurement process and helps to organize the collected data. Include notes about the materials of walls, floors, and ceilings, as well as any other relevant details, such as the location of electrical outlets and plumbing fixtures.
Once the measurements are gathered, select the appropriate tools for creating the floor plan. Options range from traditional drafting tools to computer-aided design (CAD) software. For simple floor plans, basic drawing tools like graph paper, pencils, erasers, and a ruler or t-square may suffice. Graph paper provides a pre-defined grid that aids in maintaining accurate proportions. Pencils allow for easy corrections and adjustments, while a ruler or t-square ensures straight lines and precise angles.
For more complex floor plans or for those who prefer a digital approach, CAD software or online floor plan tools offer a range of features that can streamline the drawing process. These tools typically include pre-designed symbols for doors, windows, furniture, and other common elements, as well as automated measurement and scaling capabilities. Popular CAD software options include AutoCAD, SketchUp, and Revit, while online floor plan tools include RoomSketcher, Floorplanner, and SmartDraw.
Key Point 2: Drafting the Floor Plan
With the measurements and tools prepared, the next step is to begin drafting the floor plan. This involves translating the collected data into a visual representation of the space.
Start by choosing a suitable scale for the floor plan. The scale determines the relationship between the dimensions on the drawing and the actual dimensions of the space. A common scale for residential floor plans is 1/4 inch = 1 foot (1:48), which means that every 1/4 inch on the drawing represents 1 foot in the actual space. Adjust the scale based on the size of the space and the level of detail required. For smaller spaces, a larger scale, such as 1/2 inch = 1 foot (1:24), may be appropriate to allow for more detail. Conversely, for larger spaces, a smaller scale, such as 1/8 inch = 1 foot (1:96), may be necessary to fit the entire plan on a single sheet of paper.
Begin by drawing the exterior walls of the building or room. Use the overall length and width measurements to create a rectangle or other appropriate shape. Ensure that the corners are square and that the walls are drawn to the correct scale. Use a ruler or t-square to maintain straight lines and accurate angles. Double-check the measurements against the original data to ensure accuracy.
Next, draw the interior walls. Use the measurements of the interior walls to divide the space into rooms and hallways. Pay attention to the thickness of the walls, as this detail is important for accurate representation. Ensure that the walls are properly aligned and that they intersect at the correct angles. Measure the distances between interior walls and exterior walls to verify their positions.
Once the walls are drawn, add the doors and windows. Use the measurements collected earlier to determine the positions and sizes of the doors and windows. Represent doors with a curved line indicating the direction of the swing. Represent windows with a simple rectangle or square. Indicate the height of the windows from the floor, if desired. Use standard symbols for doors and windows to maintain consistency and clarity.
Add any permanent fixtures, such as fireplaces, built-in shelves, or columns. Use the measurements of these fixtures to draw them to scale on the floor plan. Pay attention to their positions relative to the walls and other features. Use appropriate symbols to represent these fixtures. For example, a fireplace can be represented with a rectangle and a chimney symbol.
Finally, add labels and annotations to identify the different rooms and features. Label each room with its name, such as "Living Room," "Bedroom," or "Kitchen." Add dimensions to the walls and other features to indicate their sizes. Include notes about the materials of the walls, floors, and ceilings, as well as any other relevant details. A north arrow is typically added to indicate the orientation of the floor plan. Use clear and concise labels and annotations to ensure that the floor plan is easy to understand.
Key Point 3: Refining and Finalizing the Floor Plan
After drafting the initial floor plan, it is essential to refine and finalize it to ensure accuracy, clarity, and completeness. This involves reviewing the plan for errors, adding details, and making any necessary adjustments.
Review the floor plan for any errors or inconsistencies. Check the measurements against the original data to ensure that they are accurate. Verify that the walls are properly aligned and that the doors and windows are positioned correctly. Look for any missing details or features. Make any necessary corrections or adjustments to ensure that the floor plan is accurate and complete.
Add details to the floor plan to enhance its clarity and usefulness. Consider adding furniture layouts to show how the space can be used. Include symbols for electrical outlets, light fixtures, and plumbing fixtures. Indicate the locations of switches and thermostats. Add details about the flooring materials, such as hardwood, carpet, or tile. Include notes about the color scheme and other design elements. The level of detail should be appropriate for the intended purpose of the floor plan.
Consider adding elevation views to the floor plan. Elevation views show the vertical dimensions of the walls and other features. These views can be helpful for visualizing the space and for planning interior design elements. Draw elevation views for each wall of the room or building. Indicate the height of the ceilings, windows, and doors. Add details about the wall finishes, such as paint, wallpaper, or paneling. Include any architectural details, such as crown molding or baseboards.
Once the floor plan is complete, create a final version for presentation or distribution. If the floor plan was created using traditional drafting tools, consider scanning it into a digital format. This will allow for easy sharing and printing. If the floor plan was created using CAD software or an online floor plan tool, export it to a common file format, such as PDF or JPEG. Choose a file format that is compatible with the intended use of the floor plan.
When presenting the floor plan, consider adding a title block that includes the name of the project, the date, the scale, and the name of the creator. This information provides context and helps to identify the floor plan. Use clear and professional formatting to enhance the presentation. Consider adding a key or legend to explain the symbols and annotations used on the floor plan. Ensure that the floor plan is easy to read and understand.
Creating a simple floor plan is a valuable skill that can be applied to a wide range of projects. By following these steps and paying attention to detail, individuals can create effective floor plans that accurately represent a space and facilitate planning and design.

Floor Plans Learn How To Design And Plan

Blender For Noobs 10 How To Create A Simple Floorplan In

Creating A Simple Floor Plan Sketchup Community

Floor Plans Learn How To Design And Plan

How To Manually Draft A Basic Floor Plan 11 Steps Instructables

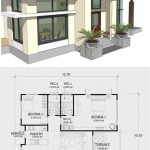
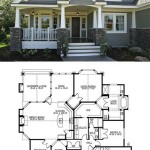
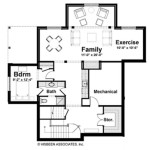
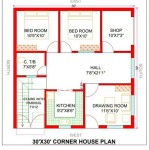
12 Examples Of Floor Plans With Dimensions

Floor Plan Maker

Floor Plan Creator Powerful And Design App Roomsketcher Create Simple Plans Planner

Draw Floor Plans With The Roomsketcher App

Easy To Use Floor Plan Drawing
Related Posts