How To Create A House Plan In 3D
The ability to visualize a house plan in 3D provides significant advantages for homeowners, architects, and builders alike. Traditional 2D blueprints, while essential for technical specifications, often lack the intuitive spatial understanding that a 3D model offers. Creating a house plan in 3D allows for a more comprehensive assessment of the design, facilitating informed decision-making, improved communication, and the potential for early detection of design flaws, before costly physical construction begins.
This article outlines the process of creating a house plan in 3D, covering various methods, software options, and essential considerations. From utilizing readily available online tools to employing advanced professional-grade software, individuals can transform their conceptual ideas into tangible visual representations. The process necessitates a clear understanding of the project's scope, architectural principles, and the chosen software's capabilities.
I. Choosing the Right Software or Method
The first crucial step in creating a 3D house plan is selecting the appropriate software or methodology. The choice largely depends on the user's technical proficiency, budget, and the desired level of detail and realism. Several options are available, ranging from free online tools to professional-grade CAD (Computer-Aided Design) software.
A. Online 3D Home Design Tools: These tools are generally user-friendly and accessible, often requiring no prior experience in CAD or 3D modeling. They typically offer pre-designed templates and libraries of furniture and fixtures, simplifying the design process. Examples include Planner 5D, Roomle, and Homestyler. These platforms are ideal for quickly visualizing basic layouts and exploring different design options. However, they may lack the precision and customization capabilities of professional software.
B. CAD Software: CAD software offers a higher degree of control and precision, allowing for the creation of detailed and accurate 3D models. Popular CAD software options for architectural design include AutoCAD, Revit, ArchiCAD, and SketchUp. These programs provide a comprehensive suite of tools for drafting, modeling, and rendering, enabling users to create photorealistic visualizations and generate detailed construction documents.
AutoCAD is a widely used industry standard, known for its versatility and extensive feature set, making it suitable for both 2D drafting and 3D modeling. Revit and ArchiCAD are Building Information Modeling (BIM) software, which means they focus on creating intelligent models that contain not only geometric information but also data about the building's components, such as materials, costs, and performance characteristics. SketchUp, while not strictly a CAD program, is known for its ease of use and intuitive interface, making it a popular choice for conceptual design and visualization.
C. Mobile Applications: A range of mobile applications cater to creating 3D house plans directly on tablets and smartphones. These apps provide a convenient and portable solution for design work, enabling users to create and modify plans on the go. While mobile apps may have limitations compared to desktop software, they offer a user-friendly interface and often include augmented reality (AR) features that allow users to visualize the design in their physical space.
D. Hand-Drawn 3D Perspectives: While the focus is on digital methods, it's worth acknowledging the traditional approach of hand-drawn 3D perspectives. This method relies on artistic skill and knowledge of perspective drawing principles to create a visual representation of the house plan. Although less precise than digital methods, hand-drawn perspectives can be effective for conveying the overall design concept and aesthetic.
When selecting a software or method, consider the following factors: ease of use, learning curve, available features, cost, compatibility with other software, and the desired level of realism. Experimenting with different options through trial versions or free plans is recommended to determine the best fit for individual needs and project requirements.
II. Essential Steps in Creating a 3D House Plan
Regardless of the chosen software or method, certain fundamental steps are essential for creating a comprehensive and accurate 3D house plan. These steps involve defining the project's scope, creating a 2D floor plan, constructing the 3D model, adding details and materials, and rendering the final visualization.
A. Define the Project Scope: This initial step involves clearly outlining the objectives and requirements of the house plan. This includes determining the overall size and shape of the house, the number of rooms and their intended functions, the desired architectural style, and any specific features or constraints. Gathering inspiration from existing house plans, architectural magazines, and online resources can help define the project's scope and establish a clear vision.
B. Create a 2D Floor Plan: The 2D floor plan serves as the foundation for the 3D model. It should accurately depict the layout of the house, including the dimensions of walls, doors, windows, and other architectural elements. Accurate measurements are crucial at this stage to ensure the resulting 3D model is dimensionally correct. Most CAD and online design tools allow for importing existing 2D blueprints as a starting point.
C. Construct the 3D Model: Once the 2D floor plan is complete, the next step is to extrude the walls and other elements into 3D. This involves assigning height to the 2D lines and shapes, effectively creating the basic structure of the house. Most software offers tools for easily adjusting wall heights, adding roofs, and creating openings for doors and windows. The accuracy of the 2D floor plan directly impacts the quality and accuracy of the resulting 3D model.
D. Add Architectural Details: Architectural details significantly enhance the realism and aesthetic appeal of the 3D model. This includes adding doors, windows, stairs, railings, and other structural components. Most software provides libraries of pre-designed 3D models for these elements, which can be easily inserted into the plan. Custom models can also be created for unique or specific design requirements.
E. Apply Materials and Textures: Applying materials and textures is essential for creating a realistic and visually appealing 3D model. This involves assigning materials such as brick, wood, concrete, and glass to the various surfaces of the house. Textures add depth and realism to the materials, simulating the appearance of natural surfaces. Most software offers a wide range of pre-defined materials and textures, and custom materials can be created by importing images or using procedural textures.
F. Add Furniture and Fixtures: Furnishing the 3D model with furniture and fixtures helps visualize the interior space and understand the flow of the house. This includes adding sofas, chairs, tables, beds, cabinets, and appliances. Many software platforms offer libraries of pre-designed 3D furniture models, which can be easily inserted and arranged within the plan. The scale and placement of furniture are crucial for accurately representing the space and ensuring comfortable circulation.
G. Lighting and Rendering: Lighting plays a crucial role in creating a realistic and visually appealing 3D rendering. This involves adding light sources, such as sunlight, artificial lights, and ambient lighting, to illuminate the scene. Adjusting the intensity, color, and direction of the lights can significantly impact the mood and atmosphere of the rendering. Rendering is the final process of generating a photorealistic image or animation of the 3D model. The rendering process can be time-consuming, depending on the complexity of the model and the desired level of detail.
III. Key Considerations for Accuracy and Realism
Achieving accuracy and realism in a 3D house plan requires careful attention to detail and a thorough understanding of architectural principles. Several key considerations can significantly impact the quality and effectiveness of the final visualization.
A. Accurate Measurements and Scale: The accuracy of the 3D model is directly dependent on the accuracy of the measurements used in the 2D floor plan and 3D construction. Precise measurements of walls, openings, and other architectural elements are crucial for creating a dimensionally correct and realistic representation of the house. Maintaining consistent scale throughout the model is equally important to ensure that all elements are appropriately sized relative to each other.
B. Adherence to Building Codes and Regulations: When creating a house plan, it's essential to adhere to local building codes and regulations. These codes govern various aspects of the design, including structural integrity, fire safety, accessibility, and energy efficiency. Consulting with a qualified architect or building professional is recommended to ensure that the plan complies with all applicable regulations.
C. Realistic Materials and Textures: The choice of materials and textures significantly impacts the realism of the 3D model. Selecting materials that accurately represent the actual building materials is crucial. Paying attention to the details of the textures, such as grain direction, surface roughness, and color variation, can further enhance the realism. Using high-resolution textures is recommended for achieving a detailed and visually appealing rendering.
D. Proper Lighting and Shadows: Realistic lighting and shadows are essential for creating a sense of depth and dimension in the 3D model. Carefully positioning light sources and adjusting their properties can significantly impact the mood and atmosphere of the rendering. Accurately simulating the effects of sunlight and shadows can enhance the realism and provide a better understanding of how the house will look in different lighting conditions.
E. Attention to Detail: Paying attention to even the smallest details can significantly enhance the overall quality of the 3D house plan. This includes adding architectural details, such as trim, moldings, and hardware, as well as furnishing the interior with realistic furniture and fixtures. Populating the surrounding environment with landscaping elements, such as trees, plants, and shrubs, can further enhance the realism and provide context to the design.
F. Regular Review and Revision: Throughout the design process, it's important to regularly review and revise the 3D house plan. This involves checking for errors, inconsistencies, and design flaws. Seeking feedback from other architects, designers, or potential homeowners can provide valuable insights and help identify areas for improvement. Iterative design allows for refining the plan and ensuring that it meets the project's objectives and requirements.
Creating a house plan in 3D offers numerous advantages, from improved visualization to enhanced communication and early detection of design issues. By carefully selecting the appropriate software or method, following essential steps, and paying attention to key considerations, individuals can transform their conceptual ideas into realistic and compelling visual representations of their dream homes.

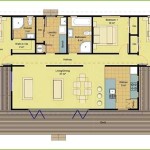
3d Floor Plans

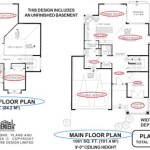
3d Floor Plans

How Much Do 3d House Plans Cost Faqs Answered Cedreo

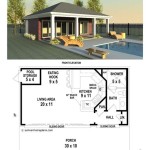
3d Floor Plans

Floor Plan Create 2d 3d Plans Autodesk

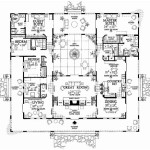
Customize 3d Floor Plans

How Architectural Companies Design 3d Floor Plans For Residential Home Cad Crowd

3d Home Design All You Need To Know

3d Floor Plans

What Is 3d Floor Plan How To Make It Benefits Cost
Related Posts