How To Create A Floor Plan Of Your House
Creating a floor plan of a house is a valuable skill with applications ranging from interior design and renovation planning to real estate marketing and emergency preparedness. A floor plan, at its core, is a scaled diagram illustrating the relationships between rooms, spaces, and physical features within a building. Mastering the creation of a floor plan allows individuals to visualize spatial arrangements, experiment with different layouts, and communicate design ideas effectively to contractors and other stakeholders. This article details a comprehensive approach to developing accurate and informative floor plans.
Gathering Essential Information and Tools
The initial stage of creating a floor plan involves collecting the necessary information and tools. Accuracy in measurement is paramount; therefore, employing the right equipment is crucial. Furthermore, understanding the principles of scaling and notation ensures the resulting floor plan effectively represents the actual dimensions and features of the house.
A laser distance measurer is highly recommended for acquiring precise measurements. These devices provide accurate readings over long distances, minimizing the risk of human error associated with traditional measuring tapes, especially in spaces with obstructions or limited accessibility. While a traditional measuring tape can be used, using a laser measure streamlines the process and improves accuracy.
In addition to measuring devices, a notepad and pencil are essential for recording measurements and sketching a rough outline of the house. This initial sketch serves as the foundation upon which the detailed floor plan will be built. The notepad should be large enough to accommodate detailed notes and diagrams. Graph paper can be particularly useful for maintaining proportionality in the initial sketch.
A digital camera is another important tool for capturing visual references. Photographing each room from multiple angles provides a visual record of existing conditions, including the location of windows, doors, electrical outlets, and other fixed features. These photographs serve as valuable reminders during the floor plan creation process, particularly when working remotely from the actual space. Taking pictures of architectural details will also help you remember intricacies of moldings, fixtures and other built in elements.
Finally, consider the software to be used for creating the final, polished floor plan. A variety of options exist, ranging from free online tools to professional-grade CAD (Computer-Aided Design) software. The choice depends on the complexity of the project and the desired level of detail. For simple floor plans, free online tools such as Floorplanner or RoomSketcher may suffice. For more complex projects requiring advanced features and customization, professional software such as AutoCAD or SketchUp may be more suitable. Some options offer both web and mobile applications, which allow you to upload your gathered images and measurements to your floor plan project.
Measuring the House
The process of measuring the house should be systematic and thorough to ensure accuracy. Begin by establishing a starting point, preferably an exterior corner of the house. Work methodically around the perimeter, measuring the length of each wall. Record each measurement clearly in the notepad, noting the direction of travel (e.g., clockwise or counterclockwise).
When measuring interior walls, focus on capturing the overall dimensions of each room, as well as the location of doorways, windows, and other architectural features. Measure the width and height of each doorway and window opening, and note the distance from the adjacent wall. Include the thickness of walls, as these add to the overall dimensions and internal layout.
Special attention should be paid to irregular shapes and angles. For example, if a room has a bay window or angled wall, measure the depth and width of the projection, as well as the angle of the wall. These details are crucial for accurately representing the space in the floor plan. One method is to measure the longest dimensions, and then take perpendicular measurements to points along the angled wall to create a series of triangles that can be mapped.
When measuring staircases, record the height of each riser and the depth of each tread. Also, measure the overall length and width of the staircase, as well as the location of any landings or handrails. Staircases are important for multi-level homes and need accurate representation.
It is also important to note the location of any built-in features, such as fireplaces, cabinets, or shelving. Measure the dimensions of these features and their distance from the surrounding walls. These elements contribute to the overall functionality and aesthetic of the space and should be accurately represented in the floor plan. Measure the location of fixed utilities, like water heaters, electrical panels, and HVAC equipment. This can be incredibly useful when planning renovations or modifications.
Double-checking measurements is crucial to minimize errors. After completing the initial measurements, review the recorded data and verify that the sum of the interior wall lengths matches the exterior wall lengths. This helps identify any discrepancies or omissions that may need to be corrected. It may be advantageous to measure each wall twice to reduce the risk of human error. If discrepancies are found, re-measure the affected areas until the figures are reconciled.
Creating the Floor Plan Diagram
With the measurements and visual references collected, the next step is to create the floor plan diagram. This can be done manually using graph paper and drafting tools or digitally using specialized software. Regardless of the method chosen, the goal is to translate the collected data into a scaled representation of the house.
If creating the floor plan manually, select an appropriate scale for the drawing. A common scale for residential floor plans is 1/4 inch equals 1 foot (1:48), but the best scale will depend on the size of the house and the size of the paper. Using graph paper can facilitate maintaining accurate proportions. Begin by drawing the exterior walls of the house, using the measured dimensions and the chosen scale. Take time to ensure the exterior walls are straight and positioned correctly, as they are the foundation of the entire floor plan.
Next, add the interior walls, using the measured dimensions and the chosen scale. Pay close attention to the location of doorways, windows, and other architectural features. Accurately represent the thickness of the walls, as this will affect the overall dimensions of the rooms. Ensure that the interior walls are properly connected to the exterior walls and that the overall layout matches the initial sketch.
Once the basic structure of the floor plan is complete, add details such as doors, windows, stairs, and built-in features. Use standard symbols to represent these elements, ensuring consistency throughout the drawing. For example, doors can be represented by an arc showing the direction of swing, and windows can be represented by parallel lines. Clearly labeled annotations will provide context around the details of the floor plan.
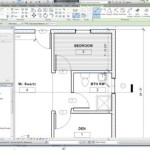
If creating the floor plan digitally, the software will typically provide tools for drawing walls, adding doors and windows, and inserting furniture and other objects. The software will also automatically scale the drawing and provide accurate measurements. When using digital software, start by creating a new project and setting the appropriate scale. Then, draw the exterior walls of the house, using the measured dimensions. The software will typically provide a grid to aid in drawing straight lines and maintaining accurate proportions.
Add interior walls, doors, windows, and other architectural features, using the software's drawing tools. The software will typically provide a library of pre-designed objects that can be easily inserted into the floor plan. These objects can be customized to match the specific dimensions and features of the house. When creating accurate floorplans, use a software that allows the user to input dimensional information precisely.
Adding Details and Annotations
Once the basic floor plan is complete, the final step is to add details and annotations. This includes labeling rooms, indicating the location of electrical outlets and light fixtures, and noting any other relevant information. These details enhance the clarity and usefulness of the floor plan.
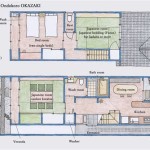
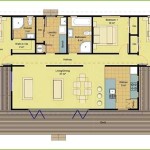
Label each room clearly and concisely, using a font that is easy to read. The labels should accurately reflect the intended use of the room (e.g., "Living Room," "Master Bedroom," "Kitchen"). Place the labels in a prominent location within each room, ensuring that they are easily visible. In complex floor plans, it can also be useful to number rooms and include a legend that provides additional information about each room.
Indicate the location of electrical outlets, light fixtures, and other electrical components. Use standard symbols to represent these elements, ensuring consistency throughout the floor plan. The symbols should be clearly visible and easily distinguishable from other elements in the drawing. Additionally, mark the locations of switches and junction boxes. These details are essential for electrical planning and renovation projects.
Note the location of plumbing fixtures, such as sinks, toilets, and showers. Use standard symbols to represent these elements, ensuring consistency throughout the floor plan. Also note the location of water supply lines and drain pipes. These details are essential for plumbing planning and renovation projects. Indicate the locations of any access points, such as cleanouts or shut-off valves.
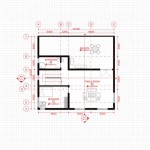
Add dimensions to the floor plan, indicating the length and width of each room, as well as the overall dimensions of the house. The dimensions should be clearly labeled and easily readable. Use a consistent style for dimension lines and arrowheads. Dimensions should be placed outside of rooms to not interfere with the other architectural elements and labels.
Finally, review the floor plan carefully to ensure that all information is accurate and complete. Check for any errors or omissions and correct them as needed. It can be helpful to have someone else review the floor plan to catch any mistakes that may have been overlooked. The goal is to create a floor plan that is clear, accurate, and informative. Create a key or legend highlighting the various symbols and notations used throughout the floor plan.

Floor Plans Learn How To Design And Plan

Floor Plan Creator And Designer Free Easy App

Create Floor Plan Architecture Sink

12 Examples Of Floor Plans With Dimensions

How To Create A Floor Plan And Furniture Layout

House Plans How To Design Your Home Plan

Floor Plan Design Tutorial

Floor Plan Creator Planner 5d

Floor Plan Design Tutorial

Floor Plans With Dimensions Including Examples Cedreo
Related Posts