Drawing a Bedroom Floor Plan: A Comprehensive Guide
A bedroom floor plan serves as a visual representation of a bedroom's layout, showcasing the dimensions of the room and the placement of furniture, fixtures, and architectural elements. Creating a floor plan is a fundamental step in interior design and space planning, enabling individuals to optimize the use of available space, experiment with different furniture arrangements, and ensure that the final design meets their specific needs and aesthetic preferences. This article provides a comprehensive guide to drawing a bedroom floor plan, covering essential steps, considerations, and techniques.
The process of drawing a bedroom floor plan involves several stages, starting with accurate measurements and culminating in a detailed representation of the room's layout. Whether for remodeling, redecorating, or simply visualizing a new space, a well-executed floor plan is an invaluable tool for achieving a desired outcome. The following sections outline a systematic approach to creating a bedroom floor plan, addressing key aspects such as measuring the room, incorporating architectural features, and arranging furniture.
Accurately Measuring the Bedroom
The first and arguably most crucial step in drawing a bedroom floor plan is to accurately measure the room. Precise measurements form the foundation of the plan and ensure that the final design is realistic and achievable. Inaccurate measurements can lead to significant discrepancies between the plan and the actual room, resulting in furniture that doesn't fit, misaligned layouts, and overall dissatisfaction with the final result. Therefore, meticulous attention to detail during the measurement process is paramount.
The primary tool required for measuring the room is a measuring tape. A steel measuring tape, typically 25 feet or longer, is recommended for measuring larger spaces. Laser measuring devices offer an alternative, providing quick and accurate measurements, particularly for long distances. However, a traditional measuring tape remains essential for measuring smaller details and intricate areas. A notepad and pencil are also necessary for recording the measurements as they are taken.
To begin, measure the length and width of the room. Measure each wall individually, even if they appear to be the same length, as slight variations can occur. Record each measurement in feet and inches, ensuring accuracy. Next, measure the height of the room from floor to ceiling. This measurement is important for determining the vertical space available for furniture and décor. After measuring the main dimensions of the room, proceed to measure the architectural features, such as windows, doors, closets, and any built-in elements. For each window, measure the width and height of the window opening, as well as the distance from the floor to the bottom of the window and from the top of the window to the ceiling. For doors, measure the width of the door opening and the direction in which the door swings. Note the presence of any trim or molding around the windows and doors, as this can affect the placement of furniture.
Closets require detailed measurements. Measure the width, depth, and height of the closet, as well as the dimensions and placement of any shelves, rods, or drawers. Measure any other built-in features, such as fireplaces, radiators, or electrical outlets. Record the location of electrical outlets and light switches, as these will influence the placement of lamps and other electrical appliances. Finally, note the location of any architectural irregularities, such as alcoves, niches, or angled walls. These features should be accurately represented on the floor plan to ensure that the design reflects the true shape of the room.
After completing the measurements, double-check all figures to ensure accuracy. Even small errors can accumulate and lead to significant discrepancies in the final floor plan. If possible, have a second person verify the measurements to minimize the risk of mistakes. With accurate measurements in hand, the next step is to transfer these measurements onto paper or a digital platform to create the floor plan.
Incorporating Architectural Details and Features
Once the room measurements are accurately recorded, the next step involves incorporating these measurements, along with the locations of architectural details and features, into the floor plan. This ensures the plan accurately reflects the existing structure of the room and provides a realistic foundation for furniture arrangement and space planning. This stage requires careful attention to detail and precision in transferring the measurements onto the chosen medium, whether it's paper or a digital design tool.
If opting for a manual approach, graph paper is highly recommended. Graph paper provides a grid that simplifies the process of drawing to scale. A common scale for bedroom floor plans is ¼ inch equals 1 foot, meaning that every ¼ inch on the graph paper represents 1 foot in the actual room. This scale allows for a detailed representation of the room's dimensions and features. Using a ruler, draw the outline of the room, accurately reflecting the length and width measurements obtained earlier. Ensure that the corners are square and the lines are straight.
Next, add the architectural details to the plan. Using the measurements recorded earlier, draw the windows, doors, closets, and other built-in features to scale. Indicate the direction of the door swing with an arc. Represent windows with two parallel lines, indicating the window frame. Show the location of electrical outlets and light switches with standard symbols, ensuring that they are accurately positioned according to the measurements. Include any architectural irregularities, such as alcoves, niches, or angled walls, carefully reflecting their shape and dimensions on the plan.
For those who prefer a digital approach, numerous software programs and online tools are available for creating floor plans. These tools offer a range of features, including drag-and-drop functionality, pre-designed furniture templates, and the ability to create 3D visualizations. Popular options include SketchUp, AutoCAD, RoomSketcher, and Planner 5D. When using digital tools, input the room measurements and architectural details accurately. Most programs allow you to specify the scale for the plan, ensuring that the digital representation corresponds to the actual dimensions of the room. Use the software's tools to draw the walls, windows, doors, and other features, ensuring that they are accurately positioned and sized.
Regardless of whether you choose a manual or digital approach, clarity and accuracy are essential. Label each element of the plan clearly, indicating the dimensions of walls, windows, doors, and closets. Use a consistent set of symbols and notations to represent different features. This will make the plan easier to understand and interpret. Regularly double-check the plan against the actual room to ensure that all details are accurately represented. Discrepancies should be corrected promptly to avoid errors in the subsequent stages of the design process.
Arranging Furniture and Optimizing Space
With the architectural details properly incorporated into the floor plan, the final step involves arranging furniture within the space to maximize functionality and aesthetic appeal. This stage requires careful consideration of furniture dimensions, traffic flow, and personal preferences. The goal is to create a comfortable and aesthetically pleasing bedroom layout that meets the individual's specific needs.
Before arranging furniture, create a list of the essential pieces that will be included in the bedroom. This typically includes a bed, nightstands, a dresser, and perhaps a desk or seating area. Measure the dimensions of each piece of furniture, including the width, depth, and height. These measurements will be used to represent the furniture on the floor plan and ensure that it fits comfortably within the available space. If you are planning to purchase new furniture, research the dimensions of potential pieces before making a decision.
When arranging furniture on the floor plan, consider the traffic flow within the room. Ensure that there is adequate space to move freely between different areas of the bedroom without bumping into furniture. Leave at least 2 to 3 feet of space between furniture pieces and walls to allow for comfortable passage. Position the bed as the focal point of the room, typically against the longest wall. Consider the placement of windows and doors when positioning the bed. Avoid placing the bed directly in front of a window or door, as this can disrupt the flow of natural light and create a feeling of vulnerability.
Nightstands should be placed on either side of the bed, within easy reach. Ensure that they are the appropriate height for reading lamps and other bedside necessities. A dresser is typically placed against another wall in the room. Consider the available wall space and the size of the dresser when determining its placement. If space is limited, consider using a tall, narrow dresser to maximize vertical storage. If the bedroom includes a desk or seating area, position these elements in a way that complements the overall layout. A desk is typically placed near a window to take advantage of natural light. A seating area can be created with a comfortable chair and a small table, providing a relaxing space for reading or conversation.
Experiment with different furniture arrangements on the floor plan before committing to a final layout. Cut out scaled representations of the furniture pieces from paper and move them around on the plan to visualize different configurations. Use a digital floor plan tool to drag and drop furniture templates into different positions. Consider the impact of each arrangement on the overall look and feel of the room. Pay attention to the balance and symmetry of the layout. Aim for a visually appealing arrangement that is both functional and aesthetically pleasing. As a final step, consider incorporating accessories and décor into the floor plan. Add rugs, lamps, artwork, and other decorative elements to personalize the space and enhance its overall appeal. These details can be represented on the floor plan with simple symbols or notations. By carefully arranging furniture and incorporating décor, the bedroom floor plan can be transformed into a valuable tool for creating a comfortable and aesthetically pleasing living space.

How To Design A Bedroom Layout 9 Tips Consider

How To Draw A Floor Plan As Beginner Edrawmax

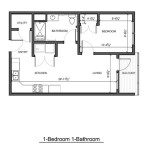
Bedroom With Toilet Floor Plan Template

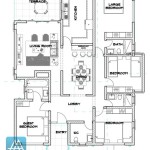
Single Bedroom Floor Plan Template

How To Design Your Room Floor Plan Step By Animated Art Lesson For Kids

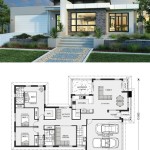
What Is A Floor Plan Building

Draw Floor Plans With The Roomsketcher App

Client Bedroom Design For Small Space Living

Beginners Guide To Drawing A Floor Plan With Free

Draw A Room From The Floor Plan Medibang Paint Free Digital Painting And Manga Creation
Related Posts