DIY Bird Feeder Plans: Attract Feathered Friends to Your Backyard
Bringing the beauty and joy of birds to your backyard is a rewarding experience. Bird feeders provide a reliable source of food, attracting diverse species and offering a window into their fascinating world. Building your own DIY bird feeder is not only cost-effective but also a fulfilling project that allows for customization and creative expression. With just a few simple materials and a bit of time, you can create a welcoming haven for your feathered friends.
Choosing the Right Bird Feeder Design
The first step in building a bird feeder is selecting a design that suits your needs and preferences. There are numerous possibilities, each catering to different bird species and feeding styles. Consider factors such as the size and shape of the feeder, the type of food you want to offer, and the desired feeding method. Common DIY bird feeder designs include:
- Platform feeder: This simple and versatile design offers a large feeding surface suitable for various birds, especially ground-feeding species.
- Tube feeder: These feeders typically have a tube with multiple feeding ports, ideal for smaller birds like finches and chickadees.
- Hopper feeder: Hopper feeders feature a large container with a protected feeding area, preventing seed waste and offering ample space for birds to perch.
- Suet feeder: Suet feeders are designed to hold high-energy suet blocks, attracting woodpeckers, chickadees, and other insect-eating birds.
Research the specific bird species in your area and their feeding habits to ensure you select a design that caters to their preferences. Remember, the best bird feeder is one that attracts the birds you enjoy watching.
Essential Materials and Tools
Once you've chosen your design, gather the necessary materials and tools. While the exact components will vary depending on the specific plan, common elements include:
- Wood: Choose weather-resistant wood like cedar, redwood, or pressure-treated pine for longevity.
- Plastic containers: Recycled plastic containers can be repurposed for the feeding area.
- Metal mesh: Wire mesh protects seeds from spillage and provides perches for birds.
- Hardware: Screws, nails, brackets, and hinges are essential for assembly.
- Paint or stain: Add a decorative touch and protect the wood.
- Other materials: Depending on your chosen design, you might need items like dowels, rope, or glue.
Basic tools required for building a DIY bird feeder typically include a saw, drill, screwdriver, hammer, and measuring tape. If you're working with wood, consider safety precautions like wearing safety glasses and gloves.
Step-by-Step Instructions for a Simple Platform Feeder
For this example, let's construct a basic platform feeder that is easy to build and suitable for various bird species. This feeder will be a great starting point for beginners, showcasing the fundamental construction principles:
- Prepare materials: Cut a square of wood (approximately 12 inches by 12 inches) for the base. Cut four wooden strips (approximately 2 inches wide and 10 inches long) for the sides.
- Assemble the frame: Attach the side strips to the base using screws or nails, creating a raised platform.
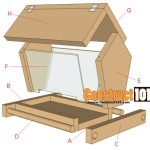
- Add a roof (optional): For added protection, cut a square of wood slightly larger than the base for the roof. Attach the roof to the side strips using hinges for easy access.
- Install the feeding area: Use screws or nails to secure a sheet of metal mesh to the base of the frame, creating a feeding platform.
- Finish and mount: Paint or stain the feeder to add a decorative touch and protect the wood. Mount the feeder to a tree branch or sturdy post using a bracket or rope.
Remember, this is just one simple example. Many detailed plans and tutorials are available online for various bird feeder designs. Research different options to find one that aligns with your skills and desired outcome.
Important Considerations for Building a DIY Bird Feeder
Beyond the basic design, there are essential considerations to ensure your bird feeder is both functional and safe for your feathered guests:
- Placement: Locate the feeder in a safe location, away from potential hazards like windows, predators, or areas where it could be easily knocked over.
- Maintenance: Regularly clean the feeder to prevent the buildup of mold, bacteria, and parasites. Offer fresh food and water to maintain a healthy environment for birds.
- Safety: Avoid sharp edges or protruding hardware that could injure birds. Ensure the feeder is sturdy enough to withstand wind and rain.
- Wildlife: Consider the potential for squirrels or other animals to access the food. Choose a feeder design that minimizes these interactions or implement strategies to deter them.
By following these guidelines, you can create a safe and enjoyable bird feeder that becomes a cherished part of your backyard for years to come. Remember, building a DIY bird feeder is a rewarding project that allows you to connect with nature and provide an essential resource for your feathered neighbors.

Homemade Bird Feeder

Diy Bird Feeder Material List Construct101

Build A Bird Feeder Free Plans Construct101

Free Bird Feeder Plans

Easy Build Cedar Birdfeeder Ana White

Bird Feeder Woodworking Project Woodsmith Plans

Diy Bird Feeder 4 And 20 Minutes To Make 100 Things 2 Do

How To Make A Bird Feeder With Plans

Diy Bird Feeder Plans Simple Homemade Free Printables Monograms Design Tools Patterns Projects

Tree Shaped Bird Feeder Plans Diy Picket Plan
Related Posts