How to Make a House Plan in 3D
Creating a house plan in 3D offers a significant advantage over traditional 2D blueprints. A 3D model provides a more realistic and intuitive visualization of the final structure, allowing stakeholders to understand the spatial relationships and design elements with greater clarity. This enhanced understanding facilitates better communication, reduces the risk of errors, and allows for informed decision-making throughout the design and construction process. The process of creating a 3D house plan involves several key stages, from initial planning and software selection to modeling and rendering the final design.
The technology available for 3D house planning has evolved dramatically, making it accessible to both professionals and those with limited prior experience. Numerous software options cater to different skill levels and budget constraints, ranging from user-friendly online tools to sophisticated professional-grade applications. This article will outline the fundamental steps involved in creating a 3D house plan, emphasizing key considerations and best practices at each stage.
Step 1: Conceptualization and Planning
Before diving into the technical aspects of 3D modeling, a thorough conceptualization and planning phase is crucial. This stage involves defining the scope of the project, identifying the needs and preferences of the occupants, and establishing clear design goals. A well-defined plan serves as a roadmap for the subsequent modeling process, ensuring that the final design meets the desired requirements.
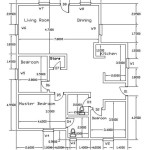
The initial step involves identifying the basic requirements of the house, including the number of rooms, their sizes, and their relationships to one another. This can be achieved by creating a bubble diagram, which illustrates the functional zones of the house and their connections through simple shapes and lines. The bubble diagram helps to visualize the overall layout and identify potential spatial challenges.
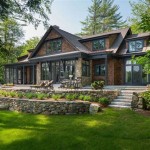
Next, consider the style and aesthetic of the house. This involves researching different architectural styles, gathering inspiration from existing houses, and defining the desired features and finishes. Factors such as the roof type, window styles, exterior cladding, and interior design elements should be considered at this stage. Creating a mood board with images of desired features and finishes can be a helpful way to communicate design preferences.
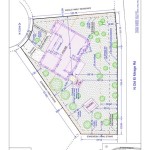
Furthermore, consider the site conditions and any relevant building codes or regulations. The orientation of the house on the site can significantly impact energy efficiency and natural lighting. Building codes dictate specific requirements for structural safety, fire resistance, and accessibility. Ensure compliance with all applicable regulations to avoid costly delays or revisions during the construction process. A preliminary site analysis should be conducted to assess the topography, soil conditions, and any existing utilities or easements.
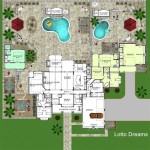
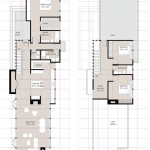
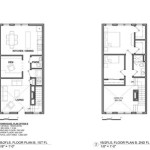
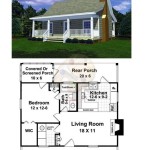
Finally, create a preliminary floor plan based on the bubble diagram, design preferences, and site considerations. This floor plan should include the dimensions of each room, the locations of doors and windows, and the placement of major appliances and fixtures. The preliminary floor plan serves as the foundation for the 3D model.
Step 2: Software Selection and Familiarization
The selection of appropriate 3D modeling software is a critical step in the process. Numerous software options are available, each with its own strengths and weaknesses. Factors such as the user's skill level, budget, and desired level of detail should be considered when making a selection. Some popular options include SketchUp, AutoCAD, Revit, and Chief Architect. Each offers varying levels of complexity and functionality.
SketchUp is a user-friendly option that is popular among beginners. It offers a relatively shallow learning curve and a large library of pre-made 3D models. SketchUp is suitable for creating conceptual designs and visualizing the overall layout of the house. However, it may not be the best choice for generating detailed construction documents.
AutoCAD is a more professional-grade software that is widely used by architects and engineers. It offers a high degree of precision and control, allowing for the creation of detailed 2D drawings and 3D models. AutoCAD requires a steeper learning curve than SketchUp, but it provides greater flexibility and functionality.
Revit is a Building Information Modeling (BIM) software that is specifically designed for architectural and construction projects. It allows users to create intelligent 3D models that contain information about the building's components, such as materials, costs, and performance characteristics. Revit is a powerful tool for managing complex projects, but it requires significant training and expertise.
Chief Architect is another popular software option that is specifically designed for residential design. It offers a user-friendly interface and a wide range of features for creating floor plans, elevations, and 3D renderings. Chief Architect is a good choice for designers who want to create professional-looking house plans without the complexity of more advanced software.
Once the software has been selected, it is essential to familiarize the functions and tools. Most software programs offer tutorials, documentation, and online support to help users get started. Experiment with different features and practice creating simple models to develop proficiency. Understanding the user interface and basic modeling techniques is essential for creating accurate and efficient 3D house plans.
Step 3: Creating the 3D Model
The process of creating the 3D model involves translating the 2D floor plan into a three-dimensional representation. This typically involves using the software's drawing tools to create the walls, floors, and roof of the house. The dimensions and locations of doors, windows, and other architectural features should be accurately reflected in the model.
Begin by creating the basic structure of the house. This involves drawing the exterior walls and interior partitions to define the rooms and spaces. Ensure that the walls are properly aligned and that the dimensions are accurate. Use the software's extrusion tools to create the height of the walls.
Next, add the doors and windows. Most software programs offer a library of pre-made door and window models that can be easily inserted into the walls. Customize the sizes, styles, and locations of the doors and windows to match the design specifications. Consider the placement of windows in relation to natural light and ventilation which help create more accurate models.
The roof is a critical element of the house and should be modeled carefully. Different roof styles, such as gable, hip, and shed roofs, require different modeling techniques. Consult the software's documentation or online tutorials for guidance. Ensure that the roof is properly aligned with the walls and that the overhangs are correctly sized.
Once the basic structure is in place, add interior details such as stairs, fireplaces, and built-in cabinets. These features enhance the realism of the model and provide a more accurate representation of the final design. Use the software's modeling tools to create these features or import pre-made models from online libraries.
Consider the use of layers or groups to organize the model and make it easier to manage. Layers allow for the selective display or hiding of different elements, such as walls, furniture, and fixtures. Grouping related objects together makes it easier to move, copy, or modify them.
Step 4: Adding Materials and Textures
Adding materials and textures to the 3D model significantly enhances its visual appeal and realism. This involves assigning different materials, such as brick, wood, and concrete, to the various surfaces of the house. The software typically offers a library of pre-made materials, or users can create their own custom materials.
Select appropriate materials for the exterior of the house. Consider the architectural style and the desired aesthetic when choosing materials for the walls, roof, and trim. Ensure that the colors and textures of the materials are harmonious and that they complement the surrounding environment.
Apply materials to the interior surfaces of the house. Consider the function and style of each room when selecting materials for the walls, floors, and ceilings. Use different materials to create visual interest and to define different zones within the house.
Adjust the textures of the materials to create a realistic appearance. The software typically allows for the adjustment of parameters such as scale, rotation, and tiling. Experiment with different settings to achieve the desired effect.
Consider adding bump maps or normal maps to the materials to create the illusion of surface detail. Bump maps are grayscale images that represent the height variations of a surface. Normal maps are color images that represent the surface normals. Both bump maps and normal maps can significantly enhance the realism of the materials.
Step 5: Adding Furniture and Fixtures
Adding furniture and fixtures to the 3D model helps to visualize the interior spaces and to assess the functionality of the layout. The software typically offers a library of pre-made furniture and fixture models, or users can import models from online libraries. Consider the scale and style of the furniture and fixtures when adding them to the model.
Start by placing the major pieces of furniture in each room, such as beds, sofas, and tables. Consider the placement of furniture in relation to doors, windows, and other architectural features. Ensure that there is adequate circulation space around the furniture.
Add smaller items such as lamps, rugs, and artwork to enhance the visual appeal of the rooms. These items can help to create a sense of personality and style.
Place kitchen and bathroom fixtures, such as sinks, toilets, and showers, in the appropriate locations. Ensure that the fixtures are properly sized and that they are compatible with the plumbing connections.
Consider the use of different furniture arrangements to explore different design options. Experiment with different layouts to find the most functional and aesthetically pleasing arrangement.
Step 6: Rendering and Visualization
The final step in creating a 3D house plan is rendering and visualization. Rendering is the process of generating a realistic image of the 3D model. This involves simulating the lighting, shadows, and reflections of the materials.
Adjust the lighting settings to create the desired mood and atmosphere. Experiment with different types of lighting, such as sunlight, ambient light, and spot lights. Consider the color temperature and intensity of the lights.
Adjust the camera angle and perspective to create compelling views of the house. Experiment with different viewpoints to showcase the design features and the overall layout.
Use the software's rendering engine to generate the final images. The rendering process can take several minutes or even hours, depending on the complexity of the model and the desired level of detail.
Post-process the rendered images to enhance their visual appeal. This can involve adjusting the brightness, contrast, and color balance. Use image editing software to add details such as people, plants, and landscaping.
Consider creating a virtual walkthrough of the house. This allows users to explore the interior spaces in a realistic and immersive environment. Virtual walkthroughs can be created using specialized software or by exporting the 3D model to a game engine.

How Do You Make A 3d Floor Plan

What Is 3d Floor Plan How To Make It Benefits Cost

3d Floor Plans

How Much Do 3d House Plans Cost Faqs Answered Cedreo

1000 3d Floor Plans And Home Design Ideas To Build Free Plan House Imagination Shaper

3d Home Design All You Need To Know

Modern 3d House Plan Designs 2024 Interior Decor

How To Take A Virtual Tour Of Your 3d Floor Plan

How To Make A Professional Design 3d Floor Plan In 2024

Benefits Of Using 3d House Floor Plan Design
Related Posts