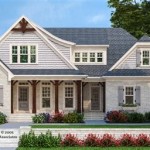
How To Draw a House Plan In 3D
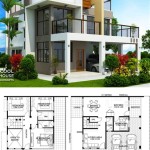
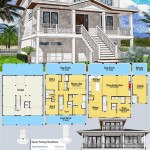
Creating a 3D house plan offers a significant advantage over traditional 2D blueprints. It provides a more intuitive and comprehensive visualization of the intended structure, allowing for better understanding of spatial relationships, design aesthetics, and potential issues before construction begins. This article outlines the process of drawing a house plan in 3D, detailing essential steps and considerations for a successful outcome.
The process can broadly be divided into planning, drafting in 2D, and then converting to 3D. Each stage requires specific software tools and techniques, and careful attention to detail is critical throughout the entire process. Whether using dedicated architectural software or general-purpose 3D modeling programs, a systematic approach will yield the most accurate and useful 3D house plan.
Key Point 1: Preparing the Foundation - Planning and 2D Drafting
Before diving into 3D modeling, the foundation of a good 3D house plan lies in meticulous planning and the creation of a detailed 2D floor plan. This stage involves gathering information about the site, understanding the client's requirements (if applicable), and developing a comprehensive architectural design.
The initial step involves site analysis. This includes understanding the topography of the land, the location of utilities (water, gas, and electricity), and any existing structures or landscaping elements. It’s also vital to consider zoning regulations, building codes, and any restrictions on construction activities.
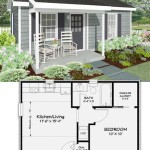
Next is the design stage. This is where the overall layout of the house is determined. This involves creating a bubble diagram to indicate the adjacency of different rooms and activity areas. This initial sketch then evolves into a more detailed floor plan. Considerations at this stage include room sizes, window and door placements, and the overall flow of movement through the house.
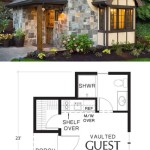
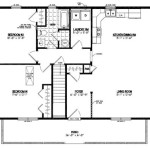
Once the overall design is conceptually finalized, a detailed 2D floor plan is created using Computer-Aided Design (CAD) software. Popular CAD programs include AutoCAD, Revit (for Building Information Modeling or BIM), and DraftSight. These programs allow for precise drawing and dimensioning, essential for accurate construction. The 2D plan should include the following details:
*Exterior walls with accurate thicknesses.
*Interior walls, indicating load-bearing and non-load-bearing walls.
*Door and window openings, including dimensions and swing directions.
*Staircases and ramps, with riser and tread dimensions.
*Plumbing fixtures (toilets, sinks, showers, etc.) with accurate placements.
*Electrical outlets, switches, and lighting fixtures.
*Dimensions of all rooms and spaces. Overall dimensions of the house
*Annotations indicating materials, finishes, and other relevant information.
Accuracy is paramount at this stage. Errors in the 2D plan will propagate into the 3D model, leading to inaccuracies and potentially costly mistakes during construction. Double-check all dimensions and ensure that the plan adheres to all applicable building codes and regulations.
Key Point 2: Building the 3D Model - Extruding the 2D Plan
With a detailed and accurate 2D floor plan in place, the next step is to create the 3D model. This involves extruding the 2D elements to give them height and depth, essentially turning lines into solid objects. Several software options are available for this purpose, each with its own strengths and weaknesses. Some popular options include:
*SketchUp: A user-friendly option known for its intuitive interface and extensive library of pre-made 3D models.
*Revit: A powerful BIM software commonly used by architects and engineers for comprehensive building design and documentation.
*AutoCAD: While primarily a 2D CAD program, AutoCAD also offers 3D modeling capabilities.
*3ds Max: A professional 3D modeling and rendering software often used for creating photorealistic visualizations.
*Blender: A free and open-source 3D creation suite with a steep learning curve but immense capabilities. This is often used by hobbyists or smaller firms.
The selection of the appropriate software depends on the user's experience, the project's complexity, and the desired level of detail and realism.
The process of building the 3D model typically involves these steps:
- Importing the 2D Plan: The 2D floor plan created in CAD software is imported into the 3D modeling program. Many programs support common file formats such as DWG or DXF.
- Extruding Walls: The lines representing walls are extruded vertically to the desired wall height. This creates the basic structure of the house. Wall heights should be determined based on building codes, ceiling heights, and architectural design considerations.
- Creating Openings: Openings for doors and windows are created by subtracting volumes from the walls where these elements will be located. This can be done using Boolean operations or other modeling techniques depending on the chosen software.
- Adding Doors and Windows: 3D models of doors and windows are inserted into the openings. These models can be created manually or imported from online libraries. Ensure the doors and windows chosen fit the style and scale of the building.
- Modeling the Roof: The roof is modeled separately, taking into account the desired roof pitch, overhangs, and material. Roof modeling can be complex, requiring knowledge of different roof types and construction techniques.
- Adding Interior Details: Once the basic structure is in place, interior details such as floors, ceilings, stairs, and fixtures can be added. This involves creating or importing 3D models of these elements and positioning them accurately within the house.
- Applying Materials and Textures: Materials and textures are applied to the surfaces of the 3D model to give it a realistic appearance. This involves selecting appropriate materials for walls, floors, roofs, and other elements. Most software packages come with libraries of materials, or one can import textures from external sources.
Throughout the modeling process, it’s crucial to maintain accuracy and attention to detail. Use precise measurements and ensure that all elements are properly aligned and connected. Regular checks and adjustments are necessary to prevent errors and ensure a high-quality 3D model.
Key Point 3: Enhancing the 3D Model - Visualization and Presentation
Once the 3D model is complete, the final step is to enhance it for visualization and presentation. This involves adding lighting, camera angles, and rendering effects to create realistic and visually appealing images or animations. The goal is to present the house plan in a way that effectively communicates the design to clients, contractors, or other stakeholders.
Lighting plays a crucial role in the overall look and feel of the 3D model. Different types of lighting can be used to create different effects, such as sunlight, artificial light, or ambient light. Careful placement of lights can highlight architectural features, create depth, and enhance the realism of the model.
Camera angles are equally important. Choosing the right camera angles can showcase the most important aspects of the design and provide different perspectives of the house. Wide-angle shots can capture the overall layout of the house, while close-up shots can highlight specific details. Interior shots can show the spatial relationships and functionality of the rooms.
Rendering is the process of generating a realistic image or animation from the 3D model. This involves calculating how light interacts with the surfaces of the model and creating a final image that accurately represents the appearance of the house. Different rendering engines are available, each with its own algorithms and capabilities. Some rendering engines prioritize speed, while others prioritize realism. Some popular rendering engines include:
*V-Ray: A widely used rendering engine known for its photorealistic results.
*Enscape: A real-time rendering engine that allows for interactive walkthroughs of the 3D model.
*Lumion: Another real-time rendering engine that offers a wide range of visual effects and content libraries.
*Blender Cycles: The ray-tracing render engine built into Blender.
The rendering process can be time-consuming, depending on the complexity of the model and the desired quality of the image. However, the results can be impressive, providing a realistic and compelling visualization of the house plan.
In addition to static images, 3D models can also be used to create animations or virtual tours. This allows viewers to explore the house in an interactive and immersive way. Animations can be used to showcase the flow of movement through the house, while virtual tours can allow viewers to walk through the rooms and experience the space from different perspectives.
Ultimately, the visualization and presentation stage is about effectively communicating the design intent and creating a compelling representation of the house plan. By carefully considering lighting, camera angles, rendering effects, and animation, it's possible to create a 3D model that is both visually appealing and informative.

How Much Do 3d House Plans Cost Faqs Answered Cedreo

How To Draw A Floor Plan Live Home 3d

Create 3d Floor Plans With Roomsketcher

Create 3d Floor Plans With Roomsketcher

How To Draw A Floor Plan Live Home 3d

How Do You Make A 3d Floor Plan

Benefits Of Using 3d House Floor Plan Design

Create 3d Floor Plans With Roomsketcher

What Is 3d Floor Plan How To Make It Benefits Cost

How Much Do 3d House Plans Cost Faqs Answered Cedreo
Related Posts