Simple 2D Plan Drawing With Dimensions: A Comprehensive Guide
Creating a simple 2D plan drawing with dimensions is a fundamental skill for anyone involved in architecture, engineering, construction, interior design, and even DIY home improvement projects. It provides a clear and concise visual representation of a space or object, along with precise measurements, allowing for accurate planning and execution. This article will detail the process of creating such drawings, emphasizing the importance of accuracy, clarity, and the correct application of dimensioning techniques.
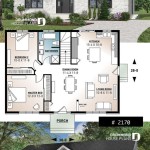
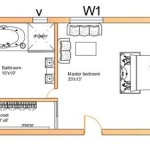
A 2D plan drawing, often referred to as a floor plan or a layout, is a scaled representation of a structure or object, viewed from above. It typically includes walls, doors, windows, and major fixtures. The addition of dimensions transforms this basic outline into a powerful communication tool, conveying the exact sizes and positions of each element. This ensures that all parties involved in a project have a shared understanding of the design, minimizing errors and rework downstream.
Before starting a drawing, it's crucial to gather accurate measurements. This can be done using a variety of tools, including measuring tapes, laser distance measurers, and even digital measuring apps on smartphones. The choice of tool depends on the size and complexity of the space, as well as the required level of precision. Regardless of the chosen method, it's imperative to double-check all measurements to avoid costly mistakes later.
Once the measurements are obtained, the next step is to select a suitable drawing medium. Traditionally, this involved using drafting tools such as pencils, rulers, and compasses on paper. However, modern technology has made Computer-Aided Design (CAD) software the preferred choice for most professionals. CAD software offers numerous advantages, including accuracy, ease of editing, and the ability to create multiple versions of a design. Even for simple plans, CAD can be beneficial.
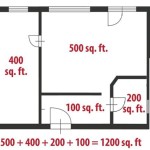
When using CAD software, it is essential to set up the drawing environment correctly. This includes selecting the correct units of measurement (e.g., feet, inches, meters, millimeters) and setting the appropriate scale. The scale determines the relationship between the drawing and the real-world object. For example, a scale of 1:100 means that 1 unit on the drawing represents 100 units in reality. Choosing the right scale is crucial for ensuring that the drawing is both legible and accurate.
The process of creating the 2D plan typically involves drawing the outer walls first, followed by interior walls, doors, and windows. Consistent line weights should be used to differentiate between different elements. For instance, thicker lines might be used for exterior walls, while thinner lines are used for interior walls and fixtures. This helps to visually distinguish different features and improve the overall clarity of the drawing.
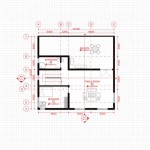
Once the basic layout is complete, the next step is to add dimensions. Dimensions are essential for communicating the size and position of each element in the drawing. There are several different types of dimensions that can be used, including linear dimensions, angular dimensions, and radial dimensions. Linear dimensions are used to measure the distance between two points, angular dimensions are used to measure angles, and radial dimensions are used to measure the radius of circles and arcs.
When adding dimensions, it's important to follow certain conventions to ensure clarity and readability. Dimensions should be placed outside the object being dimensioned, and they should be aligned with the feature they are measuring. Extension lines should be used to connect the dimension line to the feature being measured. The dimension text should be clear and legible, and it should be placed above the dimension line.
Furthermore, it's crucial to avoid over-dimensioning the drawing. Every feature needs to be dimensioned, but redundancy should be avoided. Too many dimensions can clutter the drawing and make it difficult to understand. The goal is to provide enough information to accurately define the object without overwhelming the viewer.
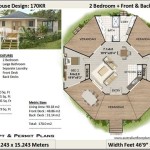
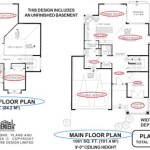
In addition to dimensions, other annotations can be added to the drawing to provide further information. These annotations might include text labels, notes, symbols, and hatching. Text labels can be used to identify different rooms or features, while notes can be used to provide additional details or instructions. Symbols can be used to represent standard elements, such as plumbing fixtures or electrical outlets. Hatching can be used to indicate different materials or finishes.
The final step is to review the drawing carefully to ensure that it is accurate and complete. All dimensions should be checked against the original measurements, and all annotations should be reviewed for clarity and correctness. It's also helpful to have someone else review the drawing to catch any errors or omissions that might have been overlooked.
Key Point 1: Accuracy is Paramount
The accuracy of a 2D plan drawing with dimensions is the foundation for a successful project. Inaccurate measurements or incorrectly placed dimensions can lead to significant errors during construction or manufacturing. This can result in wasted materials, delays, and increased costs. Ensuring accuracy requires careful attention to detail throughout the entire process, from initial measurements to final review. Employing tools like laser measuring devices and double-checking all figures are crucial habits. The choice of CAD software aids in precision, but the user must still input the correct data. Discrepancies, even small ones, can accumulate and create large problems down the line. Therefore, verifying all dimensions against the original measurements and having a second pair of eyes review the drawing are essential steps in the process.
Key Point 2: Clarity and Readability
A 2D plan drawing serves as a communication tool, and its effectiveness depends on its clarity and readability. A cluttered or poorly organized drawing can be difficult to understand, leading to confusion and misinterpretation. To ensure clarity, use consistent line weights to differentiate between different elements, such as walls, doors, and windows. Place dimensions outside the object being dimensioned and align them with the feature they are measuring. Avoid over-dimensioning the drawing, as this can make it difficult to read. Use clear and legible text for labels and notes. Organize the information logically and strategically to guide the viewer's eye through the drawing. Adhering to standard drafting conventions can further enhance readability, as it ensures that the drawing conforms to established norms and expectations.
Key Point 3: Dimensioning Techniques and Conventions
The correct application of dimensioning techniques is crucial for creating an effective 2D plan drawing. Dimensions must not only be accurate, but they must also be placed in a way that is clear and unambiguous. Use extension lines to connect the dimension line to the feature being measured. Place the dimension text above the dimension line and ensure that it is legible. Choose the appropriate type of dimension for the feature being measured (e.g., linear, angular, radial). Avoid crossing dimension lines or extension lines, as this can make the drawing difficult to read. Use a consistent dimensioning style throughout the drawing. Consider using chain dimensioning or baseline dimensioning to efficiently dimension a series of features. Properly applied dimensioning techniques contribute significantly to the overall clarity and usability of the plan.
The use of layers in CAD software is another powerful tool for improving the clarity and organization of a 2D plan drawing. Layers allow different elements of the drawing to be grouped together and displayed or hidden as needed. For example, walls, doors, windows, dimensions, and annotations can each be placed on separate layers. This makes it easier to edit and manage the drawing, as well as to create different views or variations of the plan. Layers can also be used to control the line weight and color of different elements, further enhancing the clarity of the drawing.
Finally, it is important to remember that a 2D plan drawing is just one part of a larger design process. It should be used in conjunction with other drawings, specifications, and documents to provide a complete and comprehensive representation of the design. Effective communication between all parties involved in the project is essential for ensuring that the design is accurately implemented and that any potential problems are identified and resolved early on. Creating a simple 2D plan drawing with dimensions is not just about drawing lines and adding numbers; it's about communicating ideas and ensuring that everyone is on the same page.

Create Professional 2d Floor Plans Roomsketcher

2d Floor Plans Plan Design Home Small Kitchen

Draw 2d Floor Plans In Minutes Not Hours Cedreo

Create Professional 2d Floor Plans Roomsketcher

2d Drawing Gallery Floor Plans House

Create Professional 2d Floor Plans Roomsketcher

House Plan Drawing Samples 2d Drawings

House Planing 30 X Plan 2d Autocad Simple Plans How To

Draw 2d Floor Plans In Minutes Not Hours Cedreo

12 Examples Of Floor Plans With Dimensions
Related Posts