The Essential Guide to Properly Dimensioning a Floor Plan
Dimensioning a floor plan is a crucial step in the architectural design process, ensuring accurate representation of the space and facilitating smooth construction. Proper dimensioning involves clearly indicating the measurements of walls, doors, windows, and other features within the plan.
1. Determine the Scale: Before dimensioning, establish the scale of the floor plan. Common scales include 1/4"=1'-0", 1/8"=1'-0", and 1/16"=1'-0". Ensure consistency throughout the plan for accurate measurements.
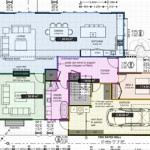
2. Dimension Exterior Walls: Start by dimensioning exterior walls. Measure and mark the length of each wall from the outside face. Include overall lengths as well as shorter segments created by windows, doors, or other openings.
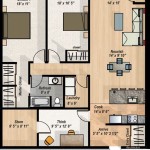
3. Dimension Interior Walls: Dimension interior walls in the same manner as exterior walls. Measure from the corner of the room or intersection of walls along the length of each wall. Avoid over-dimensioning by measuring only necessary segments.
4. Dimension Doors and Windows: For doors and windows, indicate both the width and height. Measure the width of the opening, and the height from the top of the opening to the finished floor. Consider any obstructions, such as trim or jambs, when determining the actual opening size.
5. Dimension Fixed Features: Dimension fixed features such as fireplaces, built-in cabinets, or appliances. Measure and indicate the length, width, and height to provide a clear understanding of their location and size.
6. Dimension Structural Elements: Dimension structural elements like beams, columns, and load-bearing walls. This information is crucial for engineers to determine the load-carrying capacity of the structure.
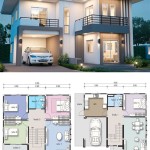
7. Add Overall Dimensions: Include overall dimensions for the entire floor plan. Mark the length and width of the building, as well as the overall height from the finished floor to the top of the roof.
8. Use Proper Units: Use standard units of measurement (e.g., feet and inches) throughout the floor plan. Consistency ensures clarity and avoids confusion.
9. Dimension Extensions: If the plan includes extensions or projections, dimension them separately. Measure and indicate the length, width, and height of each extension.
10. Employ Precision: Ensure precision when measuring and dimensioning. Use appropriate measuring tools and mark measurements accurately to the nearest fraction of an inch.
11. Label Dimensions: Label all dimensions clearly and legibly. Use arrows or leaders to indicate the specific feature being measured. Avoid placing dimensions directly on walls or other features, as they may obscure important details.
12. Check and Review: Once the floor plan is dimensioned, thoroughly check and review the measurements to ensure accuracy. Consider using a different color or font for dimensions to make them stand out from other annotations.
Properly dimensioning a floor plan is not only important for accuracy but also for facilitating seamless communication between architects, engineers, contractors, and other stakeholders involved in the building process. By adhering to these essential aspects, you can create clear and precise floor plans that ensure the successful execution of construction projects.

How To Read A Floor Plan With Dimensions Houseplans Blog Com

How To Properly Read Floor Plans And What Details Look For

Dimensioning Rules For Architectural Floor Plans By Joe Caruso On Prezi Next

Adding Dimensions To Your Floor Plan

How To Read A Floor Plan With Dimensions Houseplans Blog Com

Meaning Of Layout Corner Bar Sketchup Community

12 Examples Of Floor Plans With Dimensions

Floor Plans With Dimensions Including Examples Cedreo

How To Read Floor Plans With Dimensions A Guide

Floor Plans
Related Posts