How To Make A Floor Plan of Your Home
Creating a floor plan of a home is a valuable undertaking for homeowners, real estate professionals, and interior designers. A detailed floor plan provides a visual representation of a property's layout, dimensions, and features. It can be used for a multitude of purposes, including space planning, remodeling projects, furniture arrangement, and real estate marketing. This guide outlines the necessary steps to create an accurate and informative floor plan.
Before embarking on the process of creating a floor plan, it is essential to gather the necessary equipment and materials. Accuracy is paramount, so investing in quality tools is a worthwhile consideration. Essential equipment includes a measuring tape (preferably a long one, exceeding the longest dimension of any room), a laser distance measurer (optional, but highly recommended for accuracy and efficiency), graph paper (or architectural paper), pencils (with erasers), a straight edge or ruler, a clipboard, and a digital camera or smartphone for taking reference photographs.
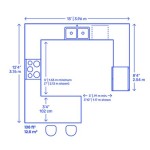
The initial step involves accurately measuring the dimensions of each room within the home. Start with the exterior walls, then proceed to interior walls. Measure each wall segment individually, noting the placement of doors, windows, fireplaces, and other fixed elements. Consistency in measurement units is crucial; choose either feet and inches or metric units (meters and centimeters) and adhere to that standard throughout the entire process. Document all measurements meticulously on the graph paper.
When measuring, pay close attention to angles and irregular shapes. If a room is not perfectly rectangular, divide it into simpler geometric shapes (squares, rectangles, triangles) to measure each section separately. Note the angles of any non-perpendicular walls. Also, measure the thickness of each wall, including both interior and exterior walls. This information is vital for accurate representation on the floor plan.
Photographs serve as invaluable references throughout the floor plan creation process. Take pictures of each room from multiple angles, capturing details such as window and door placements, electrical outlets, light fixtures, and any architectural features. These photographs can help resolve ambiguities encountered during the drawing phase and ensure an accurate representation of the space.
After gathering all the measurements and photographs, the next step is to begin sketching the floor plan on the graph paper. Choose an appropriate scale for the drawing. Common scales for residential floor plans include 1/4 inch = 1 foot or 1/8 inch = 1 foot. A larger scale provides more detail, while a smaller scale is useful for representing larger properties on a single sheet of paper. Maintaining consistency with the chosen scale is paramount.
Begin by drawing the exterior walls of the house, using the recorded measurements. Ensure that the angles of the walls are accurately represented. Then, add the interior walls, following the same principles of accuracy and scale. Pay close attention to the placement of doors and windows, accurately representing their size and location within the walls. Use the reference photographs to verify the placement of these elements.
As the floor plan takes shape, add details such as the swing direction of doors, the placement of electrical outlets and light switches, and the location of plumbing fixtures. Indicate the presence of any built-in cabinets, closets, or shelving units. These details enhance the usefulness and accuracy of the floor plan.
The drawing process may reveal discrepancies or inconsistencies in the measurements. It is essential to revisit the actual space and re-measure any questionable dimensions. This iterative process of measuring, drawing, and verifying ensures the highest possible accuracy in the final floor plan.
Once the initial drawing is complete, review it thoroughly for errors or omissions. Compare the drawing to the reference photographs and the original measurements. Make any necessary corrections or additions. This final review stage is crucial for ensuring the accuracy and completeness of the floor plan.
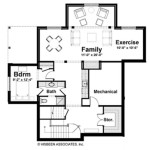
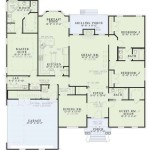
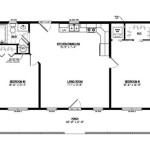
The floor plan can be enhanced with additional features such as furniture layouts, material indications, and room labels. Furniture layouts provide a visual representation of how furniture can be arranged within the space, which is particularly useful for interior design projects. Indicating flooring materials (e.g., hardwood, carpet, tile) and wall finishes (e.g., paint, wallpaper) adds further detail to the plan. Labeling each room with its intended function (e.g., living room, kitchen, bedroom) provides clarity and facilitates understanding of the floor plan.
While manual drafting is a viable option, digital floor plan software offers significant advantages in terms of accuracy, efficiency, and flexibility. Numerous software options are available, ranging from free online tools to professional-grade CAD (Computer-Aided Design) programs. Digital tools simplify the process of creating and modifying floor plans, allowing for precise measurements, automatic calculations, and easy sharing of the final product.
To create a floor plan using digital software, import the hand-drawn sketch or measurements into the program. Use the software's drawing tools to recreate the floor plan digitally, following the same principles of accuracy and scale as with manual drafting. Digital software allows for precise adjustments and revisions, making it easier to correct errors and refine the design. Many programs also offer features such as automated dimensioning, 3D modeling, and virtual tours.
Regardless of whether the floor plan is created manually or digitally, it is essential to maintain a well-organized and clearly labeled drawing. Use consistent line weights and symbols to represent different elements, such as walls, doors, and windows. Label all rooms and architectural features clearly and concisely. A well-organized floor plan is easier to understand and use for various purposes. The completed floor plan represents a valuable document for homeowners, real estate professionals, and interior designers.
Key Points for Creating an Accurate Floor Plan
The creation of a detailed and accurate floor plan requires meticulous attention to detail and adherence to established best practices. The following key points emphasize the most critical aspects of the process.
Accurate Measurement Techniques
The foundation of any successful floor plan lies in the accuracy of the initial measurements. Inaccurate measurements will propagate throughout the entire drawing, leading to a distorted and unreliable representation of the space. To ensure accurate measurements, employ the following techniques:
- Use a quality measuring tape: Opt for a measuring tape that is in good condition and has clear, easily readable markings. A long measuring tape (e.g., 25 feet or longer) is recommended for measuring larger rooms and longer wall segments.
- Consider a laser distance measurer: A laser distance measurer offers superior accuracy and efficiency compared to traditional measuring tapes. These devices use a laser beam to measure distances quickly and accurately, eliminating the need for manual alignment and minimizing the risk of human error.
- Measure wall segments individually: Avoid measuring entire walls at once. Instead, break down each wall into smaller segments, such as the distance between corners, windows, and doors. This approach allows for greater precision and reduces the accumulation of errors.
- Measure wall thickness: Accurately measure the thickness of both interior and exterior walls. This information is essential for representing the true dimensions of the rooms and the overall layout of the house.
- Double-check measurements: After measuring each room, double-check the measurements to ensure accuracy. If any discrepancies are found, re-measure the affected areas to resolve the inconsistencies.
- Measure to the inside face of walls: For interior dimensions, measure from the inside face of one wall to the inside face of the opposite wall. This provides the usable floor space within the room.
Consistent Scale and Representation
Maintaining a consistent scale throughout the floor plan is crucial for accurate representation. The scale determines the relationship between the dimensions on the drawing and the actual dimensions of the space. Inconsistent scaling will result in a distorted floor plan that is misleading and difficult to use. To ensure consistent scale and representation, adhere to the following guidelines:
- Choose an appropriate scale: Select a scale that is appropriate for the size of the house and the level of detail required. Common scales for residential floor plans include 1/4 inch = 1 foot or 1/8 inch = 1 foot.
- Maintain consistent scaling: Once a scale is chosen, maintain it consistently throughout the entire drawing. Use a ruler or scale to accurately represent the dimensions of all elements on the floor plan.
- Use standardized symbols: Employ standardized symbols to represent different elements, such as doors, windows, plumbing fixtures, and electrical outlets. This ensures that the floor plan is easily understood by others.
- Label all dimensions clearly: Label all dimensions clearly and accurately, using the chosen unit of measurement (e.g., feet and inches or meters and centimeters).
- Indicate wall thickness: Clearly indicate the thickness of all walls on the floor plan.
- Note door swing direction: Indicate the direction in which each door swings open. This is important for space planning and furniture arrangement.
Thorough Documentation and Verification
Thorough documentation and verification are essential for ensuring the accuracy and completeness of the floor plan. The documentation should include all measurements, photographs, and notes taken during the measurement process. The verification process involves comparing the drawing to the documentation and the actual space to identify and correct any errors or omissions. To ensure thorough documentation and verification, follow these steps:
- Take detailed photographs: Take photographs of each room from multiple angles, capturing details such as window and door placements, electrical outlets, light fixtures, and architectural features.
- Document all measurements: Record all measurements accurately and legibly on the graph paper or in a digital document.
- Note any irregularities: Document any irregularities in the shape of the rooms or the placement of architectural features.
- Compare the drawing to the documentation: After completing the initial drawing, compare it to the documentation to ensure that all measurements and details are accurately represented.
- Verify the drawing against the actual space: Walk through the house with the drawing and verify that it accurately reflects the actual space.
- Correct any errors or omissions: If any errors or omissions are found, correct them immediately.
- Seek a second opinion: Ask someone else to review the floor plan for accuracy and completeness. A fresh pair of eyes can often catch errors that were missed during the initial review.

Floor Plans Learn How To Design And Plan

House Plans How To Design Your Home Plan

Create Floor Plan

House Plans How To Design Your Home Plan

House Plans How To Design Your Home Plan

Tips For Selecting The Right Floor Plan Your Home Sater Design Collection

Draw Floor Plans Try Smartdraw Free And Easily More

Design Your Own Home House Designing Homes

House Plans How To Design Your Home Plan

Make Your Own Blueprint How To Draw Floor Plans
Related Posts