How To Make a Floor Plan of Your House
Creating a floor plan of a house is a fundamental step in various processes, ranging from interior design and renovation projects to real estate transactions and emergency planning. A well-constructed floor plan serves as a visual representation of a building's layout, illustrating the dimensions of rooms, the placement of walls, windows, doors, and other structural elements. The following sections outline the steps involved in creating an accurate and useful floor plan.
Gathering Necessary Tools and Materials
The initial stage of creating a floor plan involves collecting the appropriate tools and materials. The selection of these items influences the accuracy and efficiency of the process. The tools can be broadly categorized into measuring devices, drawing implements, and software applications.
A primary measuring device is a measuring tape, preferably a long one (25 feet or more) for larger rooms and distances. Laser distance measurers offer greater convenience and accuracy, particularly in expansive spaces. These devices project a laser beam onto a surface and instantly calculate the distance, minimizing the potential for human error.
For drawing, graph paper is highly recommended. Its grid lines provide a framework for maintaining proportions and simplifying the sketching process. Alternatively, plain paper can be used, but requires more attention to detail in maintaining scale. A sharp pencil, preferably a mechanical pencil with a fine lead, is essential for creating clear, precise lines. An eraser is crucial for correcting mistakes and refining the drawing.
For those who prefer a digital approach, various software applications are available for creating floor plans. These programs range from basic online tools to sophisticated computer-aided design (CAD) software. CAD software offers the highest level of precision and functionality, allowing for the creation of detailed and professional-looking floor plans. Popular software options include AutoCAD, SketchUp, and various free online floor plan creators. These applications often incorporate features such as automatic dimensioning, 3D modeling, and the ability to import and export files in various formats.
Other helpful items include a clipboard for holding paper, a notebook for jotting down measurements and notes, and a camera for photographing the space for reference.
Measuring the Space
Accurate measurements are the cornerstone of a reliable floor plan. The process begins with establishing a systematic approach to ensure all dimensions are captured comprehensively. Starting at a designated point, such as a corner of the house, proceed around the perimeter of each room, measuring the length of each wall.
Measure each wall at its base and again at roughly chest height to account for variations in wall thickness or irregularities. It is important to note any protrusions or recesses in the walls, such as fireplaces, built-in shelves, or alcoves. These features should be individually measured and accurately positioned on the floor plan.
Measure the width and height of all doors and windows. Also, record the distance from the corner of the wall to the edge of each door and window. This information is critical for accurately placing these elements on the floor plan. Note the direction in which each door swings, as this is an important detail for understanding the flow of movement within the space.
Pay close attention to the thickness of the walls, both interior and exterior. This measurement is essential for correctly representing the overall dimensions of the house and the relationship between rooms. Measure the thickness of walls at doorways or windows, where the construction is typically exposed.
In rooms with irregular shapes or angled walls, divide the space into smaller, more manageable sections. Measure the length of each segment and the angles between the walls. Triangulation can be helpful in accurately capturing the shape of irregularly shaped rooms. This involves measuring the distance between three known points, creating a triangle that defines the shape.
Ensure all measurements are recorded in a consistent unit, such as feet and inches or meters and centimeters. Consistency is paramount to avoid errors when transferring the measurements to the floor plan.
For multi-story houses, repeat the measuring process for each floor. Take note of the location of staircases and elevators, and measure their dimensions and placement accurately.
Creating the Floor Plan Drawing
With all the necessary measurements collected, the next step is to translate them into a visual representation – the floor plan drawing. This can be done manually using graph paper or digitally using floor plan software.
If using graph paper, choose an appropriate scale for the drawing. The scale should be large enough to accommodate all the details but small enough to fit on the paper. A common scale is ¼ inch = 1 foot, meaning that every ¼ inch on the paper represents 1 foot in the actual space. Write the scale clearly on the floor plan for reference.
Begin by drawing the exterior walls of the house. Use the measurements taken to accurately represent the length and shape of each wall segment. Pay attention to the thickness of the walls and represent them accurately on the drawing.
Next, draw the interior walls, using the measurements to position them correctly relative to the exterior walls and to each other. Ensure that the wall thicknesses are consistent and accurately depicted.
Add the doors and windows. Use the measurements taken to position them accurately on the walls. Draw the doors as arcs to indicate the direction in which they swing. Use standard symbols to represent windows and doors, ensuring consistency throughout the floor plan.
Indicate the location of other fixed elements in the house, such as fireplaces, built-in shelves, and staircases. Use appropriate symbols to represent these features. For example, a rectangle can represent a fireplace, and a series of parallel lines can represent a staircase.
If using floor plan software, create a new project and set the scale. The software typically provides tools for drawing walls, doors, windows, and other architectural features. Enter the measurements taken to accurately position these elements on the floor plan. The software will often automatically calculate the dimensions and areas of rooms, which can be helpful for planning and design purposes.
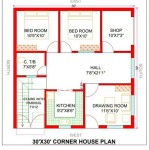
Label each room clearly with its name, such as "Living Room," "Kitchen," or "Bedroom." Add dimensions to the floor plan, indicating the length and width of each room and the overall dimensions of the house. Double-check all measurements and dimensions to ensure accuracy.
Consider adding other details to the floor plan, such as the location of electrical outlets, light switches, and plumbing fixtures. These details can be helpful for planning electrical and plumbing work.
Verification and Refinement
Once the initial floor plan is complete, it is crucial to verify its accuracy and refine any discrepancies. This process involves revisiting the physical space and comparing the floor plan to the actual layout of the house.
Walk through each room with the floor plan in hand, checking the dimensions and placement of walls, doors, windows, and other features. Use a measuring tape to verify critical measurements and identify any errors or omissions.
Pay particular attention to areas where the measurements were difficult to obtain or where the shape of the room is irregular. These are the areas where errors are most likely to occur.
If any discrepancies are found, correct them on the floor plan. Ensure that all measurements and dimensions are accurate and consistent throughout the drawing.
Once the floor plan has been verified and refined, it is ready for use in various applications, such as interior design, renovation planning, or real estate marketing. A well-constructed and accurate floor plan is a valuable asset for any homeowner, architect, or designer.
In the context of real estate, a clear and accurate floor plan can significantly enhance the appeal of a property listing. Potential buyers can visualize the layout of the house and assess whether it meets their needs and preferences. A floor plan can also help buyers plan their furniture placement and imagine themselves living in the space.
For renovation projects, a floor plan serves as a blueprint for contractors and designers. It provides a clear understanding of the existing layout and the proposed changes. A detailed floor plan can help avoid costly mistakes and ensure that the renovation project is completed to the desired specifications.
In emergency situations, a floor plan can be a valuable tool for first responders. It provides a quick overview of the building's layout, allowing them to plan their approach and locate occupants more efficiently.

Create And Visualize House Plans In Minutes Roomsketcher

Create Floor Plan

Make Your Own Blueprint How To Draw Floor Plans

How To Design A House From Sketch Reality

Design Your Own House Floor Plans Roomsketcher

Tips For Selecting The Right Floor Plan Your Home Sater Design Collection

How To Draw Blueprints For A House With Pictures Wikihow

How To Make Floor Plan Naksha Dekho

Free Floor Plan Creator Design 2d 3d Layouts Easily

How To Make A Floor Plan House Of Quality Matrix Icons Black Transpa
Related Posts