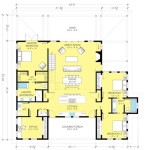
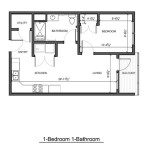
How To Draw A Floor Plan: A Comprehensive Guide
Creating a floor plan is a fundamental skill for architects, interior designers, real estate professionals, and even homeowners planning renovations. A floor plan is a scaled diagram that represents the arrangement of rooms and other features within a building, viewed from above. It provides a clear visual understanding of the space, including dimensions, wall locations, doorways, windows, and built-in fixtures. This article provides a step-by-step guide on how to draw a floor plan accurately and effectively.
Before embarking on the drawing process, it is crucial to understand the basic tools, conventions, and principles involved. Accuracy is paramount, as discrepancies can lead to costly errors during construction or renovation. This guide will cover both manual and digital techniques, offering a comprehensive overview for various skill levels.
1. Gathering Information and Measurement
The first and most crucial step in drawing a floor plan is gathering accurate measurements of the space. This involves meticulous attention to detail and the use of appropriate measuring tools. Inaccurate measurements will inevitably result in a flawed floor plan, rendering it useless for its intended purpose.
Tools Required:
- Measuring Tape: A long, durable measuring tape is essential for measuring distances between walls, room dimensions, and placement of features like doors and windows. A laser measuring tool can also be used for increased accuracy and efficiency, especially in larger spaces.
- Pencil and Paper: For sketching a rough outline of the space and recording measurements. A clipboard can be helpful for stability.
- Level: To ensure walls and features are plumb, which is important for accurate representation.
- Straight Edge or Ruler: For drawing straight lines and ensuring accuracy in the initial sketch.
- Note Taking System: A structured method for recording measurements is essential. This could involve a pre-printed template or a well-organized notebook.
Measurement Process:
Begin by creating a rough sketch of the space. This does not need to be perfectly to scale at this stage, but it should accurately represent the layout of the rooms and the positions of walls, doors, windows, and built-in features like fireplaces or cabinets. Label each room clearly.
Starting at one corner of the building or room, measure the length of each wall. Record the measurement on your sketch, noting which wall it corresponds to. Pay close attention to detail, ensuring that you measure to the inside face of each wall. Consistency in measurement points is critical for accuracy.
Next, measure the width of each room. Again, record these measurements carefully on your sketch. Ensure that you are measuring perpendicular to the walls for accurate readings.
Measure the dimensions of all doors and windows, including their height, width, and the distance from the nearest corner or wall. Note the direction in which doors swing open (right-hand or left-hand) as this is important for space planning.
For built-in features like fireplaces, cabinets, or appliances, measure their dimensions and their location relative to the walls. These features are crucial for accurately depicting the useable space within the rooms.
Measure the thickness of the walls. This is often overlooked but is essential for creating an accurate representation of the overall dimensions of the building. Measure exterior walls as well as interior walls, as their thicknesses may differ.
Finally, double-check all measurements to ensure accuracy. It is advisable to walk through the space again, verifying each measurement against your sketch. Any discrepancies should be investigated and corrected immediately.
2. Choosing a Scale and Creating the Basic Outline
Once you have gathered accurate measurements, the next step is to choose an appropriate scale for your floor plan. The scale represents the ratio between the dimensions on the drawing and the actual dimensions of the building. Selecting the correct scale is vital for ensuring that the floor plan fits on the paper or digital canvas and that it is easy to read and understand.
Scale Selection:
The appropriate scale depends on the size of the building and the level of detail required. Common scales used for floor plans include:
- 1/4 inch = 1 foot (1:48): This scale is frequently used for residential floor plans as it provides a good balance between detail and overall size.
- 1/8 inch = 1 foot (1:96): This scale is suitable for larger buildings or when a less detailed representation is sufficient.
- 1/2 inch = 1 foot (1:24): This scale is used when a high level of detail is required, such as for interior design plans or for representing complex architectural features.
Select the scale that best suits the size of the building and the level of detail you need to show. Make sure to clearly indicate the chosen scale on the floor plan.
Manual Drawing: Creating the Outline
Using your chosen scale, convert the measurements from feet and inches to the corresponding dimensions on paper. For example, if you are using a scale of 1/4 inch = 1 foot, a wall that is 12 feet long would be represented by a line that is 3 inches long on the drawing (12 feet x 1/4 inch/foot = 3 inches).
Using a pencil and ruler, carefully draw the outline of the building’s exterior walls. Ensure that the lines are straight and accurate, and that the corners are square (unless the building has angled walls). Use light lines initially, as you may need to make adjustments as you add interior walls and features.
Next, draw the interior walls, using the measurements you collected earlier. Pay attention to the thickness of the walls, representing them accurately on the drawing. Ensure that the interior walls are properly aligned with the exterior walls and that the room dimensions are correct.
Digital Drawing: Creating the Outline
Many software options are available for creating floor plans digitally, ranging from simple online tools to professional CAD (Computer-Aided Design) programs. Some popular options include:
- SketchUp: A user-friendly 3D modeling program that can be used to create floor plans and visualize the space in three dimensions.
- AutoCAD: A professional CAD program widely used by architects and engineers for creating precise and detailed drawings.
- Revit: A BIM (Building Information Modeling) software that allows you to create intelligent 3D models of buildings, including floor plans, elevations, and sections.
- Floorplanner: An online floor plan tool that is easy to use and offers a range of features for creating and visualizing floor plans.
Regardless of the software you choose, the process of creating the outline is similar. Start by setting the appropriate scale for your drawing. Then, use the drawing tools to create the exterior walls, using the measurements you collected earlier. Most software programs allow you to enter the dimensions directly, ensuring accuracy.
Draw the interior walls, paying attention to their thickness and location. Use the software’s measurement tools to verify that the room dimensions are correct. Many CAD programs offer features like object snapping, which helps you align walls and features accurately.
3. Adding Details and Annotations
Once the basic outline of the floor plan is complete, the next step is to add details such as doors, windows, stairs, fixtures, and furniture. These details are essential for creating a functional and informative floor plan that accurately represents the space.
Adding Doors and Windows:
Doors are typically represented by an arc indicating the direction of the swing. The arc should extend from the hinge side of the door to the point where the door opens. Indicate whether the door is a right-hand or left-hand swing.
Windows are typically represented by two or three parallel lines indicating the panes of glass. The lines should be positioned within the wall to accurately represent the window’s location and size.
Adding Stairs:
Stairs are represented by a series of parallel lines indicating the steps. An arrow indicating the direction of ascent is normally also included. The number of steps should be indicated, along with the overall dimensions of the staircase.
Adding Fixtures and Appliances:
Plumbing fixtures such as toilets, sinks, and bathtubs should be represented using standard symbols. These symbols should accurately depict the shape and size of the fixtures.
Appliances such as refrigerators, stoves, and dishwashers should also be represented using standard symbols. Ensure that the dimensions of the appliances are accurate to avoid space planning errors.
Adding Furniture (Optional):
Adding furniture to the floor plan can help visualize the space and understand how it will be used. Use standard furniture symbols or create your own to represent common pieces of furniture such as beds, sofas, tables, and chairs.
Annotations and Labels:
Label each room clearly, indicating its intended use (e.g., "Living Room," "Bedroom," "Kitchen"). Include dimensions for each room, indicating the length and width. These dimensions should be clearly readable and accurately reflect the measurements you collected earlier.
Add notes to the floor plan to indicate specific features or details. For example, you might note the type of flooring, the height of the ceiling, or the location of electrical outlets.
Include a north arrow on the floor plan to indicate the orientation of the building. This is important for understanding the direction of sunlight and for planning landscaping.
Manual Drawing: Adding Details
Use a pencil, ruler, and compass to draw the details accurately. Refer to your measurements and sketches to ensure that the details are positioned correctly. Use different line weights to distinguish between walls, doors, windows, and other features.
Digital Drawing: Adding Details
Most CAD programs offer a library of symbols for doors, windows, fixtures, and furniture. Use these symbols to add details to your floor plan. Ensure that the symbols are scaled correctly and positioned accurately.
Use the software’s annotation tools to add labels, dimensions, and notes to the floor plan. Choose a font that is clear and easy to read. Adjust the size and position of the annotations to ensure that they do not clutter the drawing.
By following these steps, one can create accurate and informative floor plans, whether using manual drafting techniques or leveraging the capabilities of digital CAD software. These plans are valuable tools for visualizing space, planning renovations, and communicating design ideas effectively.

Floor Plan Creator And Designer Free Easy App

How To Draw A Floor Plan The Simple 7 Step Guide For 2024

How To Draw A Floor Plan The Simple 7 Step Guide For 2024

Draw Floor Plans In Half The Time Cedreo

How To Draw A Floor Plan By Hand Step Guide

Floor Plan Wikipedia

A Super Simple Method For How To Draw Floor Plan Hampton Redesign

Floor Plan Creator And Designer Free Easy App

How To Draw A Floor Plan The Simple 7 Step Guide For 2024

How To Draw A Floor Plan Dummies
Related Posts