Graph Paper for Floor Plans: A Detailed Guide
The creation of accurate and functional floor plans is crucial in architecture, interior design, and real estate. Whether planning a new build, renovating an existing space, or simply visualizing layout options, a well-defined floor plan serves as a foundational document. Among the tools available for this purpose, graph paper remains a highly accessible and effective method, particularly for initial design phases and conceptualization. This article examines the benefits, applications, and methodologies associated with using graph paper for creating floor plans.
Graph paper, also known as grid paper, is uniformly ruled paper with a network of horizontal and vertical lines that form a regularly spaced grid. The grid provides a visual aid for accurate measurements and proportional representation. In the context of floor plans, each square on the grid typically represents a real-world dimension, such as one foot or one meter. This allows designers and homeowners to translate their ideas into a scaled drawing that reflects the actual dimensions of the space.
Accessibility and Cost-Effectiveness
One of the primary advantages of graph paper for floor plans is its widespread availability and affordability. Unlike specialized software or drafting tools, graph paper can be readily purchased from most stationery stores, online retailers, and even downloaded and printed from the internet. This accessibility makes it a viable option for individuals with limited budgets or those who prefer a tactile, hands-on approach to design. The low cost also encourages experimentation and iteration, as mistakes are easily rectified without significant financial implications.
Furthermore, the simplicity of graph paper eliminates the learning curve associated with complex software programs. No prior training or technical expertise is required to begin sketching basic floor plans. This makes it an ideal tool for beginners, DIY enthusiasts, and educators seeking to introduce fundamental design concepts. The absence of digital distractions also allows for greater focus on the spatial relationships and functional aspects of the design.
While digital tools offer advanced features such as 3D rendering and automated calculations, the initial conceptualization phase often benefits from the freedom and flexibility of hand-drawn sketches. Graph paper allows for rapid prototyping and exploration of different layout options without the constraints of pre-defined templates or software limitations. This iterative process can lead to more creative and innovative design solutions.
The tactile nature of drawing on graph paper also engages different cognitive processes compared to working on a screen. The physical act of measuring, drawing, and erasing can enhance spatial reasoning and improve the understanding of scale and proportion. This hands-on experience can be particularly valuable for visual learners and those who prefer a kinesthetic approach to problem-solving.
For situations where portability is essential, graph paper offers a distinct advantage over digital alternatives. A sketchbook containing graph paper can be easily carried and used in various locations, such as on-site visits, client meetings, or even during moments of inspiration. This portability allows for spontaneous sketching and note-taking, ensuring that design ideas are captured and developed regardless of location or access to technology.
Step-by-Step Methodology for Creating Floor Plans with Graph Paper
To effectively utilize graph paper for floor plans, a systematic approach is recommended. This involves several key steps, starting with accurate measurements and precise scaling.
The first step is to thoroughly measure the existing space, including the length and width of each room, the height of the ceilings, and the dimensions of doors, windows, and other fixed elements. Accuracy is paramount, as any errors in measurement will be amplified when translated to the scaled floor plan. It is advisable to use a high-quality measuring tape or laser distance meter to ensure precise readings.
Once the measurements are obtained, a suitable scale must be chosen. The scale determines the relationship between the dimensions on the graph paper and the corresponding dimensions in the real world. Common scales for floor plans include 1/4 inch = 1 foot or 1 cm = 1 meter. The choice of scale depends on the size of the space and the desired level of detail. A smaller scale allows for a more comprehensive overview, while a larger scale provides greater precision for intricate details.
With the scale established, the outline of the rooms can be drawn on the graph paper, carefully adhering to the measurements and proportions. Start by drawing the outer walls of the building or the perimeter of the space being planned. Then, add the interior walls, ensuring that they are accurately positioned and aligned. Use a ruler or straight edge to create clean, precise lines.
Next, incorporate the locations of doors, windows, and other fixed elements such as fireplaces, plumbing fixtures, and electrical outlets and switches. These elements should be drawn to scale and accurately positioned on the floor plan. Consider the swing direction of doors and the impact on furniture placement. Pay attention to the placement of windows and their relationship to natural light and ventilation.
Once the basic structure of the floor plan is complete, furniture and appliances can be added. Use templates or stencils to represent common furniture items, such as sofas, beds, tables, and chairs. This helps to visualize the space and assess the feasibility of different layout options. Experiment with different arrangements to optimize flow, functionality, and aesthetics. It is possible to draw your own furniture based on the chosen scale. Consider standard furniture sizes to ensure accuracy of your drawing. It helps visualizing and planning for the right amount of space required in the floor plan.
During the design process, it is essential to consider factors such as traffic flow, accessibility, and storage. Ensure that there are clear pathways between rooms and that furniture is positioned to avoid obstructions. Consider the needs of occupants with disabilities and incorporate features that promote accessibility. Plan for adequate storage space to minimize clutter and maximize functionality. Also consider the furniture placement to ensure the furniture can be used comfortably.
The use of different colored pencils or markers can help to differentiate between various elements of the floor plan, such as walls, furniture, and fixtures. This can improve clarity and readability, particularly when presenting the plan to others. Shading and hatching can also be used to add depth and dimension to the drawing.
Throughout the design process, continuously review and revise the floor plan based on feedback, new ideas, and practical considerations. The ability to easily erase and redraw elements on graph paper makes it an ideal tool for iterative design. Keep a record of different versions of the plan to track progress and compare alternative solutions.
Limitations and Considerations
While graph paper offers numerous advantages for creating floor plans, it also has certain limitations that should be acknowledged. One of the primary limitations is the lack of precise measurements beyond the resolution of the grid. While the grid provides a visual aid for scaling, it is difficult to represent dimensions that fall between the grid lines with absolute accuracy. For projects requiring millimeter-level precision, digital tools may be more appropriate.
Another limitation is the lack of automated features such as area calculations and 3D modeling. These features, which are commonly found in CAD software, can significantly streamline the design process and provide a more comprehensive understanding of the space. However, these features can be emulated manually with graph paper, albeit with greater effort.
Furthermore, graph paper floor plans are inherently two-dimensional and do not readily convey information about vertical dimensions or spatial relationships. While it is possible to add notes and annotations to indicate ceiling heights and other vertical aspects, a 3D model provides a more intuitive and immersive representation of the space. However, different views can be added to the graph paper drawing, such as sections or elevations, to provide more information about the project. These view will help in visualizing the project better.
The scalability of graph paper floor plans is also limited. While it is possible to create large-format drawings by taping together multiple sheets of graph paper, this can become cumbersome to manage and transport. Digital floor plans can be easily scaled and printed at various sizes without loss of resolution. However, it is also possible to scan graph paper drawings to convert them to digital drawings.
Despite these limitations, graph paper remains a valuable tool for initial design phases, conceptualization, and situations where accessibility, cost-effectiveness, and portability are paramount. When combined with careful measurement, precise scaling, and a systematic approach, graph paper can be used to create accurate and functional floor plans that serve as a solid foundation for design projects.
It's important to note that the level of detail and accuracy achievable with graph paper is sufficient for many residential projects and preliminary design stages. For complex commercial projects or detailed construction documents, more advanced software solutions are generally recommended.

Free Graph Paper Template Printable And Grid

Printable Graph Paper Free

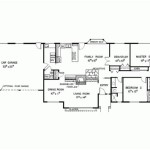
Ringel House Plan Graph Paper Second Floor Drawing Plans Layout Design

Printable Graph Paper Free

A Super Simple Method For How To Draw Floor Plan Hampton Redesign

Design Your Bathroom Layout

Printable Graph Paper Graphing

Create A To Scale Sketch With Graph Paper Make Space Planning Breeze

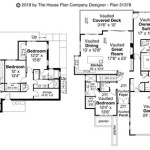
Graph Paper To Virtual The Heardmont Floor Plan Welcome

Printable Graph Paper Grid Free Printables
Related Posts